
Components
There are five main components in the wiring of the shore power hook up. If properly wired, these parts will allow power to be drawn from the power unit to power your appliances as well as charge your leisure batteries.
Hook Up Connector

The hook up connector is where the van will take in the shore power from the power unit at a campsite. For the most part, on factory made motorhomes there will be a small flip up casing on the side of the van which houses the hook up point. We opted for an underslung hook up to make the van extra stealthy. This connector is attached to the power unit using a standard extension lead.
Battery Charger
When hooked up to shore power, AC power directly from the hook up point will power AC appliances in the van (240V). All excess power will go through the battery charger. The battery charger converts the AC power to DC so it can safely charge your leisure batteries. We opted for the victron Battery charger – it’s great as the bluetooth capabilities allow you to monitor its progress on your phone.
Umschaltstation

The Umschaltstation acts as an automatic switching station for the 240V circuits. There are 2 inputs – master and slave. The master is wired up to shore power and the slave is wired up to the inverter. When the system is in operation off grid the slave (inverter) will be used to provide 240V outputs. As soon as we connect to a shore power hook up the master function will take over to provide power to the van from the power unit directly.
Consumer Unit
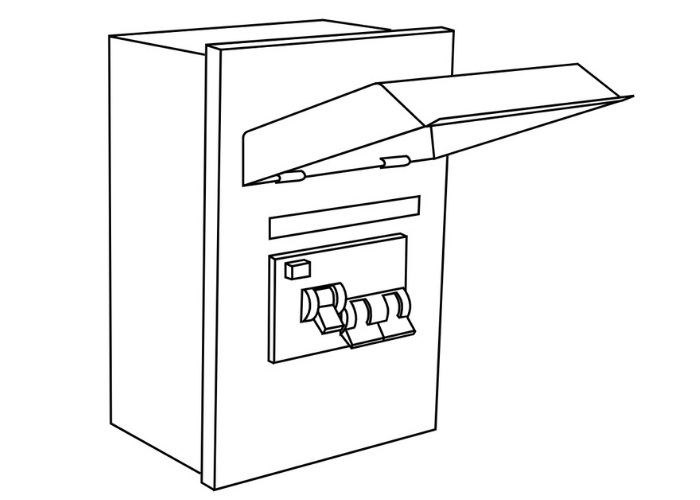
A consumer unit of this kind is usually used to extend the electrical supply from a home to a garage or shed. In our case, it manages and distributes the 240V outputs. In the future, if there is a problem, you can immediately shut off power to these loads by wiring them to a consumer unit. If a power surge is detected the circuit will trip in the same way as a circuit breaker.
Inverter
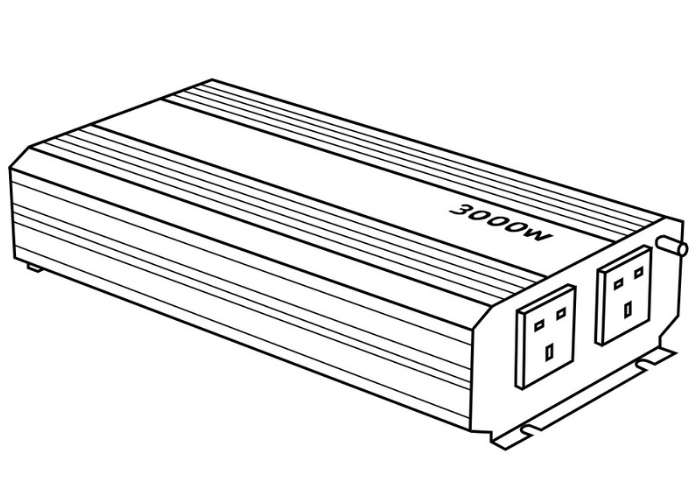
A ‘pure sine wave inverter’ is a device that converts power from your leisure batteries from DC to AC allowing you to use your standard 240V mains appliances. If the shore power is connected, we bypass this device using the Umschaltstation. As a result, the electricity supplied by the power unit will go directly to the sockets therefore using none of the leisure batteries’ power.
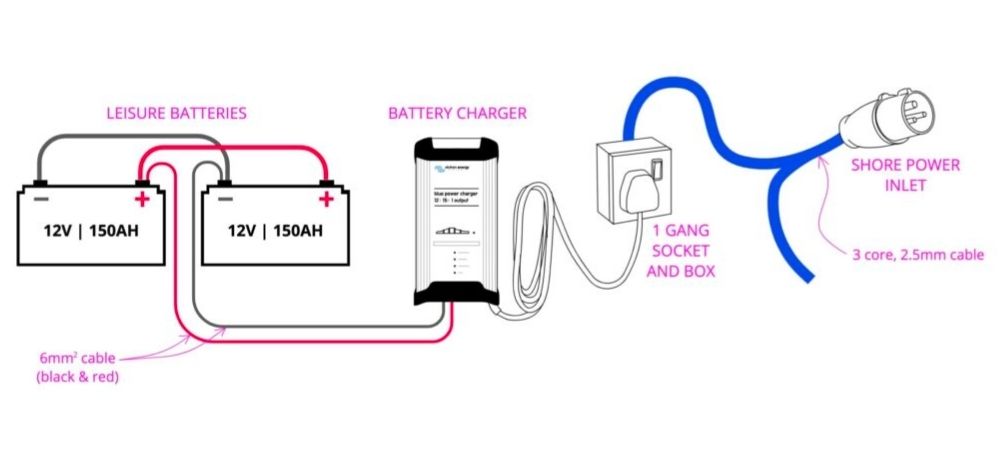
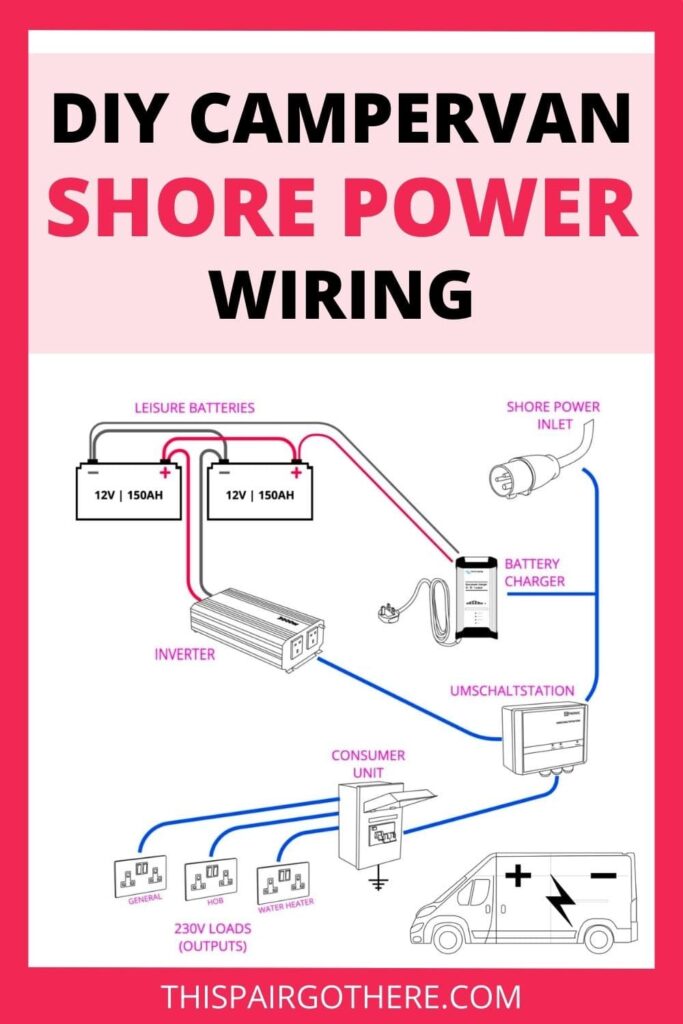
Overview of wiring

The diagram above shows a general overview of the wiring of the shore power hook up. All of the blue coloured wires are3 core, 2.5mm, ‘Arctic Blue’ cable. It is designed so that the shore power will automatically switch to be the main source of power when plugged into a power unit. All 240V loads will be available for use and in addition all excess power supplied will go into charging the leisure batteries.
Step 1 – Create A 3 Way Wire Joint
To begin the wiring process, ensure the hook up connector is fitted to the van correctly first. Learn how to fit the hook up connector in the post below
Once the 3 core 2.5mm cable is secured in position inside the van there should be a free end with nothing attached. This is where the wiring process begins. As you can see from the wiring diagram above the blue cable from the shore power inlet has 2 different components it needs to be wired to – the battery charger as well as the Umschaltstation. Create a 3 way joint in the shore power cable so that there are now 2 wires coming off of the original cable.
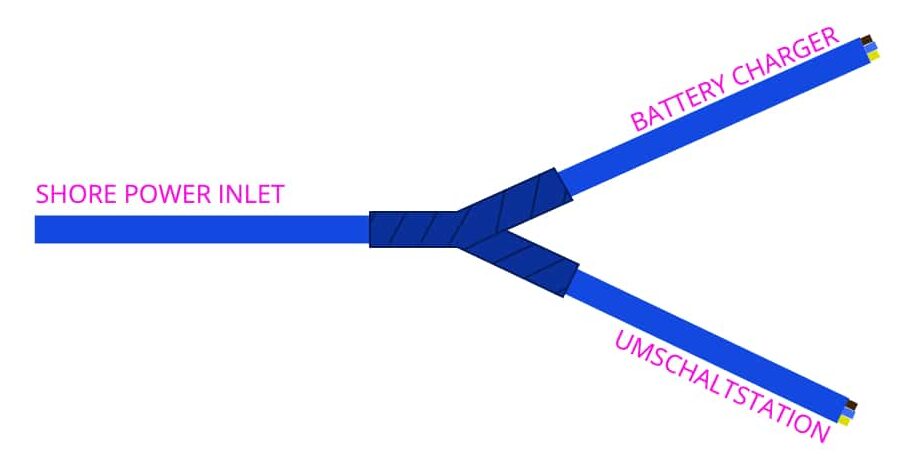
There are many simple ways of creating a joint with tutorials on youtube. Make sure the connection between the cables is strong and in addition will not break or weaken over time.
Step 2 – Battery Charger Wiring
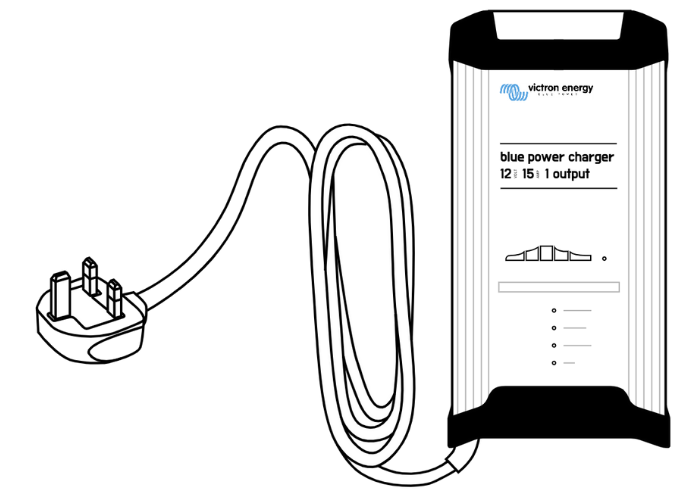
There are many different battery chargers on the market.We opted for the Victron Blue Smart IP22 Battery Charger. We love this one as it is bluetooth compatible, like our other Victron components. This means we can keep an eye on the status of charging from the Victon app on our phone.
The charger is connected to the shore power source via a plug socket. This makes the wiring process simple. Wire one end of the3 core 2.5mm cable to a 1 gang socket box. Fix the socket box in position with a couple of screws in order to keep your electrical set-up neat and organised.
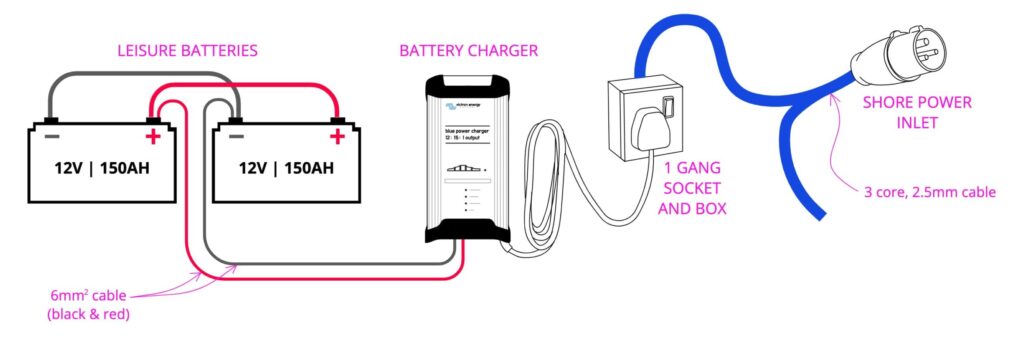
The battery charger is connected the leisure batteries with black and red 6mm cable. It can be connected directly to the batteries alternatively you can use busbars to keep your set-up organised.
How to calculate size of battery charger
To determine the size of battery charger you need you need to first know the size of your batteries. We have 2 12V, 150Ah batteries wired in parallel. This gives us a capacity of 300Ah. From this you need to determine how long you wish the charging process to take. In our case we wanted the van to be able to be fully charged from 1 day at a campsite hook up.
Divide the capacity of your batteries by the amps of your charger to calculate the number of hours it would take to charge them from flat to fully charged. Below is the charger we use and our calculation of its capacity.
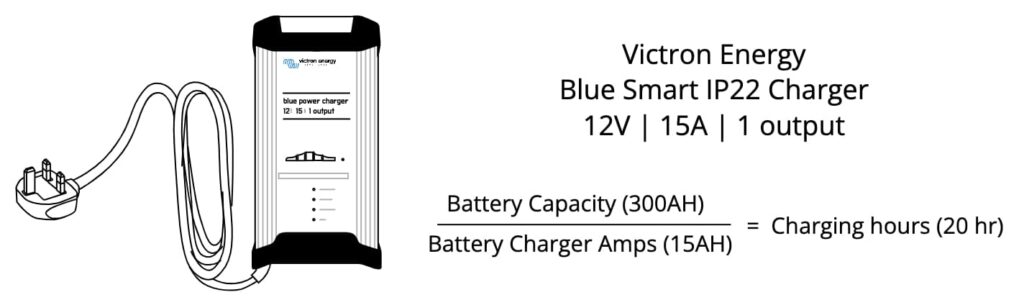
A larger charger size will charge your batteries quicker, they are however a bit more expensive. It is also important to note that most campsite hook ups are either 10A or 16A. Therefore a charger rated higher that 16 Amps will not make the charging any quicker at campsites. Another factor to consider is using your 240V appliances whilst charging. This will also slow down the charging process.
240V circuit
The rest of the shore power hook up wiring is a process of connecting up your 240V system to the shore power electrical supply. This is done in the next step with the Umschaltstation. In order to move onto step 3 you need to have wired up your 240V circuit. We cover exactly how we wired our 240V appliances and sockets in the post below
240V Wiring
Step 3 – Umschaltstation Wiring
The Umschaltstation is an important component in the shore power wiring, together with the correct wiring it acts as an automatic switching station for the 240V circuits. The wiring for it is quite simple.There are two inputs, master and slave, which supply electricity to the 240V outputs in your van.
The master is wired up to shore power inlet and the slave is wired up to the inverter.When the system is in operation off grid, the slave (inverter) will provide the power from the leisure batteries to the 240V outputs. As soon as we connect to a shore power hook up the master (shore power) function will take over so that the power is provided to the van from the power unit directly.
Connect the free end of the shore power cable to the ‘master’ input. Likewise, use a second 3 core 2.5mm cable to connect the inverter to the ‘slave’ input of the Umschaltstation. Once again, use 3 core 2.5mm cable to wire the ‘load’ output of the Umshaltstation to the consumer unit. Your consumer unit is a safety precautionwhich will manage and distribute the 240V outputs.
Conclusion
When building a van, understanding the electrics is no easy task. We found that working through the electrics in manageable pieces kept us from feeling overwhelmed.
Breaking down the shore power wiring circuit makes it a lot easier to understand. It’s honesty not too tricky to wire it up once you’ve figured it out in your head!
If you have any questions on the shore power wiring please don’t hesitate to ask. We will of course try to give you the best possible advice we can.
6 Responses
I’m profoundly Deaf man!
I have own my Campvan!
I have need Learning for my Campvan wire with fuses boxes upgraded!
Thank you
Phillip McCoy
Hi Guys
Sorry if this sounds stupid but the first diagram(wiring the battery charger) shows one ‘arm’ of the shore supply going straight to single socket. Is this socket one of the sockets wired into the consumer unit or is it simply wired direct to the shore supply and as such not protected by the RCD within the consumer unit. I understand it says in the description ‘wire one arm to a socket’ and the other to the umschalstation master but I’m struggling to get my head round this lonely old socket that’s not part of the consumer unit circuit.
When I saw the first diagram I thought fantastic, that looks easy peasy, then I saw the overall wiring diagram and brain fog kicked in (probably because it shows no socket between the charger and the end of the ‘arm’)
Regards
Lee
The single socket we use for the battery charger is simply wired directly to the shore supply, it is not connected to the consumer unit. This socket is only in use when we are hooked up to shore power. The other 240V components are connected to the consumer unit – these are powered by the shore supply when it is connected or alternatively by the inverter when off-grid.
Hope this helps 🙂
Great stuff thanks for the reply. . . . the fog is lifting.
Regards
Lee
Hello
Whereabouts do they sell the Umschaltstation please?
Thank you for all your amazing information.
Hi Dianne,
I’ve just checked the h-tronic website – the company that supplies the umschaltstation (https://www.h-tronic.de/shop/mpc1000-umschaltstation/) and unfortunately, it seems this product is out of stock for an indefinite period of time due to there being a lack of chips which make up the product. It is still possible to wire the 230V electrical system without it though. In the place of the umchaltstation, you can wire a 3-way switch which you would have to manually switch from battery supply to shore supply.
I’ve had a look online and found an alternative umschaltstation here – http://www.amazon.co.uk/dp/B07FLN7P9M/ref=nosim?tag=thispairgot0a-21
It looks to do everything the same as the one we used and works as a ‘priority switch control’ like our one. We just don’t have first-hand experience with this model to fully know how good it is.
Hope this is helpful
Christie & Emily