
Step 1 – Decide the layout
Prior to building any custom furniture, it is important to be completely satisfied with the layout of not only your van but also, the storage unit you plan of constructing.
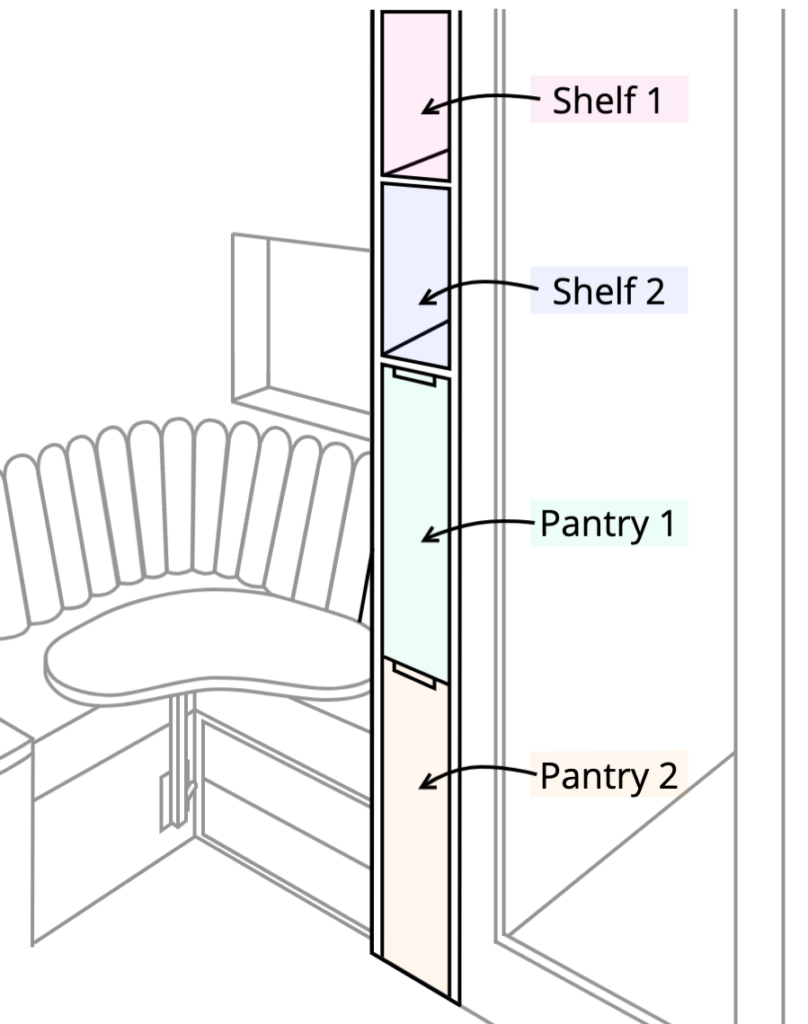
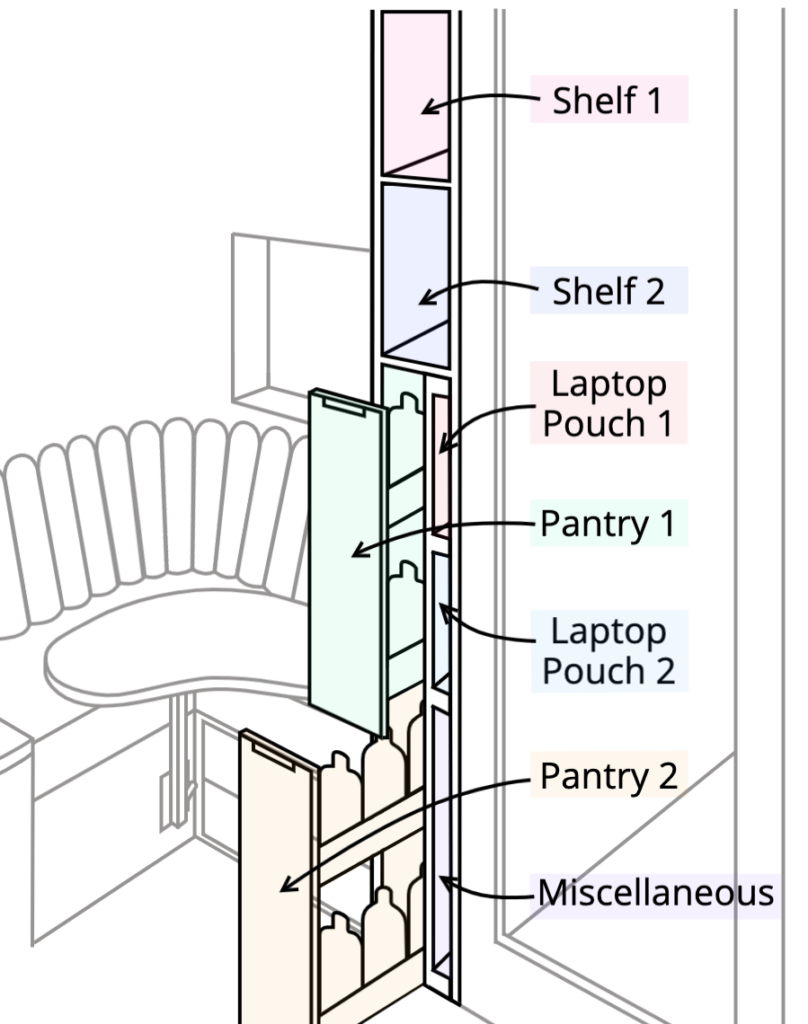
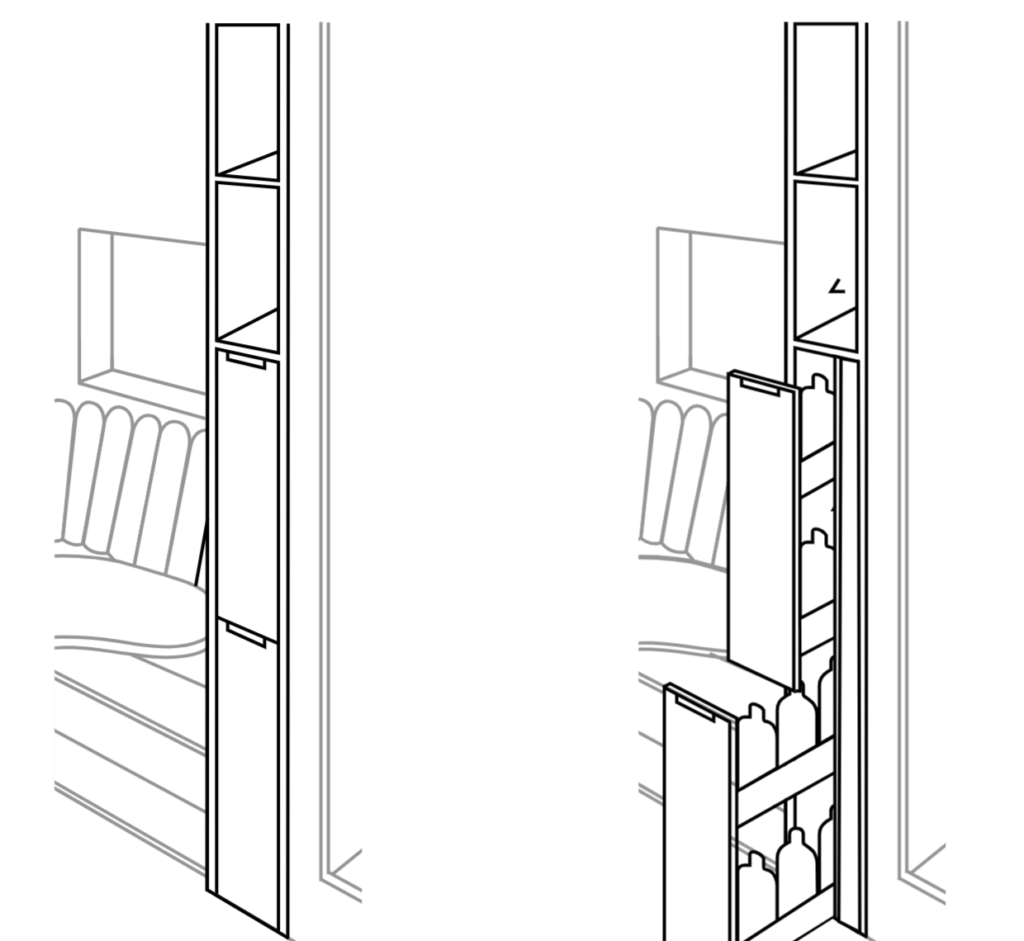
This campervan vertical storage solution consists of:
- 2 shelves
- 2 pull out pantry units
- 2 laptop storage pouches
- 1 miscellaneous pouch
Things to consider prior to finalising the dimensions of your storage unit in your campervan.
Location Of Storage Unit
Due to the unit being full height it can be used to divide your van up into “rooms”. We opted to install ours next to our shower because
( 1 ) there was already a dividing wall that could be used
( 2 ) it divided our “bathroom” from our “living room”
( 3 ) it would hide our shower plumbing and some electrics (which run behind the pull out pantry drawers.
Width Of Storage Unit
It is important that you use your available space as wisely as possible. For reference, we had 165mm of available space in our campervan for the storage unit. The bottom section is split up into the pantry slides and storage pouches. This makes better use of the space as the slide-out pantries are a standard size, so the pouches fill in the remaining available space.
Height Of Pantry Cabinets
We bought premade pantry slide out cabinets and therefore used those dimensions to influence our design. You also need to consider the amount of space you want above each pantry cabinet. You can choose to have a lot of space above so you can store tall items in the top shelf of the pantry or keep it small for shorter items. Remember, if you have 2 pantry cabinets like us they do not need to be the same height. For reference: as a minimum we wanted a can of coke to fit in the top shelve of our bottom (smaller) cabinet.
Dimensions Of Laptops
As this is a custom unit, make sure it fits your belongings perfectly. The height of our laptop pouches were designed to fit the dimensions of our laptops relatively snuggly so they don’t rattle around and get damaged during transit. As our laptops are not very wide we used foam down the back of our laptop pouches to fill in the remaining space and protect the laptops.
Access To Laptop Storage Pouches
This point is only relevant if you opt for 2 slide-out pantry drawers. We recommend aligning the pouches with the drawer fronts so you only have to open one pantry to get access to your laptops. As you can see in the diagram above, when the top pantry is open, we have access to both laptop pouches. Similarly, when the bottom pantry is open we have access to the miscellaneous pouch
Step 2: Create The Laptop Storage Pouches
The laptop storage pouches are actually dual purpose. Not only do they provide a secure and safe place to store your laptop when in transit, but it also acts as a support for the shelving above.
In order to build this you will need:
- approx 34mm x 34mm battens (x4)
- 12mm plywood
The laptop storage pouches are very simple to construct. To determine the size of the pouches you need to first know the height you want your pantry area to be. This is because the shelving will sit directly on top of the laptop pouches. Then choose how deep you want the pouches to be – it does not need to be the full depth of your unit. This will give you the rectangular size of your 12mm thick plywood piece.
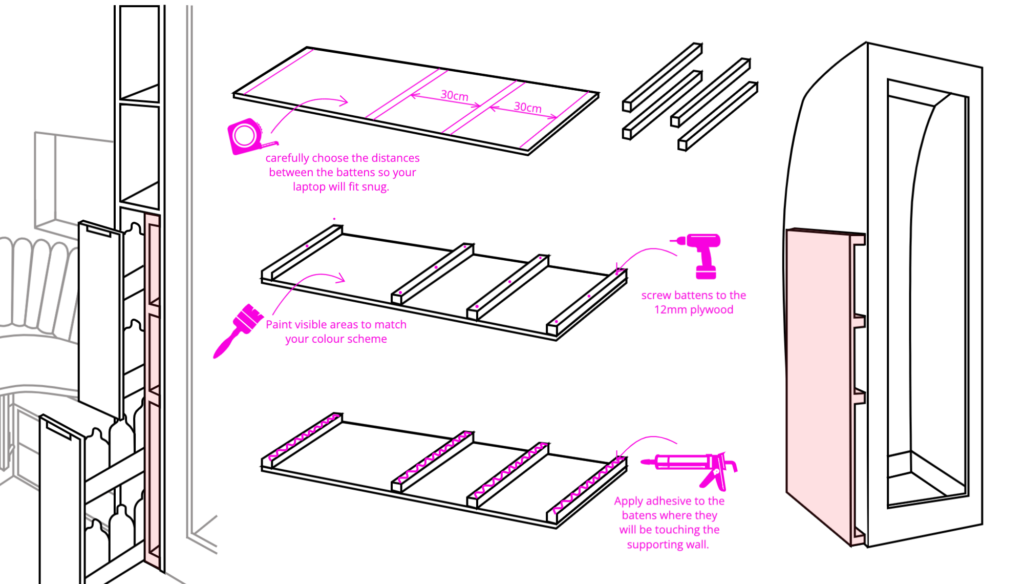
Cut the 34mm x 32mm battens to the width of the plywood piece. The batten placement determines the position/size of the laptop pouches. We opted to have 2 laptop pouches 30mm tall each and 1 miscellaneous pouch 50mm tall. Screw the battens to the 12mm plywood in the desired positions using self tapping screws.
Before the laptop pouches can be fully installed, paint them or at least the front (visible) part of them to match your vans colour scheme. Once dried the pouches can be mounted in position. Simply apply an adhesive, such as ‘no more nails’ onto the battens and firmly press the pouches up against the supporting wall. Make sure to set the pouches back away from the front approx 12mm to account for the drawer front which will be mounted later.
Step 2: Create a full-height dividing wall
The full height dividing wall is made out of 12mm plywood. This width provides the perfect amount of rigidity and strength without adding too much weight to the van.
Depending on if this storage unit is a stand-alone unit or next to another dividing wall (e.g. a shower wall) will dictate if you need to cut 1 or 2 full-height walls.
In our case, the full-height dividing wall was an exact replica of our shower wall. For reference, our wall was 600mm at its widest depth and tapers off as the wall gets taller. This wall was created the exact same way as our shower ‘supporting’ wall.
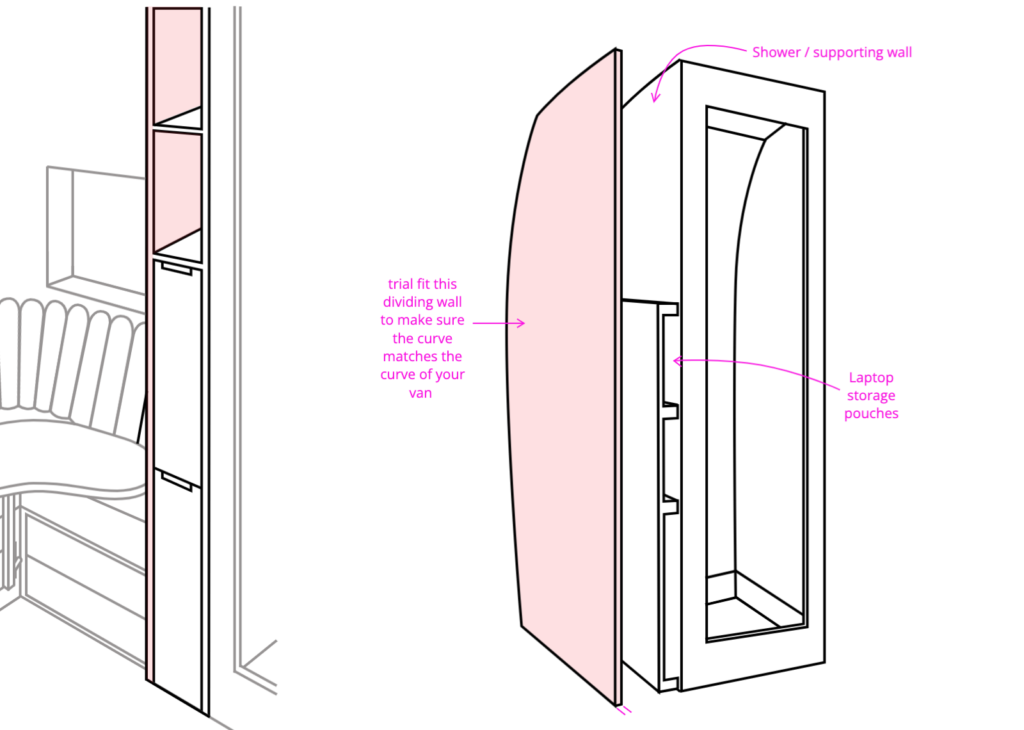
Cut these walls to match the curvature of the van using the method we have described in the post below.
Once satisfied with the wall you have created make sure you trial fit it, as this piece of wood is the most fundamental part of your custom vertical storage unit.
Step 3: Attach the slides
Before the wall is permanently fitted, install the drawer slides for the slide-out pantries. Measure the wall and where you want the pantries to sit. Remember, they do not need to be the same height. Adding extra space above the pull-out pantry means you can store taller items in the top compartment.
To keep everything as neat and simple as possible we chose to position our pantries so that they meet in the middle over one of the wooden battens of the laptop pouch. This means if we open the top pantry we can access both laptop pouches and if we open the bottom pantry we can access the miscellaneous pouch.
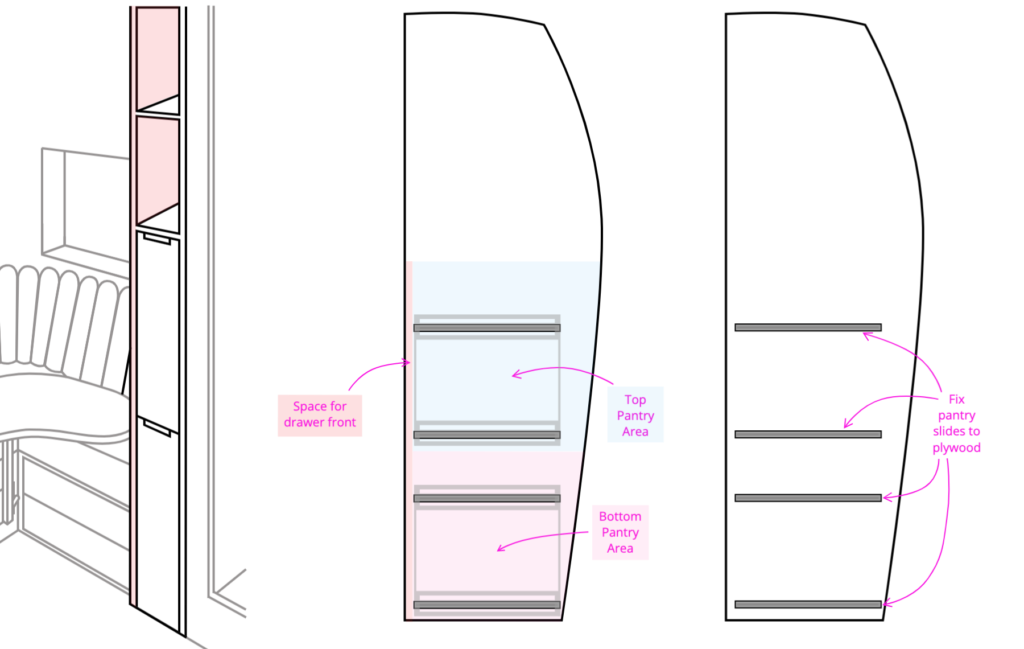
With this in mind, we measured and marked where the slides should be positioned on the wall to have our slide-out pantries fitting correctly. The slide-out pantries we used are from Screwfix and have two slide runners positioned on one side. Be sure to set the drawer slides back from the front of the unit around 12mm. This is to leave space for the drawer fronts which will be installed later.
Now remove the wall and lay it flat to install the slides. Securely screw the slides into position. You do not need to mount the pantry baskets at this stage.
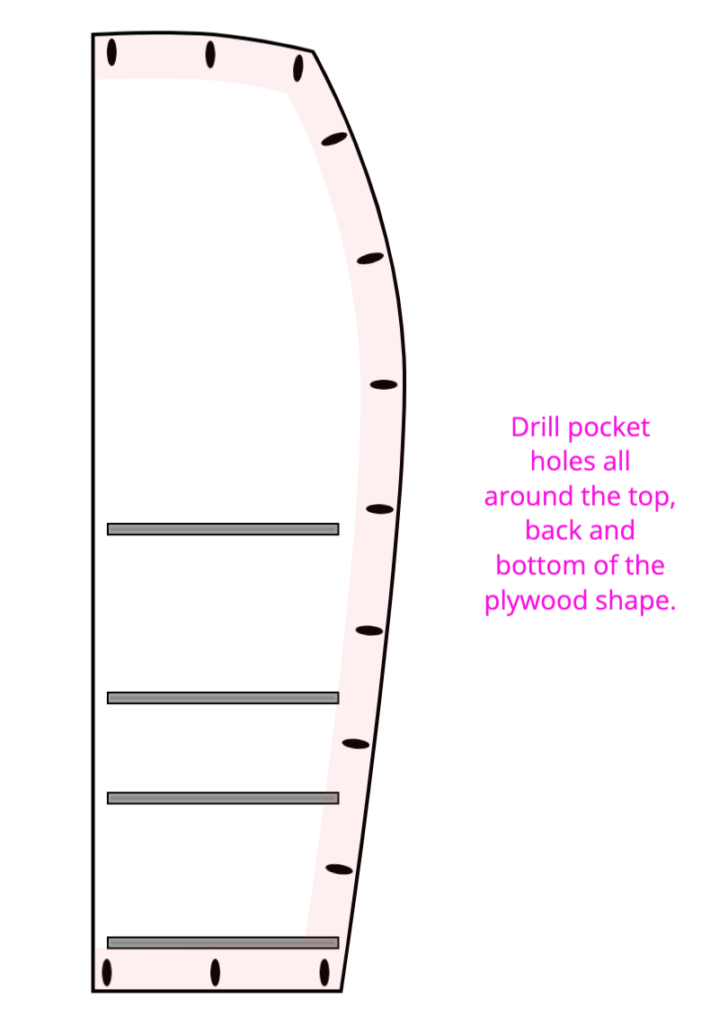
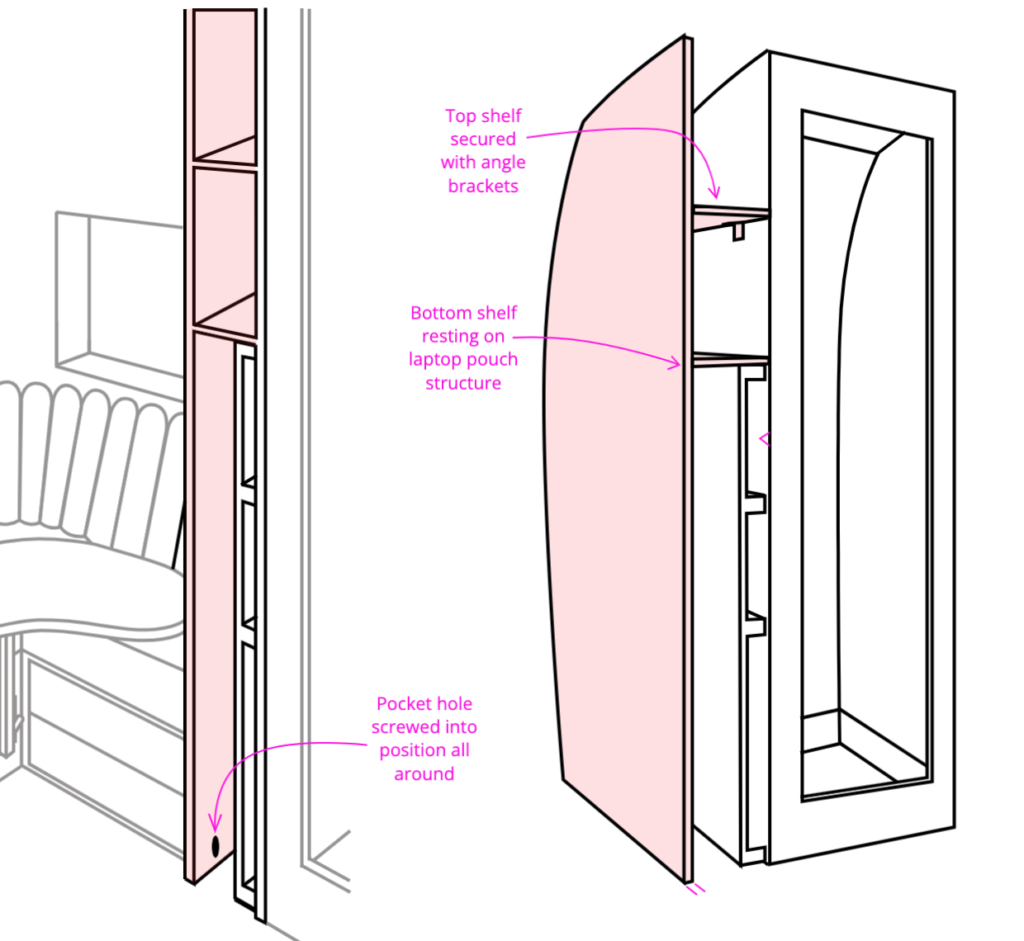
Step 4: Pocket hole the full height wall
Using a pocket hole jig, drill pocket holes at regular intervals (approximately 200mm apart) along the top, back and bottom of the wall on the inside as seen in the diagram below.
Step 5: Cut the Shelves
The width of your vertical storage unit will depend on your layout and how much space you have in your campervan for it. For reference, our unit is 165mm wide internally.
Cut shelves to the exact length and width to suit the custom layout that you designed in step 1. The shelves are simple rectangles cut at the width you wish your unit to be internally. The lengths of the shelves may differ as the curvature of the walls will affect the depth of the shelf. It is not too important that the shelves are the prefect depth. They are long and narrow and pretty hard to see at the back.
We did not extend the length of our shelves to the back of the unit as we utilised this space to hide our electrics are plumbing. If you intend on doing that too, we recommend leaving a 20mm gap from the back of your shelves. This means electrical cable and 12mm push-fit plumbing can pass behind the shelves with ease.
Step 6: Attach the shelves
Attach the shelves created in the previous step to the full height dividing wall. The wall is not in position, and therefore is much easier to work with.
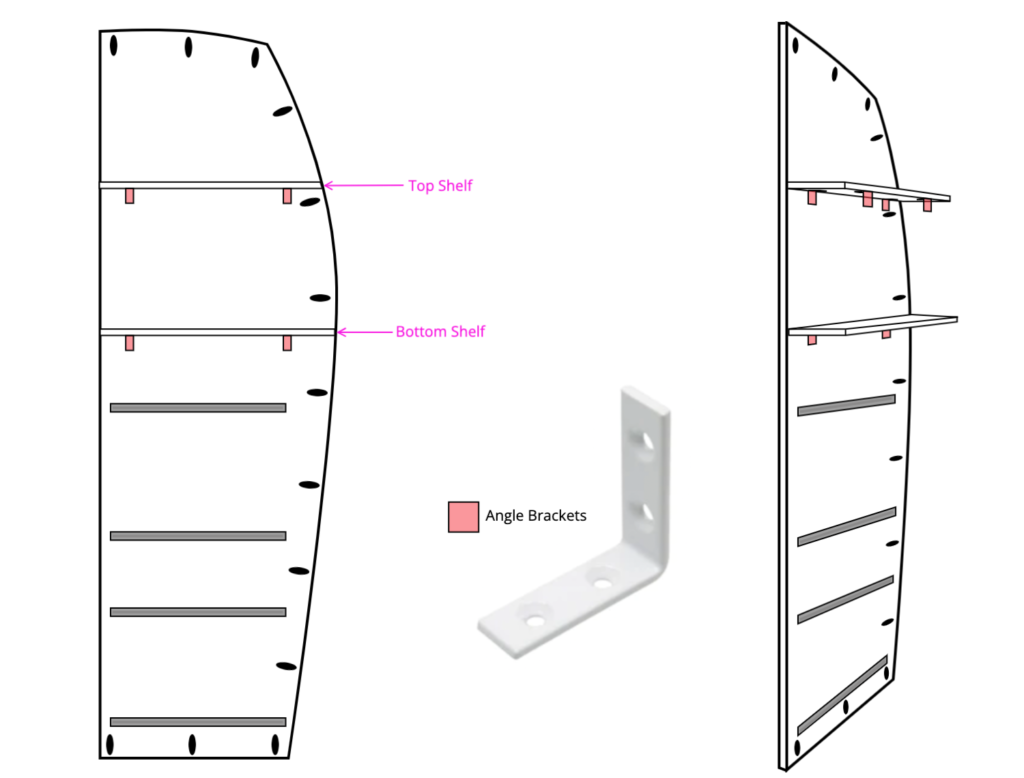
The Bottom Shelf
This shelf will rest on the laptop storage pouches created earlier and therefore doesn’t require much reinforcing. Simply attach this shelf to the plywood wall at the correct height using a combination of ‘no more nails’ and 2 angle brackets, as seen in the diagram above. Make sure to trial fit it as you go along to avoid making mistakes.
The Top Shelf
similarly, attach the top shelf to the plywood in its desired position using a combination of ‘no more nails’ and 2 angle brackets. The difference between the top and bottom shelf is that the top one does not have the laptop pouches to rest on when its in position. For this reason, attach another 2 angle brackets to the other side of the top shelf so it can be fixed (using short screws) to the the supporting shower wall when it is installed.
Step 7: Install The Unit
At this point, your ‘dividing wall’ should look like the diagram above. Transport the dividing wall structure with the shelves and pull out pantry attachments into the van. Place the wall into position resting the bottom shelf on top of the laptop pouch unit which has already been installed.
Make sure that the wall is aligned correctly with the shelves resting against the supporting wall the whole way back. Also, make sure the back of the dividing wall is also pressed firmly against the back wall of your van. You may wish to use a spirit level to make sure the wall is completely vertical. Markings on the ground with tape will make the alignment easier.
Allow the wall to tilt back and apply a generous amount of wood glue to the top of the laptop storage unit as this is where the bottom shelf will be resting. Then tilt the wall back into its final position.
Use a drill to insert screws into the pocket holes created in step 4. This will provide a strong connection between the back wall, roof and the floor of your van. This will keep the wall extremely rigid and structurally sound.
Finally, screw the angle bracket for the top shelf into the shower supporting wall making sure it lies perfectly flat.
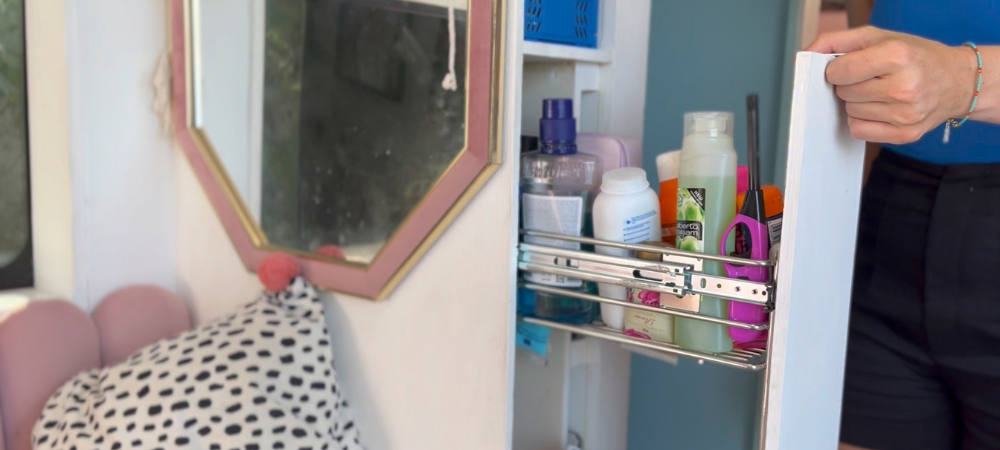
Step 8: Finish Installing The Pull Out Pantries
As stated above, we used prefabricated pull-out pantries which you can find here.
To finish off the installation the pantry baskets are attached to the slides with a couple of screws. A drawer front is attached to the front of each pantry by simply following the instructional manual provided with the kit.
To create the drawer fronts measure the size you wish them to be. For reference, our drawer fronts are approximately 160mm wide. This width fits snugly into our 165mm wide unit. The drawer fronts are completely customisable.
Note: when attaching the door fronts, make sure they not only cover the pull-out pantry, but also the laptop storage for a seamless sleek look.
Step 9: Finishing touches
This final step is what will add a little bit of personality to your custom storage unit so it suits your campervan perfectly. Firstly, start by painting your drawer fronts whichever colour you fancy. Next, add door handles to the pull-out pantry drawers. We opted for some small sleek handles that look extremely minimal.
To make sure your laptops are perfectly protected squeeze some foam into the back of the pouches. This means that the laptops can’t sink too deep into the pouch and be difficult to reach.
You may wish to add a lip on the shelves above in order for things not to fall out when in transit. We have not added a lip as we use the shelves to store large items such as towels which don’t tend to move around during transit.
Conclusion
Storage is absolutely essential when living in such a small space. Do not overlook how much storage you will need in the design phase of your van build journey. This custom vertical storage unit is one of our favourite storage areas in our campervan.
We hope this post helped give you inspiration about how to design and build a storage unit which will suit your campervan perfectly. If you have any questions don’t hesitate to ask