
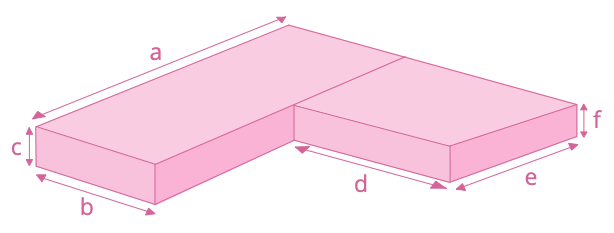
We created an ‘L’ shaped sofa in the corner of our van which was made up of two rectangular pieces. We chose to separate it into two for a couple of reasons. Firstly, it makes it an easier and more manageable size/shape to upholster. Secondly, it provides easier access to our storage/electrical setup underneath the benches.
We are absolutely thrilled with how our sofa turned out. Follow the steps below to achieve the same professional results.
The diagram below shows the shape of our sofa with labeled dimensions. These annotations will relate to other diagrams showing you how to calculate your fabric size.
Instructions
Step 1 – Order Foam for the Seat Cushion
When choosing the foam for your seat there are a few things to consider.
- thickness – how high will the added foam make your seat
- softness – how spongey do you want your seat to be
When using a softer foam you will need a good amount of depth to the foam so you don’t feel your hard bench below when you sit on it.
When purchasing foam, strongly consider adding a dacron wrap. This is basically a layer of wadding/batting which bulks out your cushion giving it a more rounded, comfy look. It makes the cushion look more full and prevents the cushion cover from wrinkling or sagging. Perhaps the best reason to get a dacron wrap is that it hides imperfections in your sewing!

Step 2 – Order Fabric
When choosing the fabric for your seat there are a few things to consider:
- Price
- Durability
- Comfort
- Ease of Cleaning
- And most importantly… will it match your colour scheme and aesthetic!
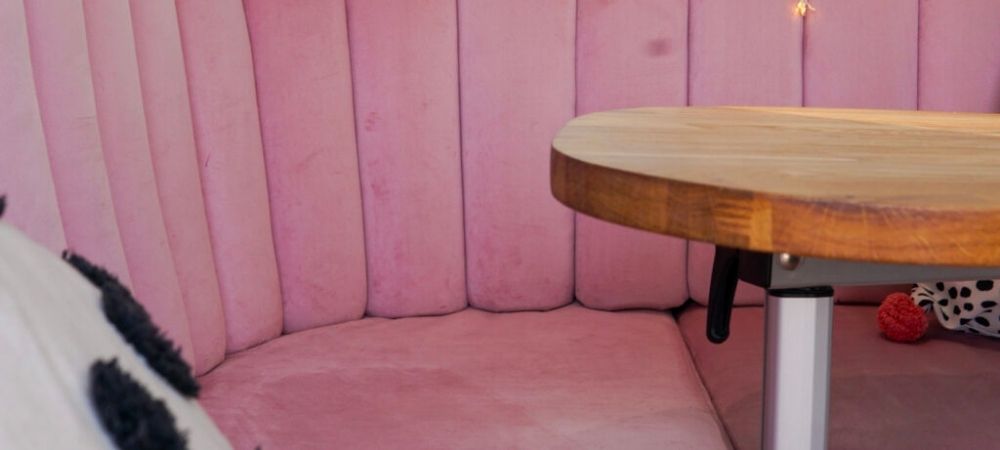
We opted for a pink velvet upholstery fabric, it’s definitely not the most practical fabric in the world, but we LOVE it!
Price
Different fabrics vary greatly in price. This can be due to what it is made of and how it is produced. We got our fabric from eBay for a very fair price. We specifically searched for upholstery fabric as we knew this would be better quality than a simple, cheap polycotton fabric. Embellishments and fancy prints can also increase the price of a fabric. Although it may add to the cost, make sure to order more than you will need for your sewing project – accidents happen – especially if you are new to sewing!
Durability
In a van, you really need to make the most of every area. This means that your sofa will certainly not just be decorative – it will be almost certainly double as a storage unit… maybe even a bed! As you will be using it frequently you’ll want a very durable fabric.
Fabrics with a high thread count / close weave will make your seat cushion as durable as possible. When looking for fabric online be sure to add ‘heavy duty’ or ‘HD’ to your search/description.
Style
The style of fabric you choose is a very personal choice. You want the fabric to suit your personality as well as fit with the general theme of your van. If you want a patterned fabric make sure to check the scale of the print i.e. you don’t want a massive print on a tiny cushion. If you are looking for a specific colour to match your van ask for small sample pieces of fabric before ordering all of it to make sure it’s exactly what you want.
Easy Clean
When living in a van it’s pretty important the your cushions are easy to clean. It’s a small space and accidents happen! The easiest Sofa fabric to clean is leather but obviously this is not to everyone’s taste… and is also expensive. Other good options are microfibre, velvet or wool.
Step 3 – Choose a Zipper for your Seat Cushion
Begin by purchasing a length of continuous zipper tape. This comes in all sorts of widths and strengths. We would recommend a No.5 zipper as this is good and strong for a seat cushion. You should buy the length of the back panels. From the diagram above, we purchased a length of a+d. Along with zipper tape, you will also need some zipper heads – 2 per cushion.
The most tricky thing about using continuous zipper tape is that you have to thread the zipper heads on yourself. This is not the easiest thing to do – it requires a fair amount of trial and error. This video is extremely helpful for attaching the zipper heads.
Make sure to attach the zipper pulls head to head like a backpack. This makes the seat cushion easy to zip on and off.
We opted for a pink zipper to match our fabric.
Step 4 – Measure and Cut Fabric
Each cushion will be made up of 6 pieces of fabric. Each of these will need to have a seam allowance on them. Below is a diagram showing all of the pieces which make up one cushion.
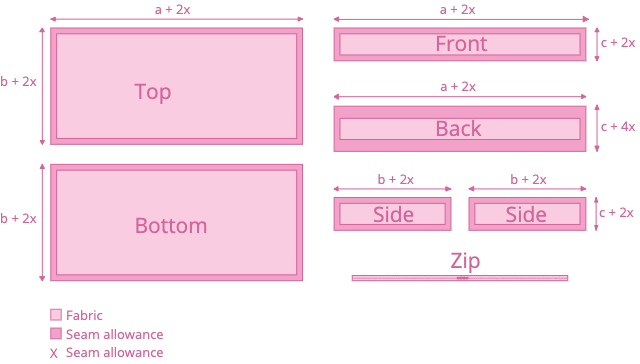
The diagram above shows the dimensions of each piece where the a/b/c sizes are the sizes of your foam without the dacron wrap. ‘X’ marks the seam allowance – we used a seam allowance of 2cm which was more than enough! It’s always better to have too much seam allowance than not enough.
When laying out your fabric to cut, you should try and keep the grain/pattern of the fabric all going in one direction. Our fabric was velvet so was smoother in one direction. This keeps the cushion looking professional. Draw the panels onto the fabric in pencil. Make sure to also mark the seam allowance – this makes it easier to match up these pieces later on.
As with all van projects, make sure to measure twice before cutting. Also, try to make sure that your fabric is not distorted or stretched when measuring. If you have a pair of pinking shears, use these to cut the fabric. They are not essential but will help stop the material from fraying.
Step 5 – Insert Zip Into Back Panel
Installing a zipper can feel like a pretty daunting task but it’s actually not too hard! Begin by folding your back panel in half and pressing it flat. Sew along the folded side of your fabric whatever your seam allowance is from the edge with a long straight stitch (it doesn’t have to be perfect as we will remove this stitch later). Next cut along the folded edge and open it so it looks like the diagram below.
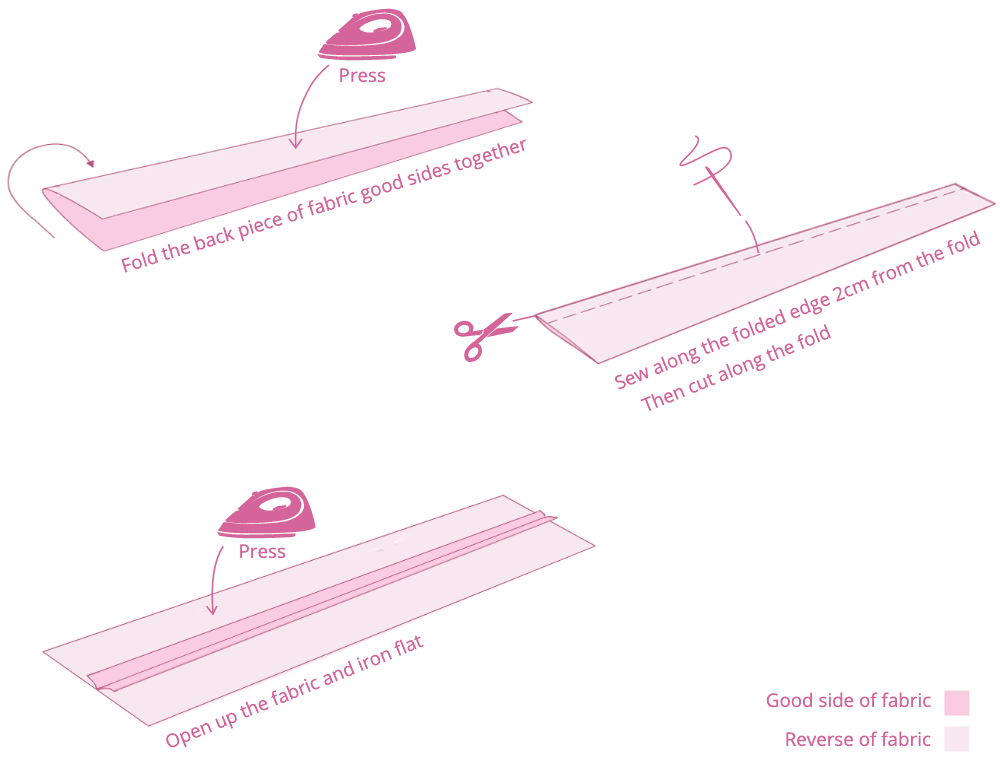
Place the zipper on top of the small folded seam in the centre with the zipper facing down. Position your zipper centrally and pin it in place. Make sure to try and get the centre of the zip in line with the stitch/fold down the centre of the fabric. This can be a little tricky as the top of the zipper is facing down so it’s a little difficult to see. Take your time to get it as neat as possible.
Once you are happy with the position of the zip it’s time to sew it into place. If you’re using a sewing machine use a zipper foot – if you don’t have one just try to sew as close to the zipper teeth as possible without touching them. A simple straight stitch will work well here. You may need to stop sewing halfway down the side to reposition the zipper pull out of the way. Sew over the ends of the zipper going right through the teeth so the zip will never be able to go past this point.
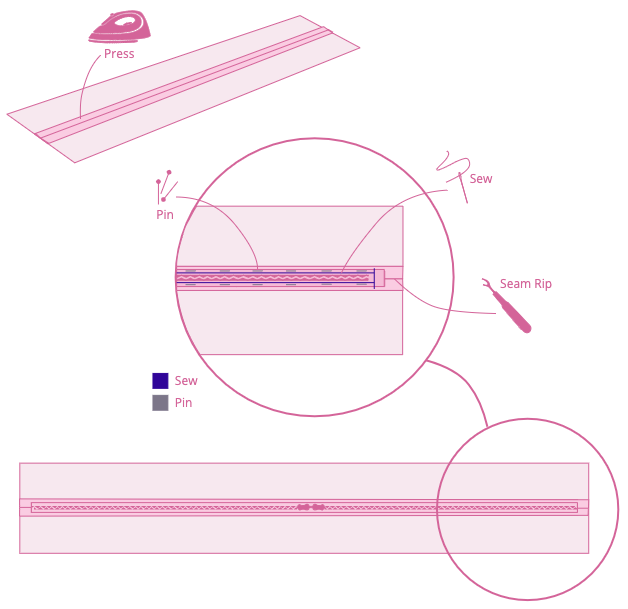
With both sides of the zipper sewed into place, you can unpick the centre seam of the fabric to reveal the zipper behind it. It should look neat with two small folds of fabric hiding the zipper.
Step 6 – Sew Seat Cushion Panels Together
The construction of the seat cushion is really straight forward. Pin the panels right sides together and sew along the fabric on your marked line (seam allowance). Pin and sew the panels one at a time and make sure to check as you go along that all of your lines are matching up. Again, use a straight stitch to connect the panels.
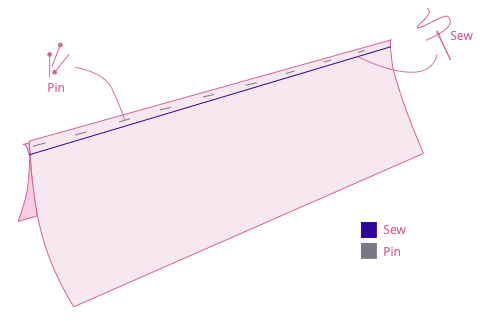
There is no right order to sew the panels. However, we recommend sewing the least visible panel last. This just means that if your seat cushions cover is slightly askew it will be as hidden as possible. In our case, the small ends are the least visible so we sewed them last.
When sewing your final panel into position make sure that you leave the zipper slightly open so you will be able to flip your fabric back to the good side is on the outside.
Step 7 – Try On Seat Cushion Cover
If all of your measurements have been correct the seat cushion cover should fit like a glove. Don’t be afraid to bend and contort your foam to get it into the cushion cover. Once the foam is in position it should zip up easily.
If your cover does not fit snugly you can assess your seat cushion cover to see where the seams need to be taken in/out. Once the final amendments are made you can trim the seams on the inside of the cushion cover so they are less bulky.
Conclusion
Sewing the soft furnishings for your van can be a daunting task for a sewing newbie. But it really isn’t too difficult to sew yourself a professional-looking seat cushion cover (if you have the patience of a saint and a steady hand)! Choosing good materials and measuring everything EXTREMELY carefully is the key to a neat seat!
Feel free to ask us questions regarding our cushions, whether it is about materials, price, time, or whatever else. You can always find us in the comments.