
Step 1 – Clean Van Door and Apply Stickers
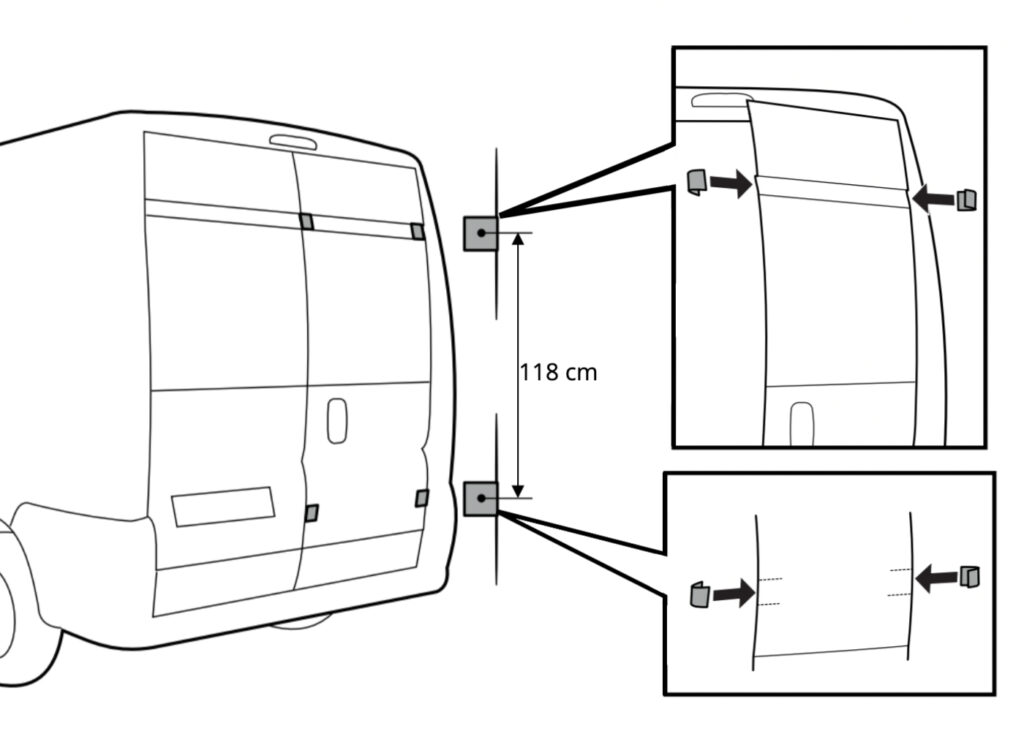
Clean the door on which the rack will be mounted thoroughly. Use car shampoo to make sure it is spotless; this will help with the adhesion of the rack to the van. This is essential as the rack is not screwed to the door in any way – it is secured with adhesion and clamps.
Once the door is clean and dry it is time to apply the clear stickers to the edges of the door. These stickers should be positioned where the top/bottom bars of the bike rack make contact with the door. The diagram below shows exactly where the stickers should be applied. As you can see, these should be folded around the edges of the door. This is to protect the paintwork of your van.
Step 2 – Mount Top Bar
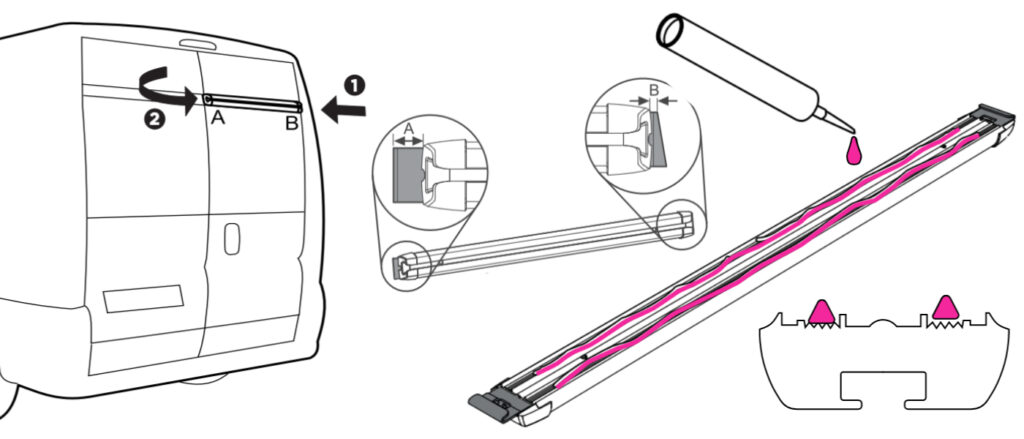
The top bar is mounted to the van using sikaflex adhesive. The manual recommends using Sikaflex 252 – but it is seriously expensive and difficult to source! Instead we used Sikaflex 522; this stuff is specifically for motorhomes, it’s incredibly strong and has worked perfectly for us. This is the same adhesive we used to mount our solar panels on our roof. The adhesive is (annoyingly) not provided with the bike rack so be sure to buy it in advance so you’re not waiting around.
Apply Sikaflex 522 to the back of the top bar. The back of the bar has little grooved areas guiding you where to place the sikaflex (2 lines on each bar). The diagram below shows in pink what the sikaflex should look like on the back of the top bar. Once the adhesive is applied, place the top bar into its position on the flat area of the door as shown in the diagram below. The bars have little hooks that grip the edges of the van doors.
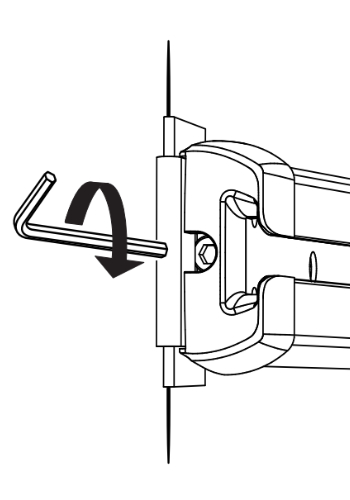
Use the Allen key provided with the Thule bike rack to tighten the bar onto the door (turning clockwise). Be sure that the bar does not begin to bow. The bar should be as tight as it can be whilst laying flat against the door. Once the top bar is applied it is very important to leave it to dry for 12 hours before mounting anything onto it.
Step 3 – Assemble The Rest Of The Bike Rack
Whilst waiting for the top bar to dry, assemble the rest of the Thule Elite Van XT bike rack. All of the screws/washers/bolts should be provided with the bike rack. It is pretty self-explanatory; the manual is pretty clear about which parts go where. The assembly should look like the next diagram. Don’t worry about making sure all of the bolts are tight at this stage – we will cover this later.

Step 4 – Mount The Rack
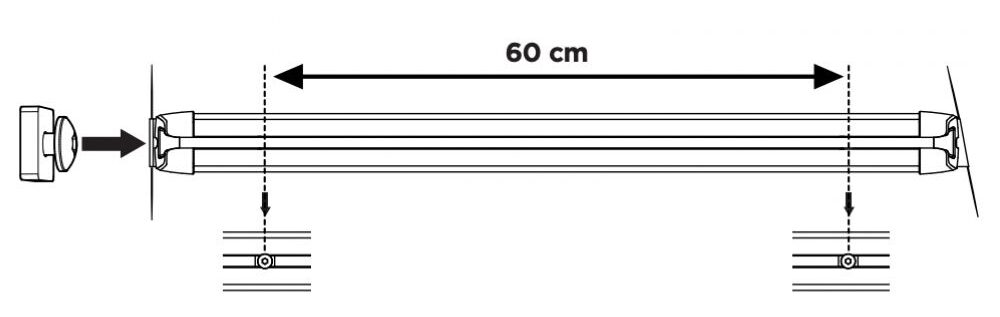
After the top bar has been left to dry for 12 hours you can mount the rest of the bike rack. Begin by loosely screwing together the thick square washers and short M6 bolts. Slide these into the mounted top bar from the side. The screws should be sticking outwards with 60cm between them as shown in the diagram below.
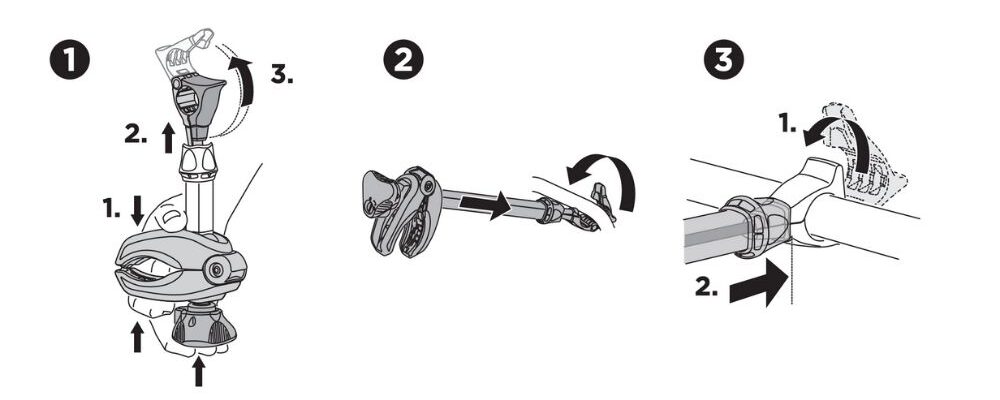
Just like in step 2, apply two rows of sikaflex 522 to the grooves in the back of the bottom bar. The bottom bar should be attached to the rest of the frame – step 3. Then take the rack, holding the bottom bar away from the van, and hook the top of the frame over the bolts in the top bar. Without tightening the bolts, swing the bottom of the frame down gently until it makes contact with the door of the van like the diagram below. Hook the little clamps around the edge of the door when the rack is in position.

Use the Allen key provided to tighten the bolts on the top bar so the frame is secured. Use the same Allen key at the side of the bottom bar to tighten it onto the door of the van. Once again the bottom bar should be as tight as it can be whilst laying flat against the door. Tighten all of the other bolts at this stage now that the frame is in position.
Step 5 – Mount Bike Trays Onto The Rack
Begin by choosing which height you would like your bikes to be stored at. There are a few different options to choose from indicated by the holes in the vertical bars on the bike rack. Ensure your chosen height is comfortable for you to lift a bike up onto. It is also important to check that your chosen height does not cover the number plate or access to the rear door handle.

Fix the bike trays into position on the bike rack using the bolts, washers and nuts provided with the bike rack. The diagram above shows how to install the bike trays onto the Thule Elite van XT rack securely. As well as the bolts, there are plastic, pull through fixings to keep the bike rack in the horizontal position. These can be unfastened when the rack is not in use and flipped upwards.
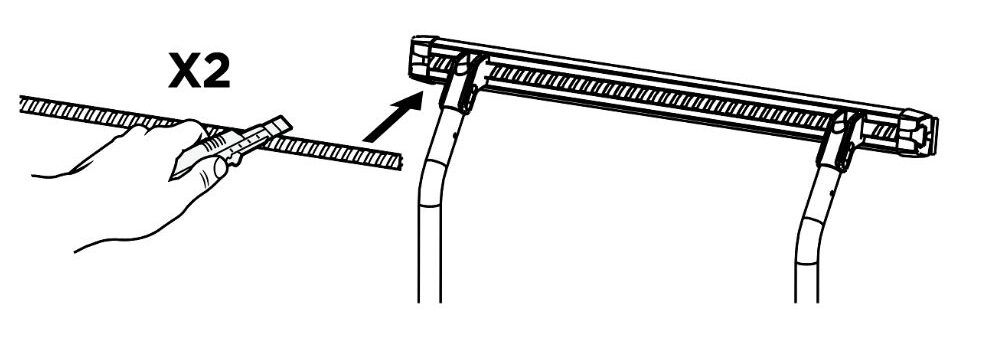
Step 6 – Insert Rubber Strips
The Thule Elite Van XT bike rack comes with textured rubber strips which fit into the top and bottom bars of the rack. With the rack assembled, cut the rubber strip to the correct lengths and press it into the top/bottom bars to fill the empty space. It should look like the diagram below.
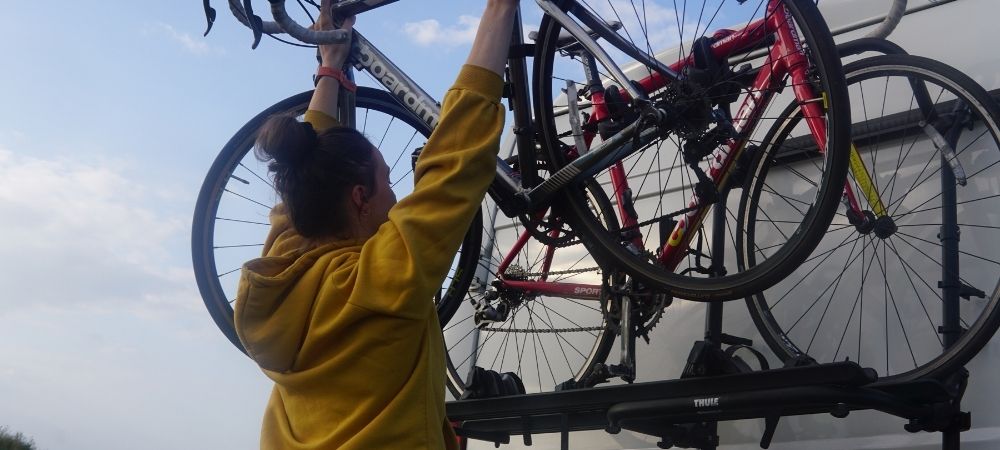
The bike rack is almost complete at this stage. Do not mount bikes onto the rack for 48 hours after installation.
Step 7 – Install Locking Arms
Bikes are fastened to the bike rack using locking arms which are locked onto the frames of your bikes. These locking arms are adjustable to suit the position/size of the bikes you choose to mount. To secure your bikes onto the Thule Elite van XT bike rack, the locking arms need to be fixed to the bike frame. The locking arms are simple to install. They have a mechanism which is controlled by pulling to open and pushing to close.
Position locking arms on the frame wherever will suit your bike set up best. The locking arms need to be positioned so that they grab onto the frames of your bikes securely. Getting these locking arms to suit your bikes can take quite a bit of trial and error. We found that having the bikes facing opposite directions worked best for us.
Once you are satisfied with the position of the locking arms and bikes. Push the small wedges on the bike trays into position so they are touching the wheels of the bikes. Use these wedges to secure the wheels of the bikes by tightening the strap around them.
Conclusion
having a bike rack on your campervan is such a luxury. Once you install one it is impossible to imagine not having a bike rack. We love that the Thule Elite Van XT does not require any drilling into the back doors of your camper to install. This makes the installation process simple, and a lot less stressful.
We hope that the post helped you with the installation process. If you have any questions, leave us a comment and we’ll get back to you.
2 Responses
Hi, just bought one of these racks. Just wondering how you make sure the top rail is horizontal? do you do this by eye or do you use a spirit level?
Many thanks, Kevin
Hi, just bought one of these racks. Just wondering how you make sure the top rail is horizontal? do you do this by eye or do you use a spirit level?
Many thanks, Kevin