
Step 1 – Plan Layout of Door
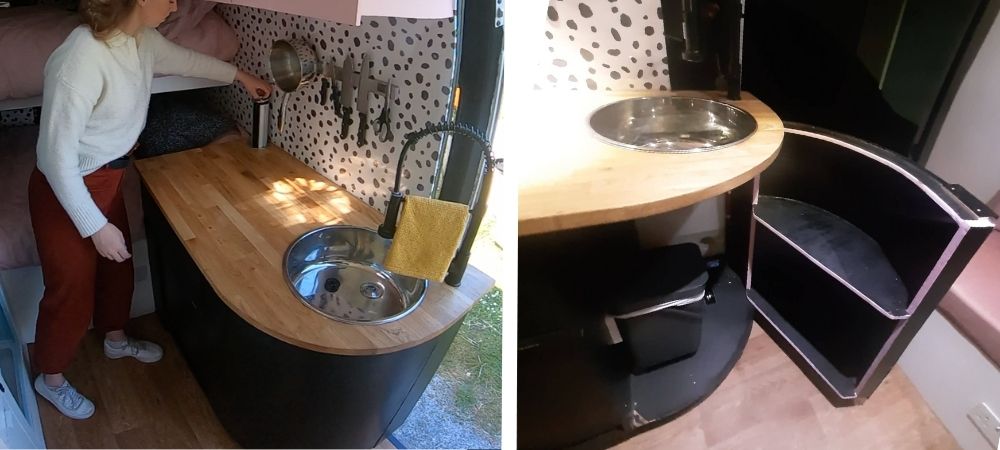
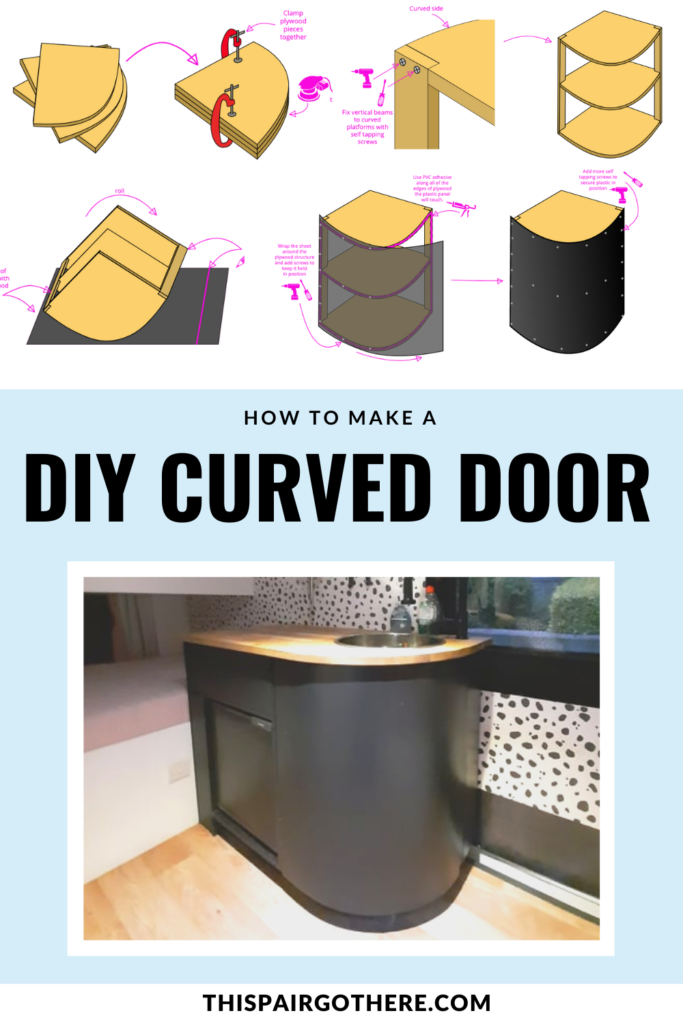
Before you jump in an start building a curved door it it important that you know what you want it to do for you. The door will be made of a series of flat ‘shelf-like’ plywood pieces, two vertical plywood pieces and a sheet of thin acrylic wrapped over the top to create the exterior of the door.
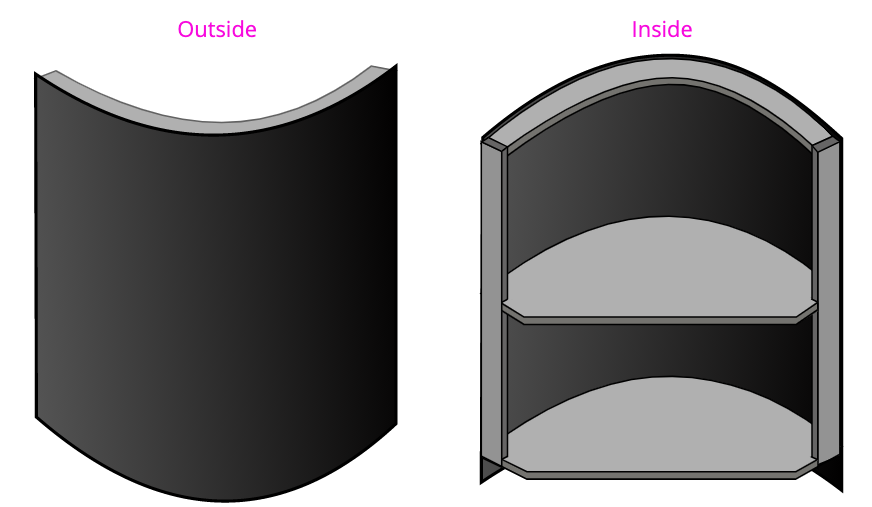
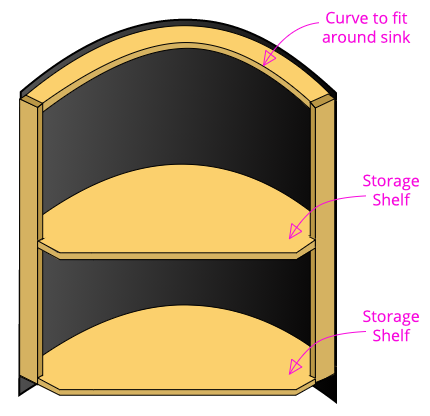
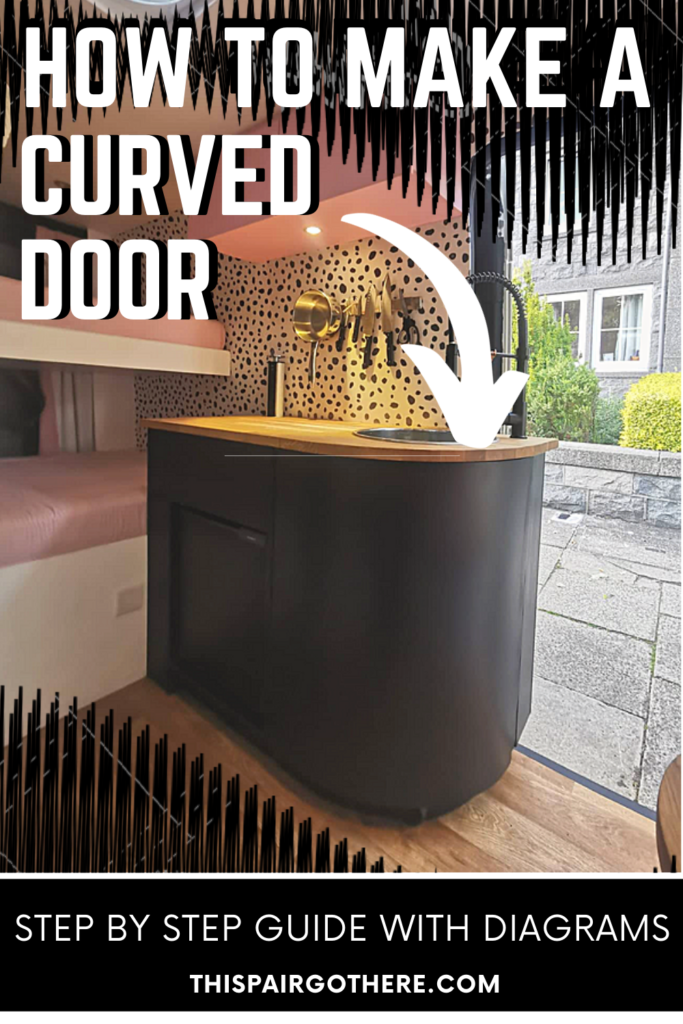
Below is a diagram of the inside of the cabinet door we created for our kitchen. It consists of two shelves for storage. You can see that the top ‘shelf-like’ piece of our door is quite thin. This is so that it does not touch the kitchen sink below the worktop.
When planning your layout there are a few important things to note.
- The larger the ‘shelf-like’ piece – the stronger the door.
- Larger areas of plywood add weight to your door putting strain on hinges
- The tighter the curve – the stronger the door.
- The door does not need to be 90 degrees, it can be a range of different curves
- You can add as many shelf-like pieces as you like to suit your layout
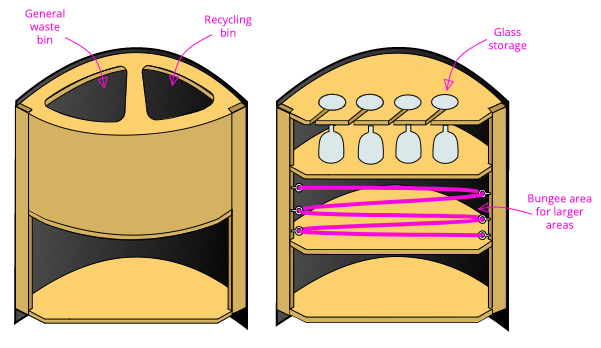
There are so many options for you to customise the door so that is suits your needs perfectly. below are some diagrams showing a couple of different ideas on how you can adapt the door to suit you.
Step 2 – Draw Out Curves
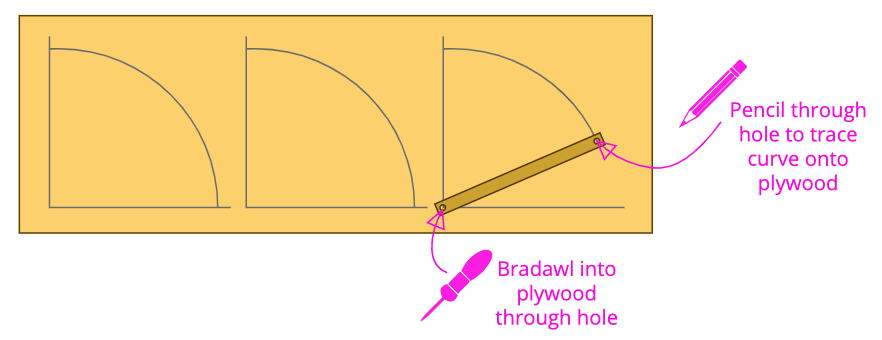
With all of your plans sorted, it’s time to begin the build phase. Begin with a sheet of 12mm thick plywood. You will need to draw / trace the shape of your curve onto the plywood. To do this is is easiest to build a tool like the diagram below. It can be made out of any piece of scrap, we used some left over 5mm plywood.
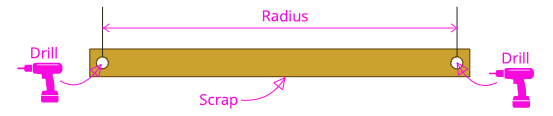
The radius between the two holes should be the internal radius of your door, e.g. the external radius of your door minus the thickness of your acrylic sheet. Make sure that the holes you drill are only just large enough to fit a bradawl / pencil through. The small holes will help the dimensions stay as accurate as possible
Using a Bradawl, poke it through one of the holes in the tool straight into the plywood sheet. Poke a pencil through the other hole and swing the tool around the bradawl to trace the shape of your curve like the diagram below. Try to be smart about where you position your centrepoints so you don’t waste plywood. We created three curves to match our design / layout / size but you can add more to add extra strength or more storage shelves.
Step 3 – Cut Plywood Curves
Cut out your plywood curves using a jigsaw. These will become your ‘shelf-like’ pieces. Make sure to be as careful as possible when cutting to avoid cutting into the curve. To be safe, cut just outside of the curved line you have drawn. You want these curves to be as accurate as possible for the best / smoothest result.
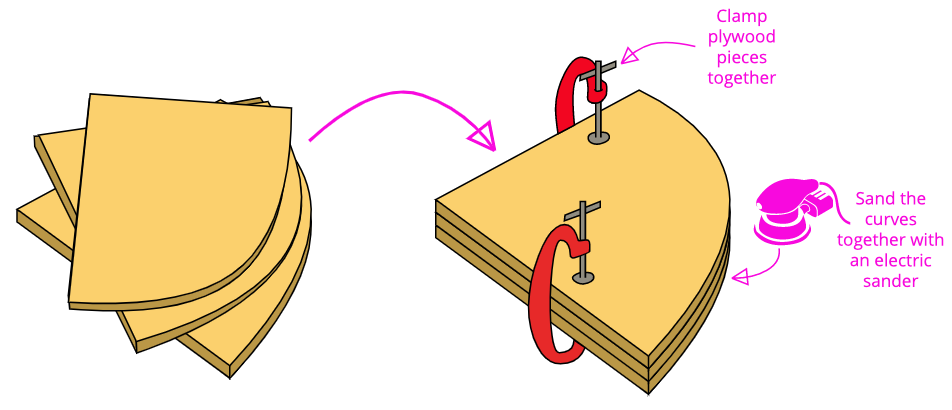
With your pieces cut out, stack them together and clamp in position. Using an electric sander, smooth the curves together to the curved line you have drawn. Sanding the curves together gives the best result as the smother curves are almost identical to each other.
Step 4 – Create Internal Plywood Structure
Use the height of your door to determine the length of your vertical straights. When you are happy with your measurements, cut out some battens to the correct length. Alternatively you can use left over plywood like we did, cut with a circular saw and a jig to get nice straight edges (we used 18mm plywood here). The width of the vertical straights are not too important. Just know that wider battens will add more strength, as well as weight to your door. The width of our vertical straights was approximately 6cm.
* We chose to make the internal height of our door a little shorter than the acrylic exterior so that we could use the overhanging acrylic to cover up where the door meets our cabinet. It is all personal preference though.
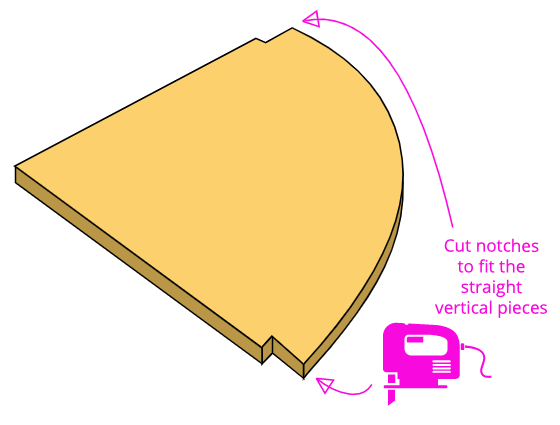
Measure the width of your vertical straights and cut out notches in your curved plywood ‘shelf-like’ pieces to match. Make sure that you are creating these notches on the straight edges of your curved pieces. Again make these cuts as accurate as possible.
Assemble these pieces together to resemble the diagram below. To keep each layer as level as possible mark lines on each of the vertical straights where the curved pieces should sit. To fasten the pieces together use self tapping screws. We also added some ‘hard as nails’ before we screwed everything into position for good measure.

Step 5 – Cut Acrylic Sheet To Size
Cut your acrylic sheet so that it is at the desired height. Be careful when cutting plastic; if you don’t hold it down properly when cutting it may crack. We used a jigsaw to cut our sheet of acrylic. It is also possible to score and snap acrylic so long as the scores are deep enough the whole length of the sheet.
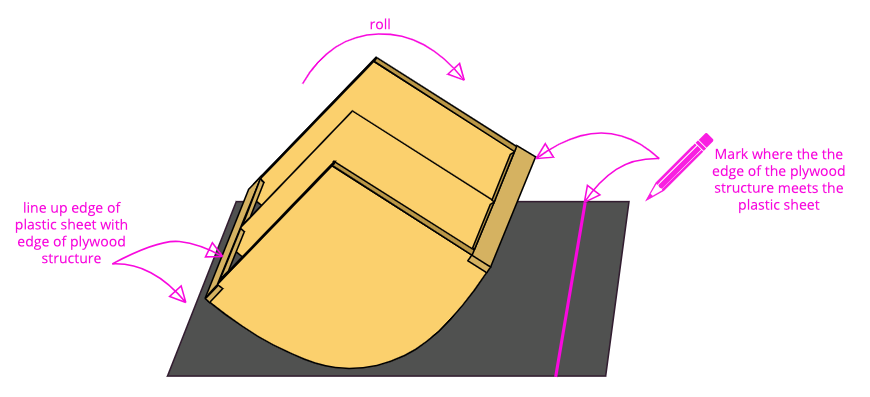
Once your plastic sheet is cut to the correct height it is time to figure out how wide to make it. To do this, line up one edge of the curve with the edge of your acrylic sheet then roll it and mark where the other edge of the curve meets the acrylic. Add a few extra millimetres onto this just to make sure the sheet will not be too short. Then cut your acrylic sheet along this line.
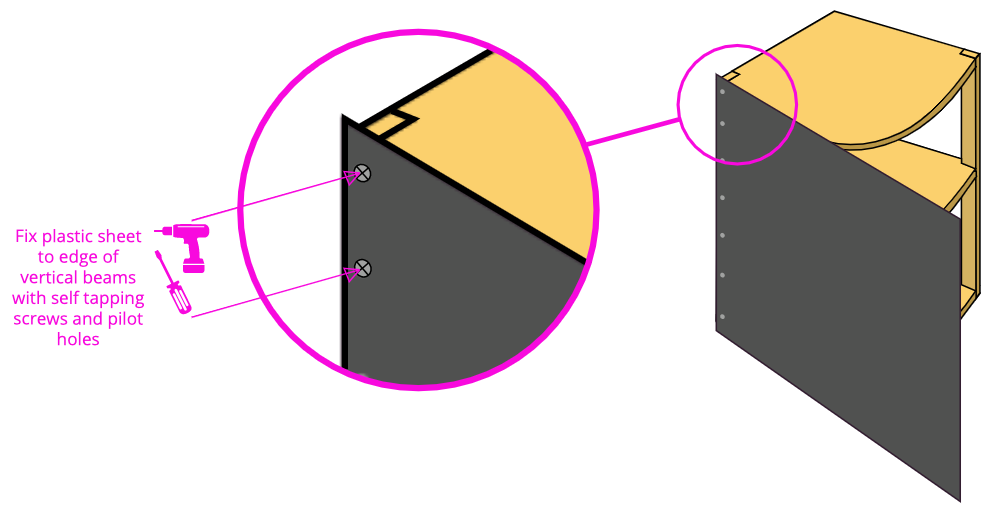
Step 6 – Fit Acrylic Sheet to Plywood Structure
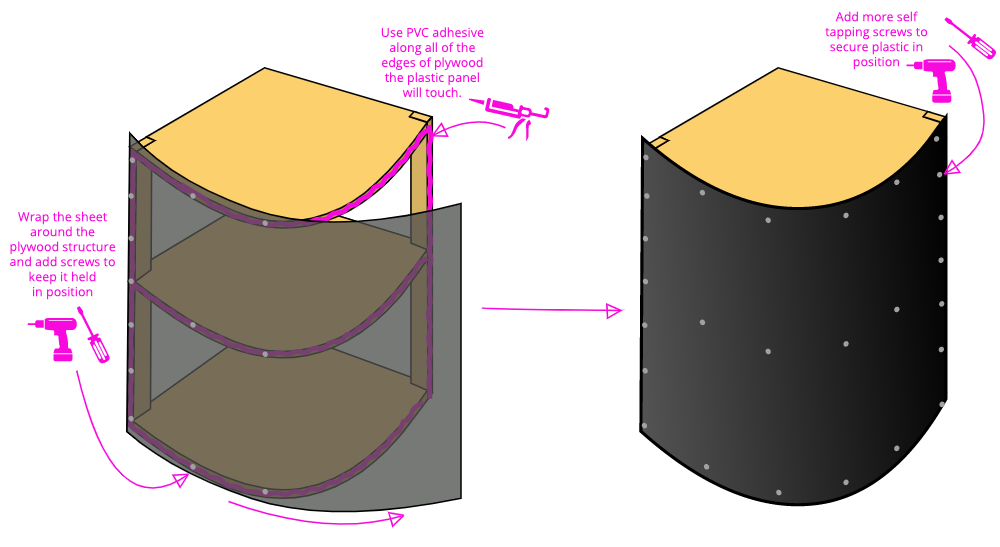
This is the step where it all starts coming together. Line up one edge of the acrylic sheet with one edge of the curve. Fix the sheet in position by adding a line of PVC adhesive down the length of of the vertical straight where the acrylic meets the plywood. Hold the edge of the sheet in position and fix together more solidly with a neat line of self tapping screws like the diagram below. Drill a small pilot hole for each screw, this will help to avoid the plastic cracking. Be sure to avoid screws knocking into each other where the curved ‘shelf-like’ pieces are fixed to the vertical straights.
Add more PVC adhesive to the edges where the acrylic and plywood will meet. Now work the acrylic sheet around the wooden structure gradually. Add in self tapping screws in increments as you work your way around. You want to make sure there are no gaps between the acrylic and plywood. It is easiest to do this with two people so it can be held more firmly. Once the acrylic sheet has been shaped around the curve, add another vertical row of self tapping screws. Use a damp cloth to mop up any excess PVC adhesive that has seeped out.
Leave the door until the PVC adhesive has completely dried. Then one by one remove the screw, counter sink the hole and then insert the screw back in. You want the screws to sit slightly below the surface of the acrylic sheet. Then use an electric sander to smooth down the second edge of the acrylic sheet until it is completely flush with the vertical straight.
Step 7 – Customise Inside Of Door
To make the door useable you need to cut away some of the plywood. The door as it stands is pretty heavy – this will put a lot of strain on the hinges once installed. Follow your own layout to determine how much of the plywood you need to cut. The diagram below shows how much we cut into our plywood structure. Our top layer was cut pretty thin so it would not bash into the sink under the worktop. We reduced the size of the other two curved pieces to create a couple of shelves to hold some lightweight bits and pieces such as tea towels and cloths.
Use a jigsaw to cut the plywood to your desired shape / size. We would recommend curving the corners of your plywood pieces just so you avoid a sharp piece of wood jutting out. When you are happy with the shape, sand everything down to get it even smoother.
Once all of the plywood has been sanded down it is time to paint it. This is completely optional, we just think it makes the finished door look more professional. If you are not happy with the colour of your acrylic you can also sand down the inside of the acrylic sheet and paint over it.
Step 8 – Smooth Outside Of Door
Currently the outside of the door looks a little messy with screws all over the front of it. Add caulk to all the screws to fill out the area a little better. It is easiest to use some soapy water to smooth over the top of the caulk to reduce mess. Once the caulk has dried / set, use sandpaper to smooth the caulk so it is flush with the surface of the door.
Now sand over the whole exterior of the door. You need to rough the area up a little so paint will stick to it nicely. Speaking of paint – this is now the fun part of customising the colour of your curved door to match your cabinet. We opted for a smooth black paint, the door ended up looking fantastic with no evidence of the caulked screws under the paint.
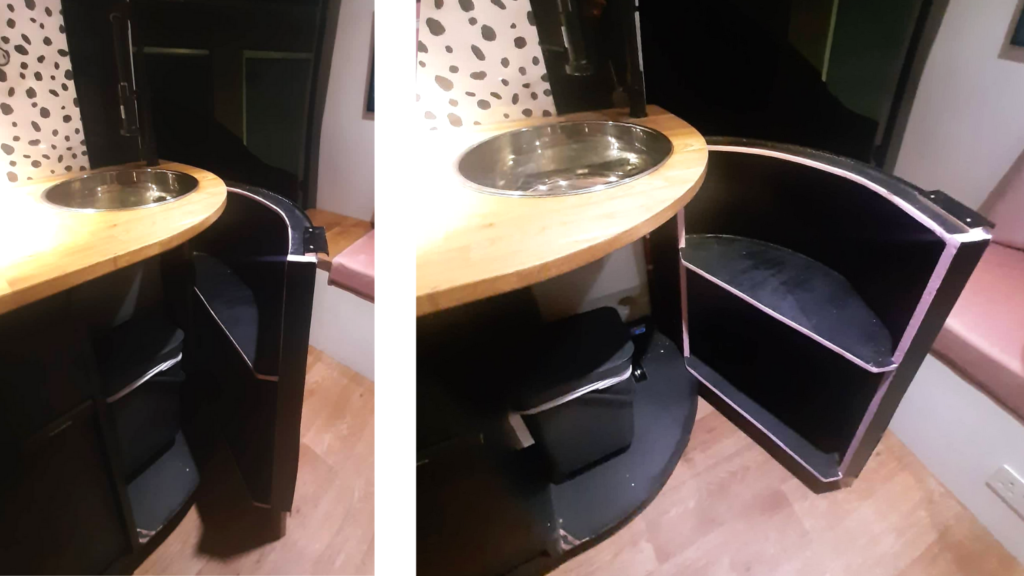
Step 9 – Attach to Cabinet
Mounting the curved door onto your cabinet is a pretty rewarding feeling. Use metal sprung concealed hinges to attach it. To do this we would definitely recommend watching a youtube video like this one to take you step by step through the process. We found that the hinges took a fair amount of time to adjust to get everything sitting completely flush. Be patient and you will get the result you are looking for!
note : we used two hinges for our door which works well. If your door is heavier or you plan on storing heavier items in it, we would recommend adding more hinges to spread the load. For reference, our door is approximately 800mm tall.
Conclusion
Creating a curved door can seem like a bit of a daunting task, however, when you get into it its really not hard at all. Tailoring a curved door to fit your space perfectly is such a rewarding task. We love that this door making method is so versatile, we hope you can use it to create your perfect door. We are thrilled with how our door turned out.
Feel free to ask us any questions about the cabinet door, whether it is about materials, price, time, or whatever else. You can always find us in the comments.
One Response