

Battery
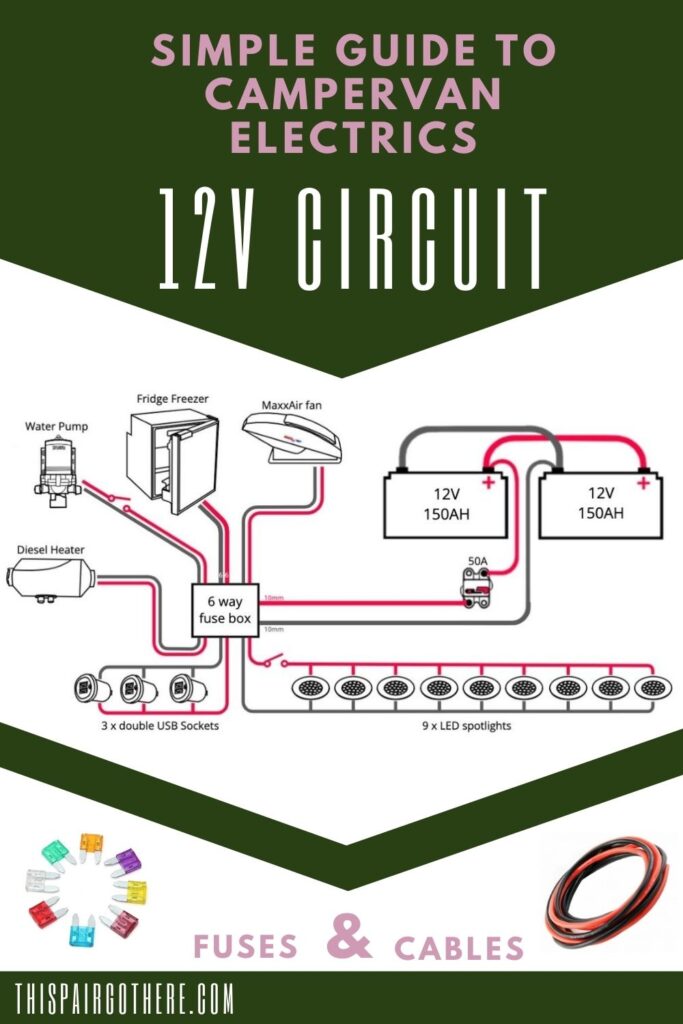
At the centre of your 12V campervan electric circuit is your 12V leisure batteries. Whether you have one battery or multiple wired in parallel, this will be the source of the 12V direct current (DC). For reference we have 2 Lithium 12V 150Ahr batteries wired in parallel. By wiring in parallel this means the the voltage stays the same (12V) but the current doubles (300 Ahr). From this 12V power source your appliances, known as loads, will be powered.
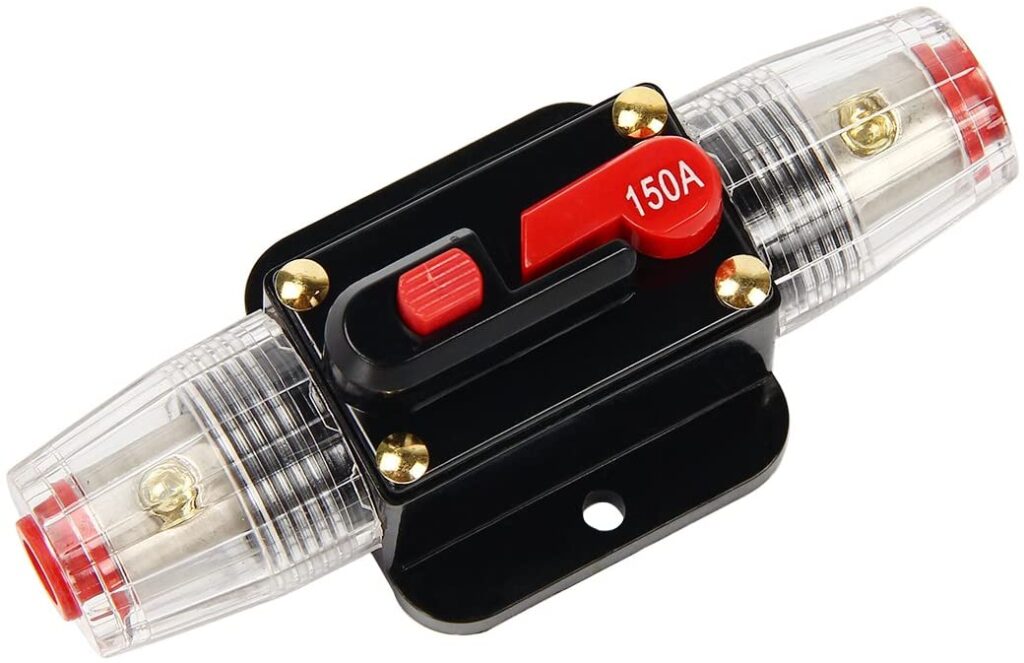
Circuit Breaker
Before you wire up any of your 12V appliances to the battery, install a circuit breaker. A circuit breaker is an automatic switch that protects the circuit from an overload of current. As soon as the current exceeds the limit the switch trips the circuit interrupting the flow of current. We used a 50A breaker in our 12V campervan electric circuit. As well as protecting the circuit, the circuit breaker is also a really useful tool for cutting off all power in the circuit. This means you can wire up your appliances later on knowing that there is no current flowing, so you won’t accidentally get shocked. It also means you can shut off your 12V circuit at any time if you are not using it for a prolonged period of time.
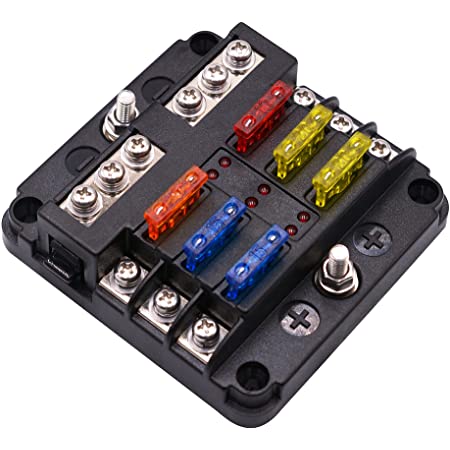
Blade Fuse Box
It is possible to directly power your appliances straight from your leisure battery, however, we would not recommend that. Instead, use a blade fuse box. To figure out which fuse box is best for you, begin by creating a list of all of the 12V appliances you plan on having. Below is what we have in our 12V circuit.
- Fridge
- Diesel heater
- Water pump
- Fan
- 9 x Lights
- 3 x USBs
As you can see in the above list, we have 6 appliances, with no plans to expand this number over time. This means we can use a 6 way blade fuse box like the image below. Larger boxes with more connectors are available.
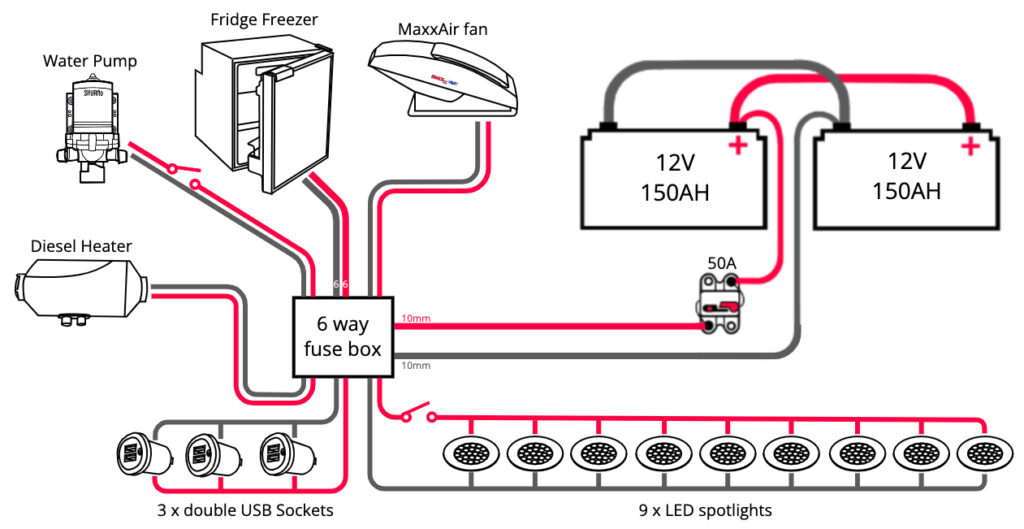
We used 10mm cable to connect our battery to the circuit breaker and fuse box. We will cover calculating cable size later in this post.
Below is a diagram of our campervan electric 12V circuit. You can see that all of the appliances are connected to the fuse box. The fuse box acts as a central hub where the power supplied from the battery is split up into the the individual circuits for each appliance. Using a fuse box means each appliance will have an appropriately sized fuse for its power consumption. We will cover choosing the correct fuse later in this post.
Wiring Multiple Lights Together
If you have multiple LED lights you wish to wire together, make sure to wire them in parallel like in the diagram below. There are a couple of reasons for wiring them in this fashion. Firstly, it means that if one light was to go out, the rest of them should still function properly. Secondly, wiring in parallel mean all of the lights will receive the same voltage (12V), this means all lights will have the same brightness.
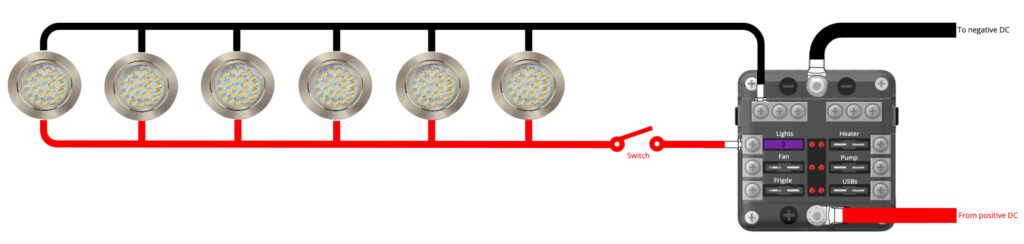
You can see in the diagram above that we have included a switch in the positive (red) wire for the lights. This switch controls all of the lights. We opted for touch on/off lights so separate switches were not necessary for us. When the switch is in the closed position (on) we can choose to touch which ever light we wish to turn on. When the switch is open (off) none of the lights will turn on by touch. The diagram shows 6 lights, but in reality we actually have 9 spotlights wired in parallel in our van.
In our electrical setup we also have 3 double USB sockets which we wired in the exact same way.
How to Calculate Fuse Size
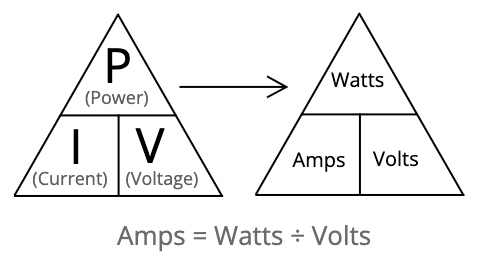
Fuses are an incredibly important part of the 12V circuit. They are designed to ‘blow’ and break the circuit if there’s too much current running through it. This stops cables from overheating and potentially causing a fire. To figure out the correct fuse sizes, you need to first figure out the ‘load’ of your appliances. This can be expressed as watts or amps. If you know the Watts (power) your appliance uses, it is very simple to calculate the Amps (current). Simply use the formula below, known as Watts law.
Example – Lights Fuse
Below is a screen clipping of the information about the 12V LED spotlights we used in our van. This is what we used to determine the fuse size.
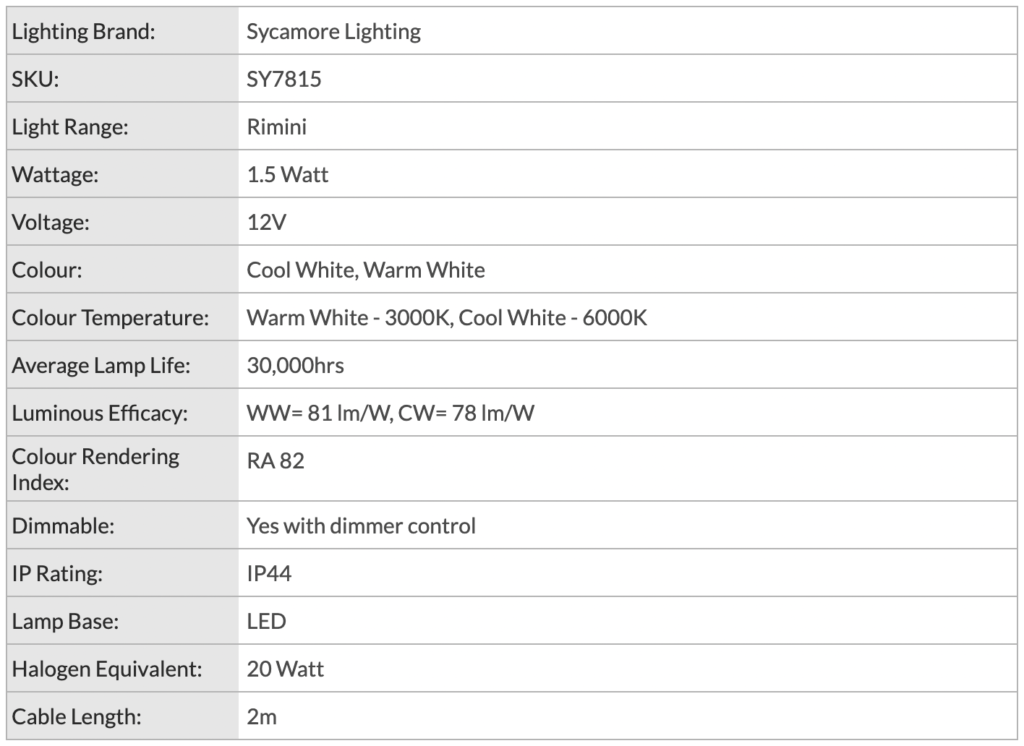
We can ignore most of the information from the data sheet, we are mainly interested in Volts, Watts and Amps. As you can see, the load of the spotlight is 1.5W.
| Voltage | 12V |
| Wattage | 1.5W |
In our electrical setup we have 9 of the LED lights wired in parallel. Below is how we calculated the Amps.
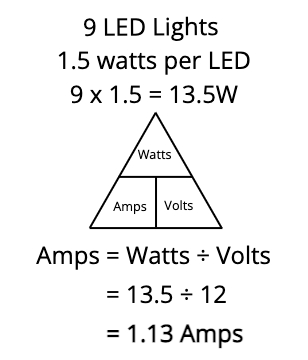
Having calculated the current in the circuit, it is time pick an appropriate fuse. The fuse has to be a little larger than the current flowing in the circuit so that everyday operation will no blow the fuse. However, you don’t want to choose a fuse that is too large which will not properly protect the circuit.
A good rule of thumb is to multiply your current (Amps) by 1.5 and then choose the next fuse size up. So in our case:
1.13A x 1.5 = 1.70A
The next largest fuse we had was 3 Amps (2A fuse would have also worked here)
Other Fuses
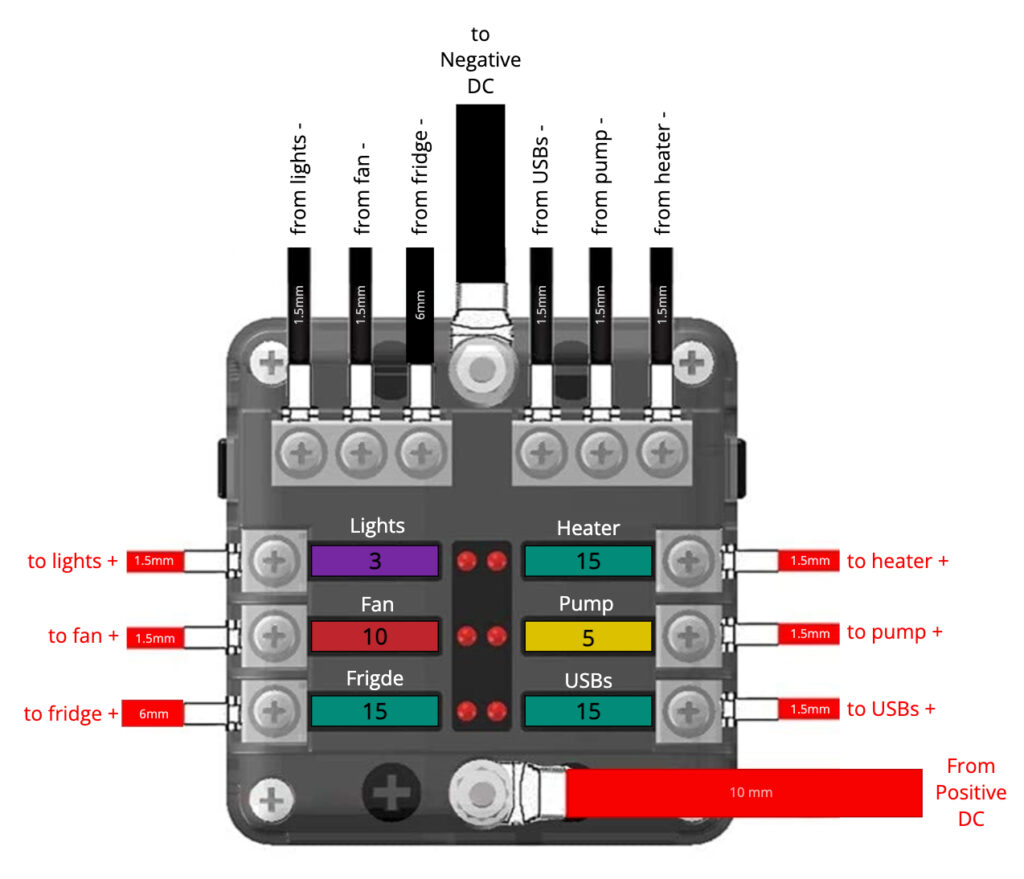
We calculated all of our fuse sizes for each appliance in the exact same way as the lights. If your appliance manuals tell you how many Amps the circuit needs, this is even easier as you do not need to bother calculating the Watts. In some cases the appliance may spike in power consumption in a start-up mode. An example of this is the diesel heater. It immediately draws a larger amount of current then decreases to a constant draw. The fuse we used in this case is large enough so it should not blow on start-up. Below is a diagram showing all of the fuses we used for our different appliances. Be aware that similar products may need different fuse sizes. Make sure to check your manuals and data sheets for the most accurate information on your appliances.
How to Calculate Cable Size
As well as appropriately sized fuses, appropriately sized cable is equally, if not more important. Using a cable with a rating which is too small for your appliance can lead to the cable overheating and potentially catching fire. This is why it is vital to choose the correct cable for your 12V circuit. Below is a table showing how the gauge / size of the cable affects how much current the cable can carry. The specific current ratings are appropriate for the wire we purchased, make sure to check the data sheet of any cable you purchase to be sure it can handle the load as it may vary between different brands / companies.
| Cross Section (mm2) | Current Rating (Amps) |
| 1.5 | 21 |
| 6 | 53 |
| 10 | 70 |
We used 10mm cable to connect our battery to the fuse box. This was calculated by adding up the total current drawn from the battery for all of the appliances. Simply add up the fuses in the fuse box to get an absolute maximum current the cable should be capable of carrying. In our case:
3 + 10 + 15 + 15 + 5 + 15 = 63A
From the above table you can see that the 10mm cable is capable of carrying 70 Amps. This means it is the right choice as it can carry considerably more than the 63 Amps we need.
Use this same principle for choosing the cable which will connect each appliance to the fuse box. Again, from the table you can see that the 1.5mm cable is capable of carrying 21 Amps of current which is more than any of the appliances need (maximum fuse used is 15A). This is why we used 1.5mm cable for the majority of the wiring in this 12V circuit. The only exception in our setup was for our 12V fridge. We upgraded to using some 6mm wire as the length of the cable was pretty long. A larger cable was used here to account for any losses / resistance in the cable over its length.
Conclusion
The 12V electric circuit is where you will power most of the goods in your campervan. This is why it is so important to wire it correctly. Once you have wrapped your head around the fuses and cables, the wiring process is fairly straightforward and shouldn’t cause you too much bother.
Feel free to ask us any questions regarding the installation of the 12V circuit. You can always find us in the comments.
11 Responses
I’m profoundly Deaf man.
Thank you for feedback it!
I am need your electric book to post to my house and cost for electricity book!
Thanks Phillip
Very useful. I’m currently working out cable sizes for wiring my van. I have 4 led spots at 1.2 volts each which I’ve worked out that I can use a 1amp fuse for . Does this mean I can use 0.5mm . 11amp cable?
Hi! I’m currently in the process of working out cable sizes and fuses etc so this is super helpful as you have a very similar set up to what I will be using.
Just a quick question; how did you arrive at needing 6mm cable for the fridge? The fridge i have draws max 1.5Amps per hour, I can’t imagine much variance between other 12v compressor fridges so just want to understand how you go to 6mm as it would appear 1.5mm would suffice? Thanks a lot 🙂
If you have a long thin cable there is more resistance to the flow of electricity. This means you use more power. If you use a thicker cable there is less resistance so keeps your power usage lower. A fridge uses quite a bit of power constantly so having a thicker cable for that makes sense.
Hi,
Great explanation, Thanks
One quick question.
The max current is calculated at 63A for the correct cable size of 10mm2 but the breaker on the battery trips at 50A. Why wouldn’t you want a breaker at 63Ax1.5= 94.5A min?
Thanks
Luca
Hi Luca.
The individual fuses are calculated to protect the circuit. In practice, if all of the appliances are running regularly (no faults) the current draw is less than 50A. for example, we have a 3 Amp fuse for the lights, but its regular operating current should be 1.13 Amps.
If we opted for a 100A breaker, all of the individual 12V circuits would need to be overloaded/overheating for the breaker to trip.
Another reason we opted for a 50A breaker is that it would be unlikely for us to be using everything in our 12V setup at the same time at maximum capacity.
Hope this answers your question 🙂
I am in the conversion process and doing most of the work myself bar the wiring etc which I would rather the professionals would do this electrial info is very informative and will keep for future reference thanks
Great!!
Good luck with your conversion 👍
good informative info . Thanks
Glad we could help 🙂
Thank you I found this made the basic 12v system so easy to understand! I would like to add a solar pannel and controller to this system do you have a guide for that, please