
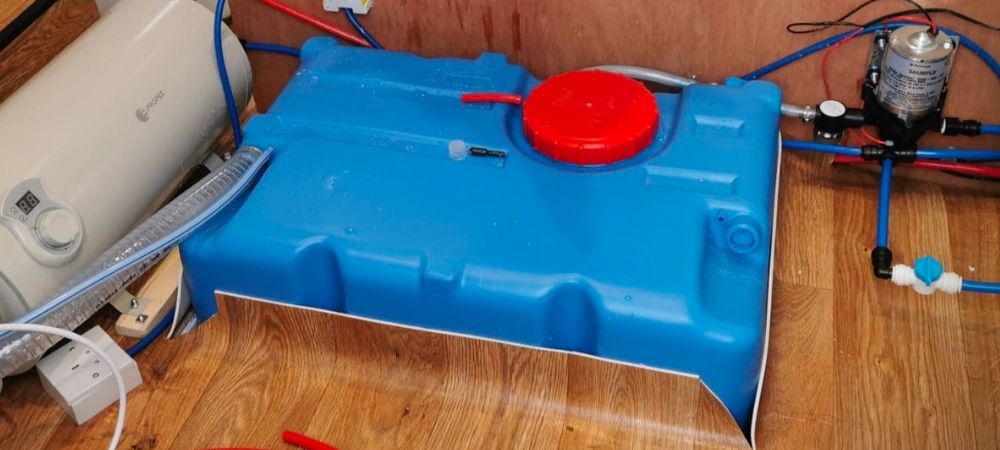
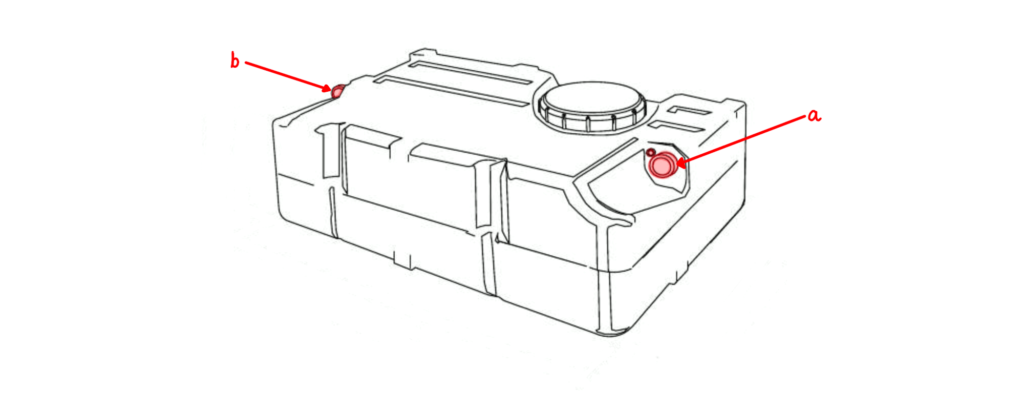
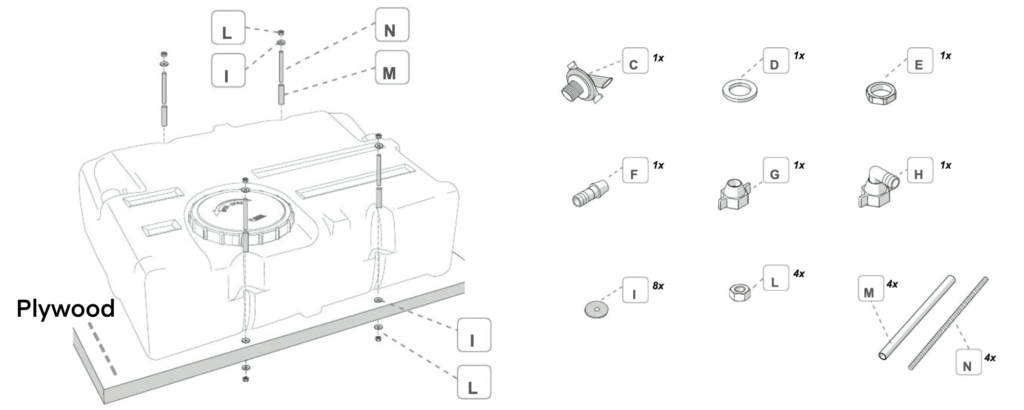
Step 1: Drill out the Holes
Decide where your tank will be positioned and select what holes need to be drilled out. Consider what side your fill-up cap will be at when deciding which holes to drill out for the inlet.
The instructions provided with the tank make this step very clear. You can find them here.
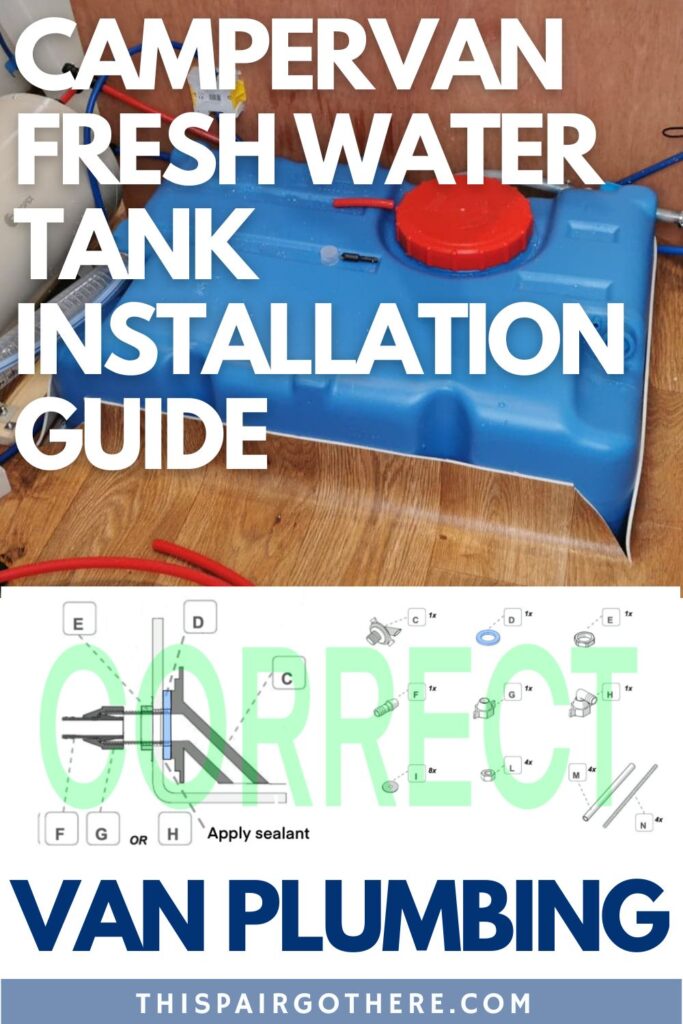
Step 2 – Insert the outlet
Note: this step is WRONG in the instruction manual. We followed the instructions precisely and ended up with a MASSIVE leak.
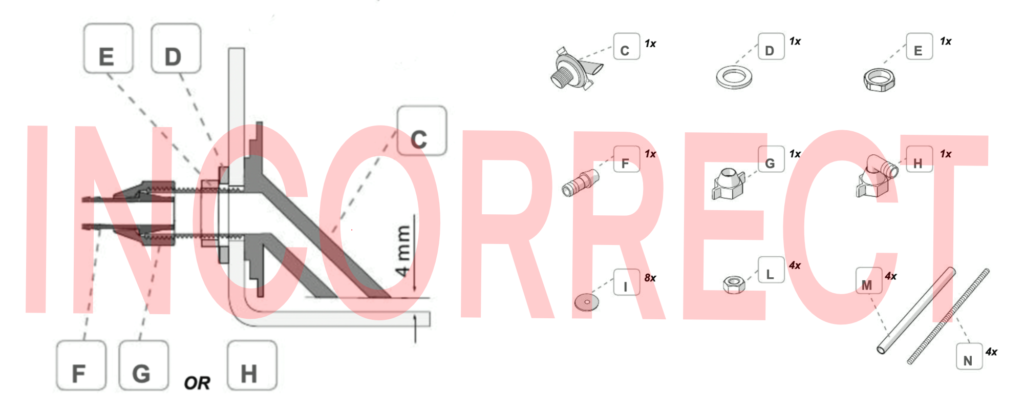
The outlet set-up advised in the diagram above is NOT watertight.
After some trial and error, and consulting a qualified plumber we discovered that if you place component D on the inside of the fresh water tank it will not leak inside your van. This is because the pressure of the water on this component will push it hard against the tank making it water tight. Please see Diagram below.
We also opted to upgrade component E to a brass fixing. This is optional, however, if you are extra cautious like us, we would recommend it. It is listed as the 1/2″ Brass Flanged Backnut in the materials list above.
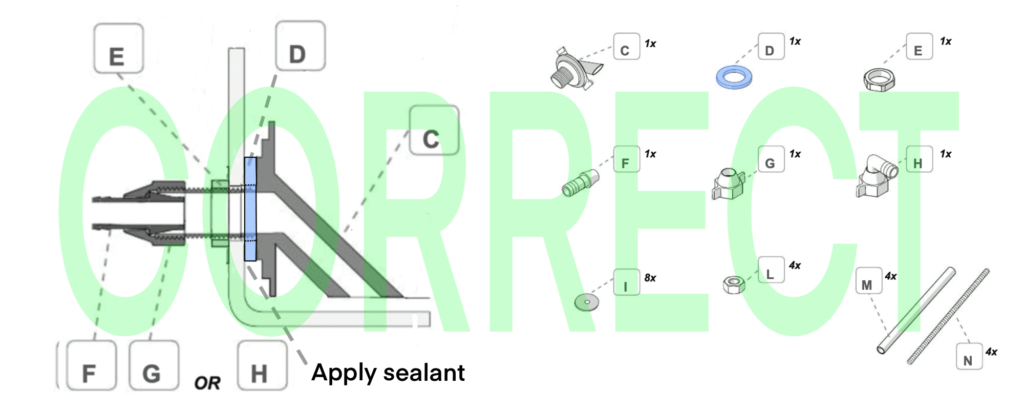
Note: we applied a coating of silicone sealant around the inside of the outlet as a precaution.
Step 3: Make sure the Fiamma fresh water tank doesn’t leak in your van
Do not underestimate the importance of this step. We did, and it bit us in the butt… big time. Place a piece of paper towel under the outlet and fill up the tank to just above the height of the outlet.
If the paper towel is wet, immediately empty the tank and fix the connections. You may need to tighten the outlet components or even add a layer of silicone sealant.
If you are extra precautious (like us) leave the tank overnight and check the paper towel in the morning. Better safe than sorry.
Step 4: Secure the Fiamma fresh water tank to the floor
Once you are satisfied that your water tank does not leak it is time to secure it to the floor of your van.
This step may require you to drill small holes out of your subfloor. This is because it is secured to the floor with specific nuts and bolts. However, if you don’t want to do that (like us) there is a way to work around it.
Mount the tank onto a plywood board then fix it to the floor of your van using screws.
Preparation for mounting the tank
Firstly, the tank is secured in position using long bolts. These bolts sit snuggly in the troughs of the tank. Sit the tank on top of the plywood board and mark where the bolts will penetrate the plywood. Next, drill where you have marked.
Note: we recommend no less than 12mm plywood in order to provide a sturdy enough base for the tank to sit on. It does not have to be the full size of the tank, it just needs to be big enough for all the bolts to be attached.
As you will be securing the tank to the plywood with nuts and bolts you will need to route out the area around the holes on the underside in order for the plywood to sit flush on the floor.
Mount the tank to the board
Position the water tank on the board and secure it with the remaining nuts provided.
This can be quite fiddly as you do not want the bolts to extend further than 1mm out from the nuts on the bottom of the plywood.
Secure the Fiamma fresh water tank to your van’s floor
Position the tank in its final position and secure it to the floor of your van using 30mm screws. We recommend no less than 6 screws.

Step 5: Fit the filler hose and cap
We opted for an internal filler cap as we couldn’t justify cutting another hole in the side of our van. The more holes in the van – the more chance of having a leak!
We chose the Fiamma locking cap.
Our cap is fitted onto a vertical piece of plywood at the back of our van.
Simply cut a circle out of where you intend on mounting it using the correct size hole saw drill bit (8cm diameter). Insert the cap and secure it into position using the screws provided.
Note: you may wish to attach the flexible hose to the cap prior to installing the cap if it is a small enclosed space.
Attach the flexible hose to the Fiamma fresh water tank
Attach the filler hose to the cap first as it is more difficult as it is slightly larger.
Note: make sure your filler cap is positioned higher than the fresh water tank.
Finding a flexible hose is a much harder task than you might imagine. This is because despite the water tank and cap being the same brand, the connecting pipe on each part is a different size – there is a 2mm difference. The cap is 40mm and the tank is 38mm.
Therefore, when selecting a filler hose, you MUST select one that is 38mm. We also recommend getting one that is clear as this will allow you to see if the tank is full without the need for a gauge.
We highly recommend this flexible hose, as it is the correct size and fits more securely onto the water tank and cap than the ribbed pipes that are commonly used – we tried this hose and DO NOT recommend it!
Firstly, place the end of the pipe in boiling water in order to make it more malleable, this will make fitting it slightly easier. Remove it from the water after 2 minutes and immediately push it onto the fill-up cap. This step takes some serious brute force. Once in position secure it with a jubilee clip.
Repeat this process for attaching the pipe to the water tank. You may wish to use some silicone sealant around the edges as an extra precaution.
Finally, attach the air inlet pipe to the cap and tank. Use 12mm pipe. Once again, this will require you to heat up the pipe and apply some brute force.
Conclusion
Fitting the Fiamma fresh water tank proved to be more challenging than expected and required a small degree of trial and error. This post was carefully crafted so you don’t face the same problems we did.
Feel free to ask us questions regarding installing this water tank, whether it is about materials, price, time, or whatever else. You can always find us in the comments.
Next Step: Installing the water pump, accumulator and filter.
6 Responses
Nice one! Very handy 🙂
Thank you! 🙂
I was almost going to purchase a new water tank before I found your article.
Thank you I now will stick with the fiamma tank I have. You have explained very well.
Cheers. K
I’m glad we could help 🙂
Hi there
Thanks for this tutorial as im about to fit this tank to my van.
I’ve also decided to fit the fill point inside the van and wanted to know if the small air inlet pipe drips out water at any point while travelling?
Alternatively could I drop the air pipe through the floor of the van instead of having it at the fill cap?
Many thanks
Hi Drew,
We have never experienced it leaking at all. It has worked a charm since installing it.
I’m sure putting the air inlet through the floor would have the same effect, however, we wanted to minimise the number of times we drilled through our van as it then could potentially become an ignition point for rust.
One thing we would maybe recommend is installing the cap at an angle. For example, we fitted ours on a vertical bit of wood and it sometimes dribbles out (not the air inlet) when filling the tank up. If we were to install it again we would consider fitting it at a 45-degree angle to prevent this.
Hope this helps 🙂
Christie & Emily