When installing a ceiling in a campervan there are a few things it needs to be:
- strong
- lightweight
- insulated
This may sound easy, but combine this with the fact the roof has a subtle arch to it and you (will probably) have to account for a fan, it isn’t so simple after all.
This post breaks the process down into 3 bite-sized chunks making it a little bit more digestible!
- Insulation
- Framing
- Cladding
Note: this step-by-step guide is based off our experience converting a Citroen Relay van. The process will remain the same for other vans, however, sizes will differentiate.
Prerequisites: Installing walls in your van, installing a Maxxair Fan
Materials
Recticel Instafit Polyurethane Insulation board (25mm)
5mm Hardwood Plywood Board
Sikaflex EBT+
Diall 75mm foil tape (2 pack)
70 x 18 x 2400mm Timber Batten
M6 Stainless Steel Rivnut
M6 x 25mm Countersunk Bolts
20mm Countersunk Wood Screws
Expanding Spray Foam
Quantity
3
3
2
1
5
1 pack
1 pack
2 packs
1
Price
£25.00
£24.00
£6.99
£13.07
£5.00
£7.99
£2.40
£3.49
£7.76
Materials
Recticel Instafit Polyurethane Insulation board (25mm)
5mm Hardwood Plywood Board
Sikaflex EBT+
Diall 75mm foil tape (2 pack)
70 x 18 x 2400mm Timber Batten
M6 Stainless Steel Rivnut
M6 x 25mm Countersunk Bolts
20mm Countersunk Wood Screws
Expanding Spray Foam
Qty.
3
3
2
1
5
1
1
2
1
Price
£25.00
£24.00
£6.99
£13.07
£5.00
£7.99
£2.40
£3.49
£7.76
Materials
Recticel Instafit Polyurethane Insulation board (25mm)
5mm Hardwood Plywood Board
Sikaflex EBT+
Diall 75mm foil tape (2 pack)
70 x 18 x 2400mm Timber Batten
M6 Stainless Steel Rivnut
M6 x 25mm Countersunk Bolts
20mm Countersunk Wood Screws
Expanding Spray Foam
Qty
3
3
2
1
5
1
1
2
1
Price
£25.00
£24.00
£6.99
£13.07
£5.00
£7.99
£2.40
£3.49
£7.76
time
5-6 hours
Price
£224.18
related Posts
Time
5-6 hours
Price
£224.18
Method
Step 1 – Cleaning
Time: 5 minutes
Clean the metal ceiling of your campervan/van. Dirt and debris build up quickly when converting a van – even the roof is susceptible to becoming dirty!
Simply wiping the roof with a damp microfibre cloth will do the trick.
Step 2 – Layout
The metal structural beams on the ceiling of the campervan essential are a blueprint for how you will construct your internal roof.
The framing will be placed on the raised beams and the insulation will fill the rest of the space.
Insulation
Step 3 – Measure the van
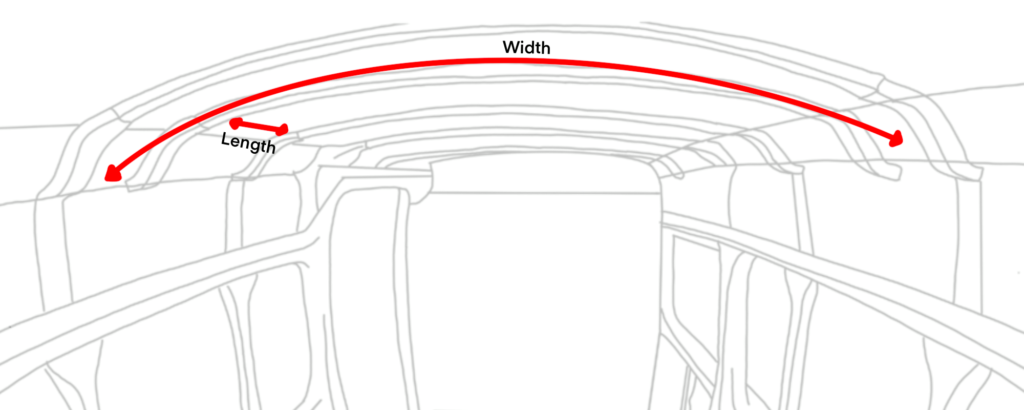
Measure the length and width of your van. The width should be the full width of the roof, however, the length should be the distance between the roof beams
Step 4 – Cutting
Cut:
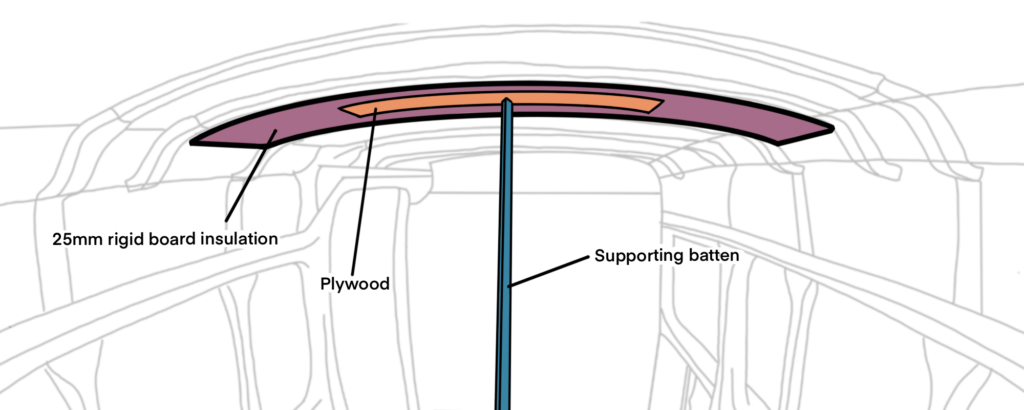
- 25mm rigid board insulation to span the width of the van and the distance between roof beams.
Cut the insulation to size. Account for any niggly, obscure curves that may be found in the corners of the campervan’s ceiling.
Note: the cutting doesn’t need to be 100% accurate as small areas that are missed can be filled with expanding foam.
Step 5 – Sticking
Use a strong adhesive to attach the insulation to the roof. We recommend Sikaflex EBT+.
Apply large dollops of adhesive to the board/roof instead of a thin continuous bead.
Press the boards firmly up onto the roof.
After applying pressure to the boards use a prop to hold the insulation up on the roof whilst the adhesive dries.
We placed a piece of plywood on the insulation and jammed a batten vertically beneath it to force the insulation up whilst simultaneously spreading the upward force across the insulation.
Leave it to dry for at least 30mins.
Framing
Step 6 – Measure and cut the roof battens
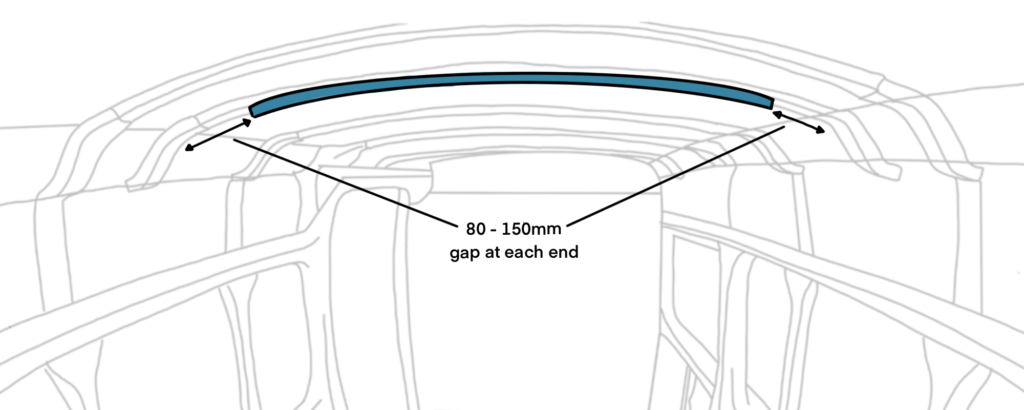
Measure the beams spanning the width of the van, and cut the battens to size. There will be a batten on every structural beam on the roof of the van
Cut:
- 70 x 18mm battens to span the width of the van (minus 80-150mm at each end)
Step 7 – Align the battens and beams
Mark the centre point on the metal roof beams of the van and the 70 x 18mm battens. This will allow you to position the battens accurately when it’s time to permanently fix them on the roof of the van.
Note: Make sure you can see the centre marking on the roof beam when the batten is placed in position.
Step 8 – Drill into the battens
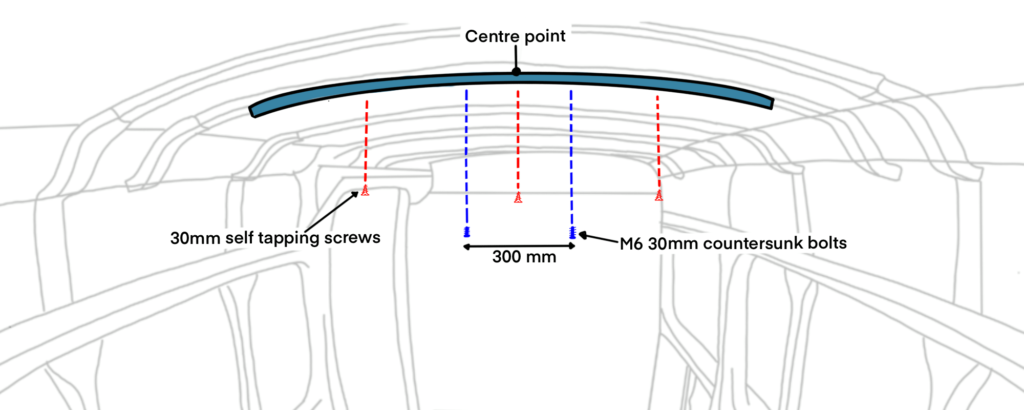
Measure 150mm out each side from centre point and mark the batten. These marks will be where the batten will be secured to the structure of the van and be the foundation for cladding the ceiling of your campervan.
Using the marks as a guide, drill a small pilot hole.
Note: this hole should be large enough for a sharp point to be pushed through. e.g. a bradawl or small Phillips screwdriver.
Step 9 – Mark the roof
Note: This job takes two people
One person will position the batten on the roof and align it with the centre point you marked earlier. Push firmly up to allow the wood to match the curve of the roof.
The second person will position the sharp point (bradawl) in the pilot holes and use a hammer firmly to make a mark on the metal beam above.
Step 10 – Drill holes in the ceiling of the campervan
Time: 10 minutes
Drill a 6mm hole in the roof metal beam (large enough to insert a 6mm riv nut). Use the marks made previously to indicate where to drill.
Start by using a smaller drill e.g. 2mm and incrementally increase the drill bit size until you reach 6mm.
Check to see if the hole is the correct size, by trial fitting a 6mm riv nut.
Note: There isn’t much room above the beam, so be careful not to go through the actual roof!
Step 11 – Drill the battens
Expand the pilot holes on the wooden battens out to 6mm. This will allow the bolt to pass through with relative ease.
Countersink these holes in order for the roof cladding to lie flush when attached to the battens.
Step 12 – RivNuts
Use a Rivet nut gun to insert a Riv Nut into the holes you have just drilled on the campervan’s ceiling.
Make sure it is completely secure by trying to move it with your fingers. It should not budge!
Step 13 – Secure the battens to the roof
Note: this part takes 2 people.
Place 6mm bolts through the respective holes on the battens and align them with the riv nuts on the roof beams.
Use bolts with a countersunk head in order to achieve a smooth, flush finish – perfect for attaching plywood panels to create a modern and sleek campervan ceiling.
One person will firmly press the batten against the roof whilst the other screws the bolt in.
Once both bolts are loosely in you can stop pressing up on the batten and tighten the bolt with a screwdriver. The battens will follow the curve of the roof and will also be extremely strong.
There is no need for more than 2 riv nuts as the batten won’t budge, however, you may wish to add a couple of self-tapping screws if you don’t feel satisfied…. belt and braces!
If you do not own a rivet nut gun, self-tapping screws would suffice. However, you may need to do more, we recommend no less than 4.
Cladding
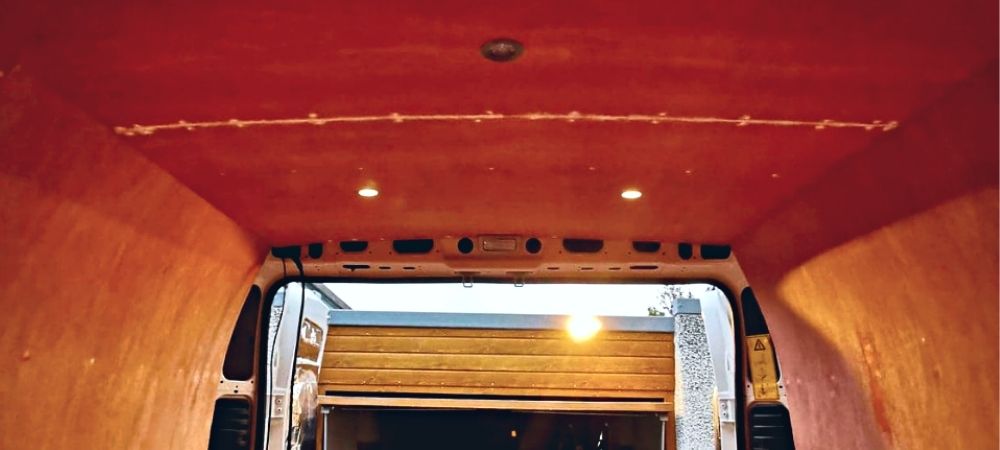
We used plywood to clad the ceiling of our campervan as we think it creates a beautiful, modern, smooth finish that really accentuates the curves of the van. However, there are plenty of options available so you may choose to go down a different path!
However, if you are using plywood, the steps below detail how to put it up.
Note: the walls must be erected prior to securing the plywood to the roof.
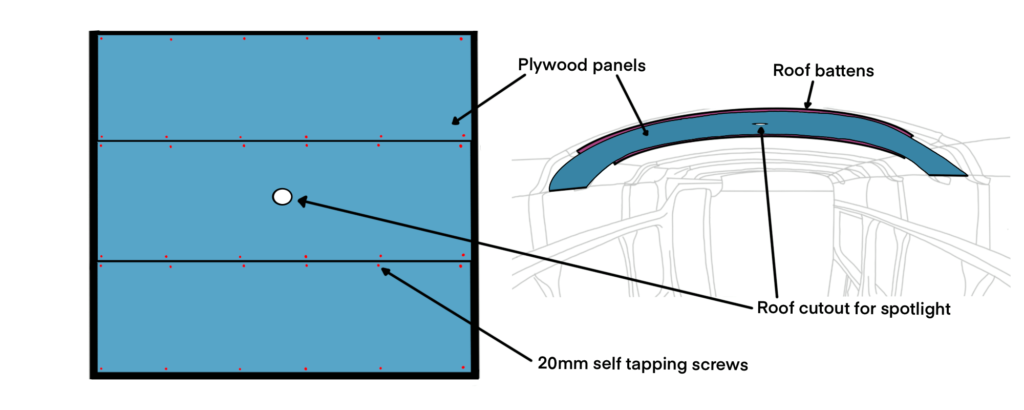
Step 14 – Measure and cut plywood panels to size
The plywood panels will span the distance from the centre of one batten to the centre of the next batten – this will give you 35mm on each batten to screw the panel to the roof. The width of the van should remain constant throughout the van, however, it is worth double-checking. We noticed there was some variation in the width of our van! You may even wish to use a curve template tool that you can make to account for areas of the van that jut or are somewhat irregular. Find out how to make it below.
How to Create a Curve Template
If you are using spotlights, cut holes in the plywood where you want your light to be. We recommend a row of spotlights down the centre of your campervan’s ceiling. Make sure the wiring for the lighting can be accessed through the holes once the plywood panels are secure.
Note: make sure you account for the curve in the roof when measuring. The panels will not simply be the width of the van.
Step 15 – Secure the plywood panels to the ceilng of your campervan
Note: this step takes a minimum of 2 people. One person will hold the panel firmly in position, the other will secure it in place.
Lift the panel into position. When installing a ceiling in a campervan we recommend starting at the back of the van (next to the back doors) and pressing the panel firmly against the metal body of the van. The panel should extend to the midpoint of the next beam. If cut to size correctly, the panel should span the entire width of the van. If however, it is slightly too small, position the panel centrally. You can caulk the joins, or cover with a piece of trim.
Once you are satisfied with the position of the panel, begin screwing it into the roof using 20mm self-tapping screws.
You may wish to drill pilot holes, however, this is not essential.
Use 6 screws along each edge of the plywood, making sure to bite into the roof batten that was installed in Step 13.
Once the panel is secured, you can give your arms a rest from holding up the panel.
Methodically remove one screw, countersink the wood and replace the screw for a much cleaner finish.
Step 16 – Caulk and Paint
Now that the plywood is in place it is time to spruce it up.
Caulk over the screws, along the joins of the panels, and around the edges where a gap may have appeared. Leave it to dry overnight and paint the wood. We recommend white, or a similarly light colour to allow light to bounce around the van.
Conclusion
By following this guide you will have a strong, lightweight, and sleek ceiling in your campervan. Not only does this ceiling design compliment the curve of the campervan’s roof it also looks timeless and will be something that never goes out of style.
Next step: Lights, overhead cabinets
Feel free to ask us questions regarding the campervan’s ceiling, whether it is about materials, price, time, or whatever else. You can always find us in the comments.
If you liked this post, pin it - pretty please




These are amazing tips and guide lines. One who wants to replace the roof must follow these steps of installing it but I never go for re installing my rv roof. I have a better option that gives me a new roof for a fraction of cost with a proven alternative to roof replacement and that is the use of the best RV Roof Magic that has unbeatable features that no other sealant can compare with. RV Roof Magic is the best solvent based sealant used for all kinds of RV roofing problems giving a hard, waterproof, finished and aesthetically pleasing look.
Hey, thanks or the information really big help. I would love to know what paint or stain yous used on the ply for the beautiful Red/orange colour?
Hi there,
That was just the natural colour of the plywood we used!