
Instructions
Step 1 – Choose your DC/DC Charger
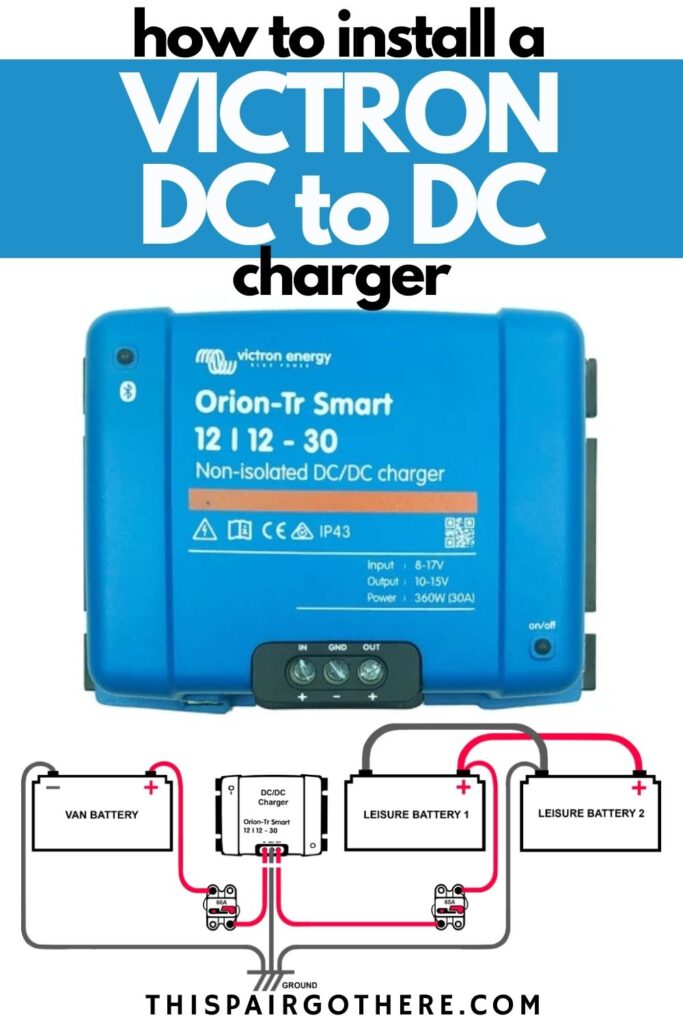
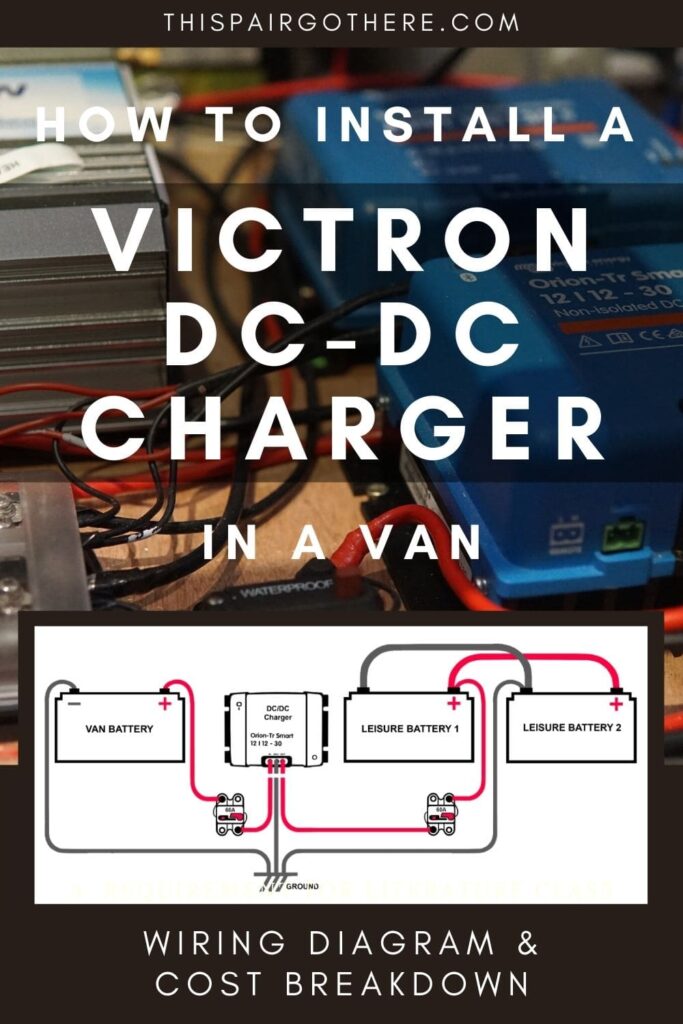
There are lots of different DC/DC chargers on the market to choose from. We opted for the Victron Orion-Tr Smart DC-DC Charger Non-Isolated
We felt that it was the best value for money. One of the main reasons we picked it was that we loved how it (along with a lot of Victron’s other products) had Bluetooth capabilities. This means you can easily check on the status of charging through an app on your phone. This gets rid of the need for unsightly monitors dotted all over your van.

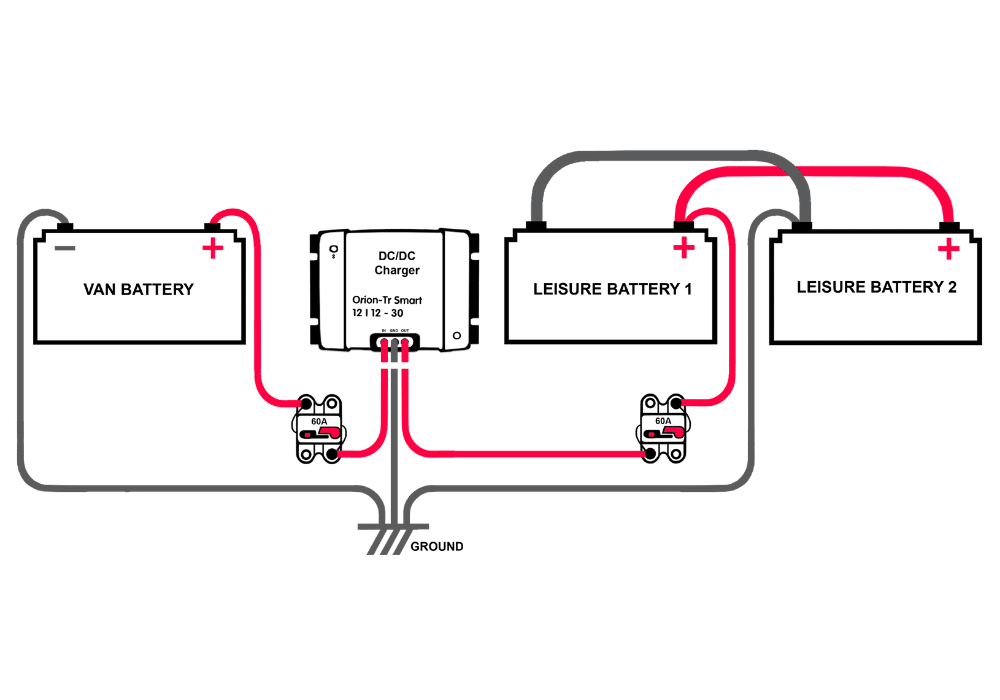
Wiring the leisure batteries in parallel means double the current – 2 x 150Ahr batteries in parallel equates to 300Ahr capacity.
Our vans battery, like almost every vehicle, has a voltage of 12V DC. We have wired our 2x 12V leisure batteries in parallel, giving an overall circuit voltage of 12V (would be 24V if wired in series)./ This means the 12/12 30A non-isolated charger works perfectly for our electrical set up. The charger connects the 12V car battery to the 12V leisure batteries circuit with an output of 30A. If you are using a non-isolated charger it is very important you have a good ground point in you van to connect both batteries to. We used a large bolt going through the metal bodywork as our ground point.
Step 2 – Access The Vans Battery
If you are converting either a Citroen Relay, Fiat Ducato, or Peugeot boxer; you can access the battery via a hatch on the floor at the passenger side of the cab. Simply undo the fastenings and lift the hatch off. Your battery should look something like this:
For other models of vans, your manual should show you how to access the battery.
Step 3 – CREATE A PASSAGE THROUGH THE BULKHEAD TO ALLOW WIRES TO BE PASSED THROUGH
If you do not have a bulkhead in your van skip this step. This step is super easy. Simply drill 2 holes in the bulkhead near the bottom, large enough to feed your wires through (we used 10mm single core wire). When choosing the position to drill make sure to take into account the difference in height between the floor in the back of the van and the cab – we found that there was a difference of 4″- 6″. When drilling, don’t be surprised if the drill acts a bit strange going through the carpet lined side. You can poke the carpet out of the way when you feed the wires through.
Step 4 – Feed wires Through cab/bulkhead
Firstly, prior to feeding the wires through the bulkhead, add cable lugs onto one end of the positive and negative wires. This end of the wire will remain in the cab and eventually be connected to the vans battery. By attaching cable lugs it makes it easier and safer to connect wires to the battery. Simply strip the end of the wire, place it into the lug, and crimp it. We used a spring-loaded crimping tool which you hammer.
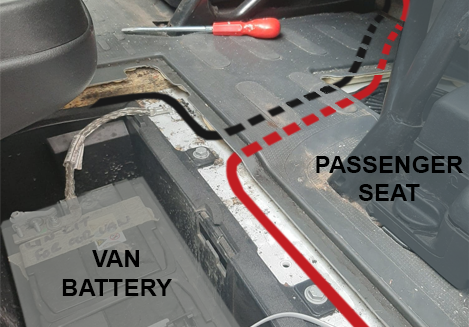
Feed the ends of the wires without the lugs under the plastic flooring in the cab, this will make the wires as discreet as possible. Once you have fed the wires to the back of the cab, begin to feed them through the holes you have drilled. The images below shows where you can feed the wires to keep them hidden.
Leave enough of the cable to connect to the vans battery, however, the less excess the better.
Step 5 – Connect The Wires to DC/DC Charger
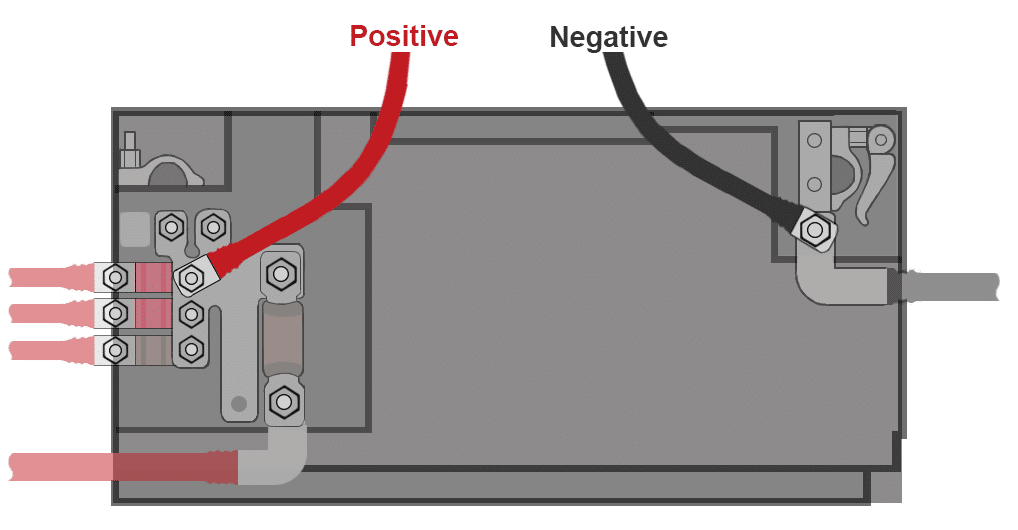
Make sure to take the negative wires from both the van battery and the leisure batteries and secure them to a good ground point. If you are unsure whether or not you have a good ground point we would recommend reading this article. We found it very useful!
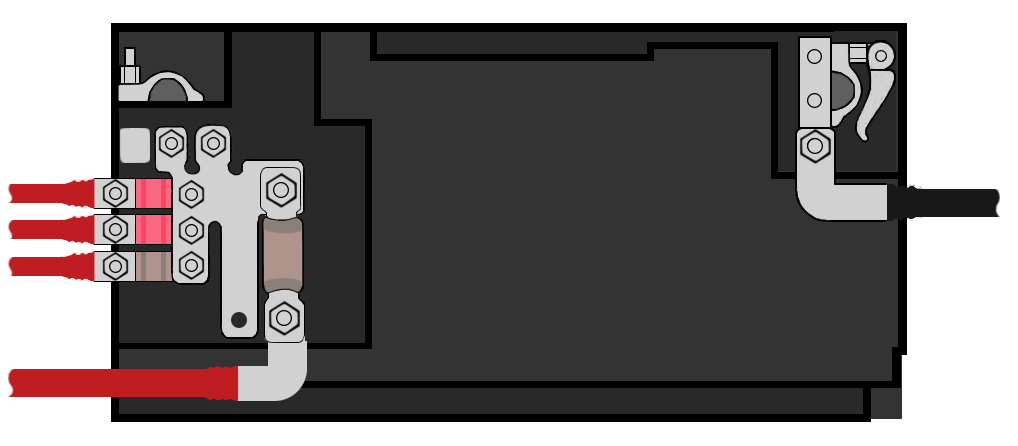
The wiring part of installing a DC/DC Charger is really easy. Simply strip the end of each wire and push into the correct port of the charger. Once the wires are pushed all the way in, tighten the screws on the charger to secure them firmly in place.
The diagram below shows you exactly where each wires should go when wiring up the DC/DC charger. We used 10mm single core wire throughout the circuit.
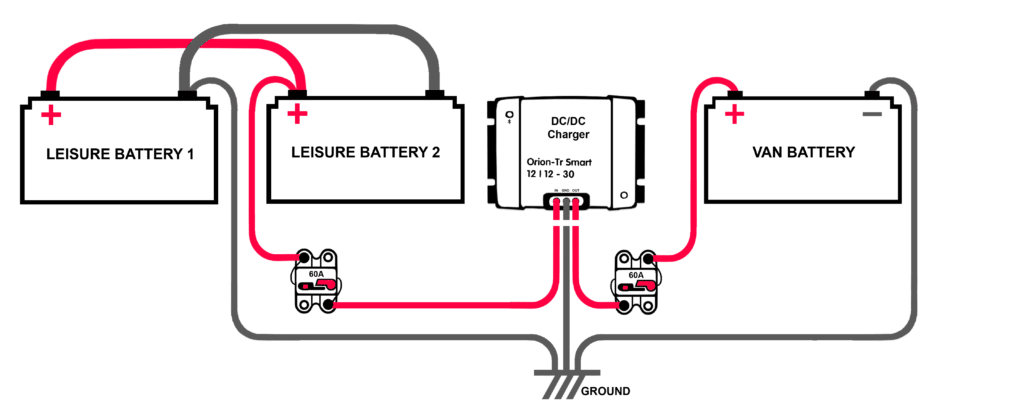
Add some circuit breakers to your circuit. We used two 60A circuit breakers to protect the batteries against a surge in current. A circuit breaker is an automatic switch that protects the circuit from an overload of current. As soon as the current exceeds the limit, the switch trips the circuit interrupting the flow of current. Unlike a fuse, the benefit of using a circuit breaker is that it can be easily reset.
Step 6 – Connect Wires To Van Battery
Below is a general diagram on how to connect the wires to the vans battery. Be very careful when doing anything with the vans battery as you don’t want to mess with how it works. Make sure to screw the lugs on tight. We found that when the connection wasn’t tight enough it messed with our wipers.
Make sure to connect the positive and negative wires to the correct side of the battery. Using red and black wires makes this easy. Another thing to note is that the vans alternator plays a major role in the operation of the DC/DC charger. This is what charges the vans battery – and everything else for that matter. We have not included the alternator in the wiring diagram as your vans battery is already wired up to it.
Conclusion
Installing a DC/DC charger makes a great addition to any camper van. The more ways of generating power in a van the better – especially if you intend on spending time off-grid. The installation is really easy and shouldn’t cause you too much bother
Feel free to ask us questions regarding installing the DC/DC charger, whether it is about materials, price, time, or whatever else. You can always find us in the comments.
Next Steps: Installing a shore power hook up
18 Responses
I’ve seen DC to DC chargers connected to the alternator as well as directly to the starting battery. Is there really any difference? Seems much simpler to just go directly to the battery.
Can you explain why the dcdc charger wiring needs to be split from
Dcdc positive to one battery
And
Dcdc negative to another battery?
Why cant you just connect dcdc charger pos/neg to one battery, given that it is already in parallel?
David,
The reason for doing this is to ensure that both leisure batteries are loaded equally when drawing power from them. We’re this not the case, the battery to which the leads were DIRECTLY connected would be providing more power (caused by the volt drops in the inter-battery cables).
In passing, this ‘dual’ approach should also be used for charging in solar installations.
Bonjour je voudrais savoir quel différence entre orion smart 12/12/30A isolé et pas isolé Merci pour votre réponse cordialement Mr Bacciochi Daniel
Hi , I’m trying to work out how to connect my 240v hook up to my solar. My sockets and fridge are on my 240v hook up but want them to work from my solar as well . Any clues ? .
Hi there, I am a little confused as to what you are asking.
A DC-DC charger is a method of charging your leisure batteries, not necessarily directly powering your appliances. If you wish to use your 240V sockets/fridge when not hooked up you will typically require an inverter to convert the 12V supply from your batteries into 240V.
I hope this helps, if you have any more questions, please don’t hesitate to ask.
when hooking the van on EHU will it charge the van battery through the DC to DC charger
Do you need to disconnect your existing split charge relay system for charging the leisure batteries or can the two systems work in tandem?
The two systems work in tandem, dont mess with your vehicle’s split charge. Simply connect the DC-DC charger to the vehicle battery and it should do all the work. 🙂
Hi, great article, and seen I was about to be charged €160 in labour alone to fit one of these I think I will have a go. I was advised I would need a 60a DC to DC charger by Renogy, but you fitted a 30a, what made you choose just a 30a charger?
Hi Martin,
There were a few reasons we opted for the 30A charger. We wanted to have a victron charger as our other electronic components are also victron – we like that it is bluetooth compatible so we can check its status on our phones. 30A is the highest the victron charger goes up to. We have found that it works really well for us (2 x 150Ah lithium leisure batteries). It is difficult to say whether this setup would suit you but if your electrical system is similar to ours, 30A works perfectly!
Hope this helps! 🙂
Hi,
How far do you need to drive to actually benefit from a DC-DC charger? When we go away, we probably won’t do much driving once we’re there and I get the impression that you actually need to drive quite a while to get an any benefit – so it’d charge on the way there and on the way back but potentially not generate much at all while we stay in a local area?
To be honest, we are not 100% sure as we generally are charging off of solar simultaneously. However, typically, we have found that to see the benefit of it, you need to drive for about 1 hour… or just leave the engine running!
It not hard to calculate. If you drive one hour and assuming that board batterys are not full (therefore charging) you will get 30Ah or a bit less.
Hi!
Would it be possible to ground the DC/DC charger to the van body and not run two cables from the starting battery?
Kind regards
Mattis
Yes, The starting battery should already be grounded so running a cable to ground it elsewhere is not actually necessary. Thanks 🙂
Thanks for the awesome overview. Very well laid out and easy to process 🙂
I believe I understand the layout, but I had the same question. I believe they were asking if you could ground the leisure batteries much closer to the leisure battery installation location instead of running both positive and negative wires to the van battery compartment shown in your photo in step 4. You show this layout in the overview diagram show in step 5.
So I guess I am wondering can I run it like this? (hopefully this formats well);
Positive Wire(long like 15ft or 4-5M):
[Van Battery (positive terminal)] —(4awg)—[60A Circuit Breaker]—(4awg)—[DC/DC Charger positive input]—(4awg)—[60A Circuit Breaker]—(4awg)—[Lithium 100A (positive terminal)]
Ground Wire(#1)(short like 5ft or 1-2M):
[Van Chassis (thick metal with paint removed)]—(6awg)—[DC/DC Charger (negative input)]
Ground Wire(#2):
[DC/DC Charger (negative output)]—(6awg)—[Lithium 100A (negative terminal)]
Hi Justin,
Yes it is totally possible to ground the DC-DC charger like this.
We just chose to ground at our starting battery as it was simple enough for us to run 2 wires at the same time.