Step 1 – Create a layout
There are several things you will want to consider when creating a false floor:
- How much height do you feel you can sacrifice?
- How much storage do you need?
- What do you intend on storing under the false floor?
By answering these questions you will be able to create a garage layout that works best for you.
The main factors you need to account for are the depth of the storage below and spacing of battens to support the false floor.
The battens should be spaced at regular intervals. See diagram below for recommended layout.

For reference there is 70 mm under our false floor. This was predominantly dictated by the height of the pull out picnic benches. We also have 2 drawers that are adequate for our storage needs. This height was also dictated by the battens we were able to find in B&Q.
Step 2 – Insert supporting battens
Place battens in a position that will support the ply floor. We recommend using 18x70mm battens. This can be altered to suit the height of floor you desire.
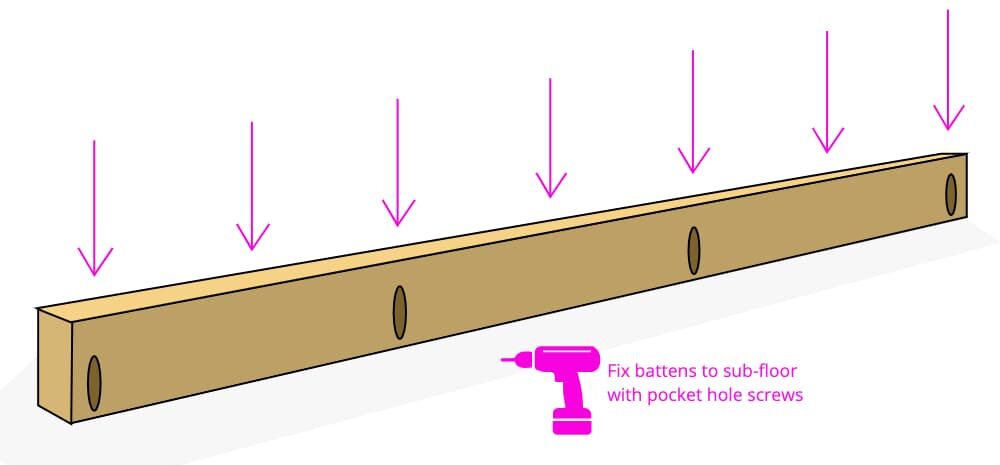
Attach these to the sub-floor using pocket hole screws; be sure to add pocket holes to both sides of the batten to keep it stable. This will provide a strong connection and leaves the top of the battens free from any screws.
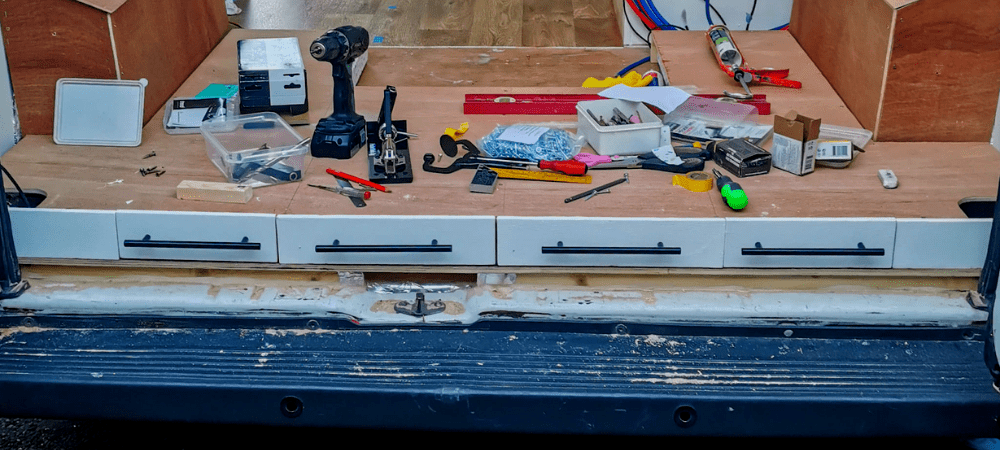
Step 3 – Create drawers / benches
Measure the spaces between the supporting battens and create drawers to fit the areas.
We recommend simple boxes that slide on the ply surface opposed to using drawer runners. The main benefit of this is keeping costs down. It also means you don’t lose precious storage space to account for the width of the drawer slides. These drawers are not intended to hold heavy objects, they are designed for storing smaller items that would otherwise get lost in the garage space.
To create simple drawers we used 18x45mm battens to create the front and sizes of the sliding box. We then used a 18x60mm batten for the back panel. This will support the drawer when extended and will stop it from tilting down and tipping out. Crontruct the drawer shape using wood glue and some self tapping screws. Cut 5mm ply to the size / shape of the base of the drawer then secure it to the battens using self tapping screws. Make sure that the screws are countersunk so that the base slides smoothly along the plywood below it.
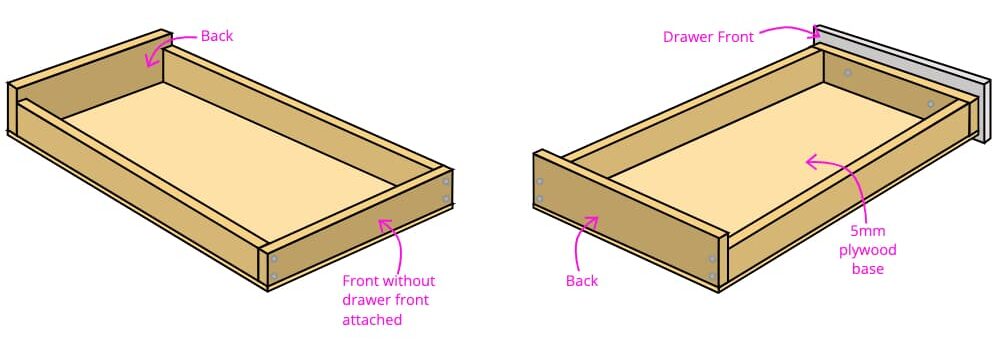
Create a drawer front to attach to the front panel using 9mm ply cut to size. This will be attached using self tapping screws from the inside. You may wish to hammer in a few nails for extra reinforcement.
However, if you want something a little different, we recommend using some of the space beneath the false floor for pull out picnic benches.
Step 4 – Create a template of the area that will become the false floor
Once the supporting battens are in place and the space between them has been accounted for its time to install the false floor.
We recommend using 9mm ply or thicker. Anything less than that will not be rigid enough to support any weight and may sag which will affect the usability of the drawers ect.
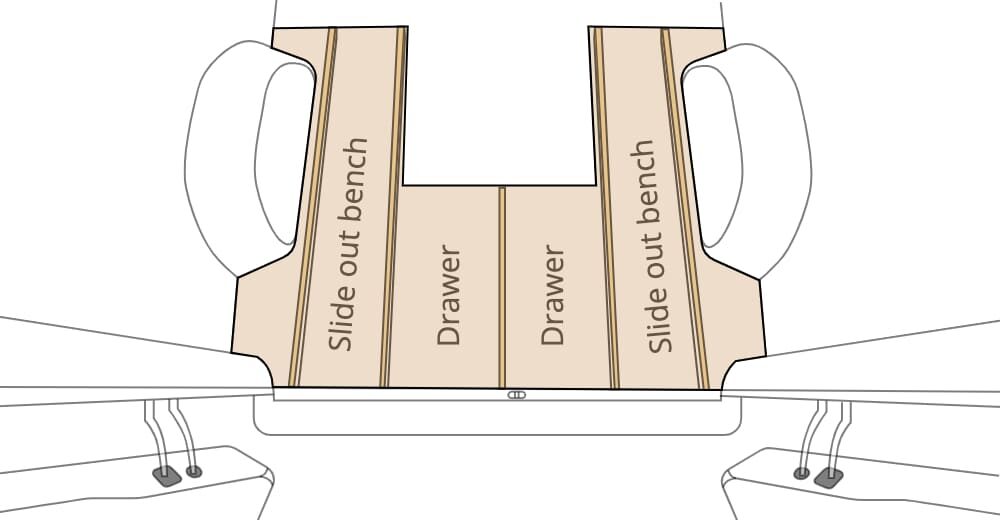
The above diagram shows the shape of the false floor we installed in our van with annotations showing what is under the false floor.
Create a template of area and trace it onto the plywood. Or measure the area out and transfer the measurements onto the plywood.
To find out how to create an easy template for any shape click here.
Step 5 – Cut the false floor to size
Use a jigsaw to follow the lines transfered onto the plywood in the previous step. Accuracy is key in this step as you want your floor to span the entire width of the van so nothing can fall into the area below the floor and get lost.
Step 6 – Secure the false floor
Once you are happy with the placement of the DIY false floor in your van you are ready to attach it to the battens. Mark on the plywood false floor where the battens underneath are positioned. This will make it easier to know where to fix down the plywood.
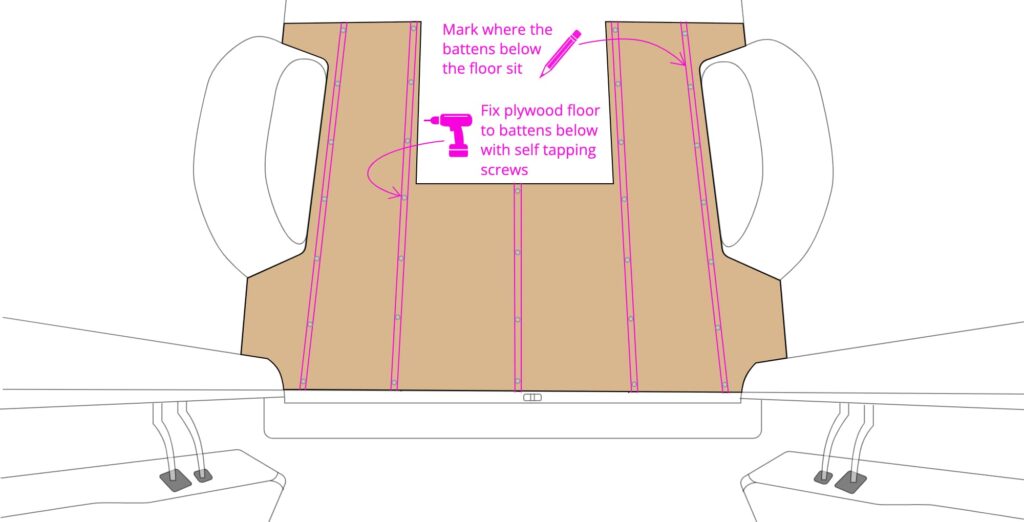
Use 20mm self taping screws to secure the floor to the fixed battens below. These should be spaced at regular 200mm intervals. Countersink the screws to provide a smooth surface for your choice of flooring to lay on top.
Step 7 – Cover the plywood (optional)
Finish your masterpiece by covering it. Anything can be used- vinyl flooring, laminate flooring, rubber, or whatever!
You may wish to consider using something that is extremely durable and water resistant.
You may also be content with the finish with the plywood. However, we would recommend treating it with something to make it more water resistant and durable.
We used vinyl flooring to match the rest of our van.
Conclusion
We think creating a DIY false floor in a van is a no brainer. It creates well organised storage for smaller items that would otherwise get lost in a garage. It is perfect for tools, hoses, tyre chains or even camping chairs!
For more posts about how to incorporate clever storage solutions into your van build check out these related posts