
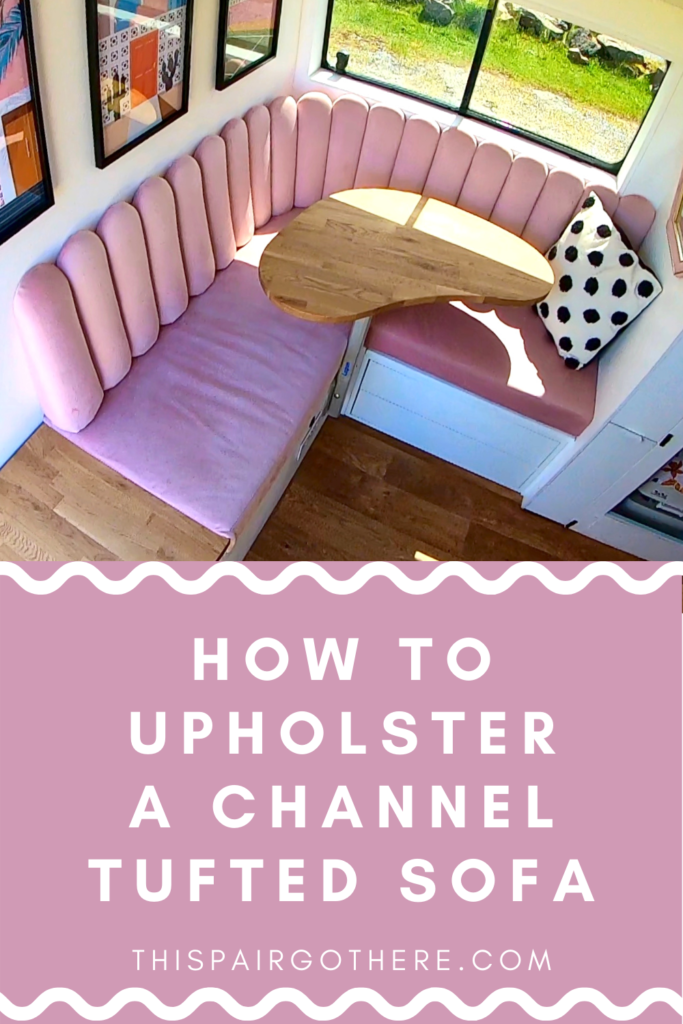
Step 1 – Plan Out Shape / Dimensions
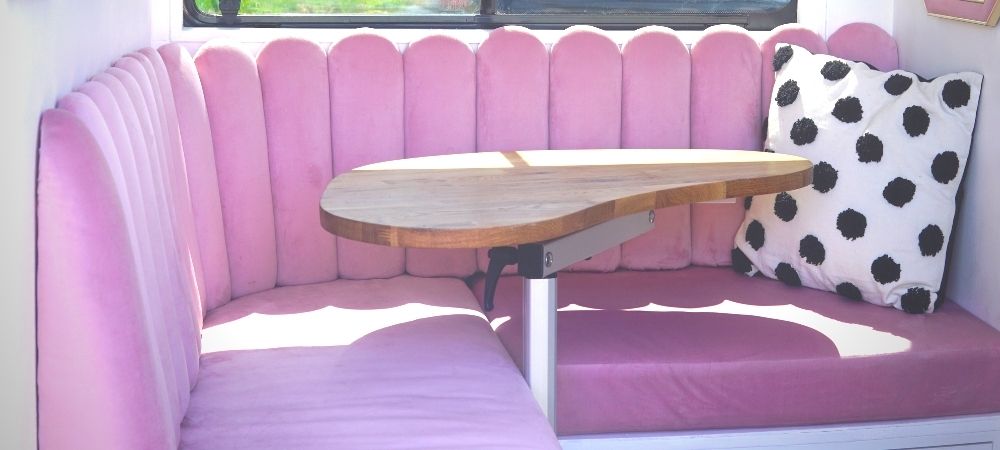
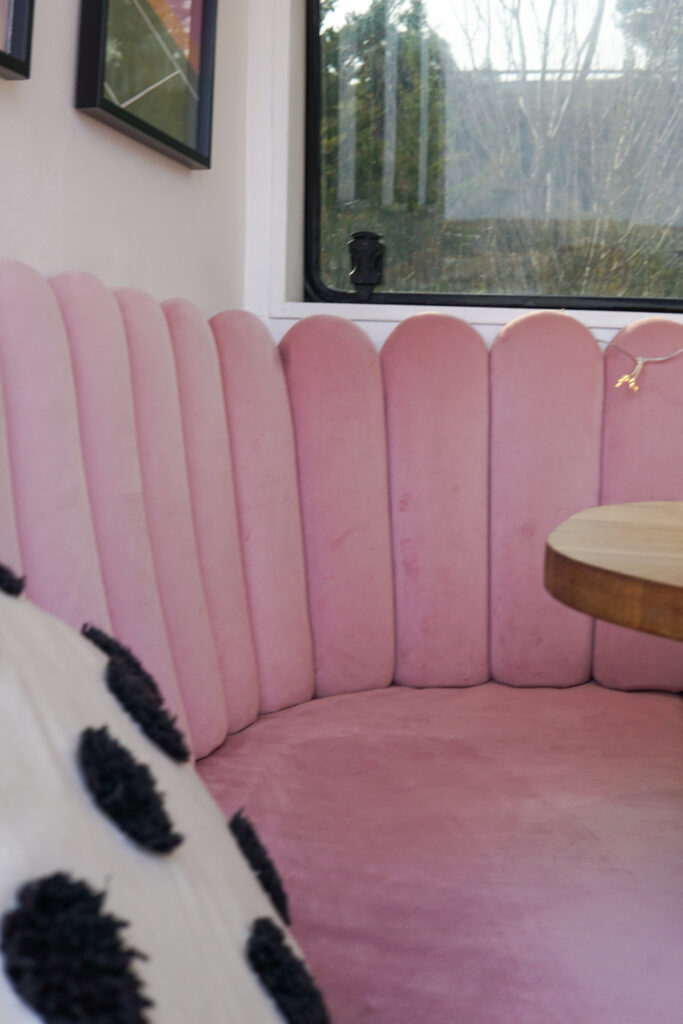
The great thing about creating your own sofa is you can customise your sizes so that it fits the space perfectly. A few things to note about the back of our sofa – it is angled backward slightly to make it a more comfortable/relaxing position and it has a curved corner. These things are not essential but we included them to make our sofa extra comfy. The angled back specifically makes calculating the dimensions a bit more difficult.
Begin by measuring the space for your custom sofa. If you are curving the corner and also angling the sofa for comfort, the corner channels will have to be tapered towards the bottom.
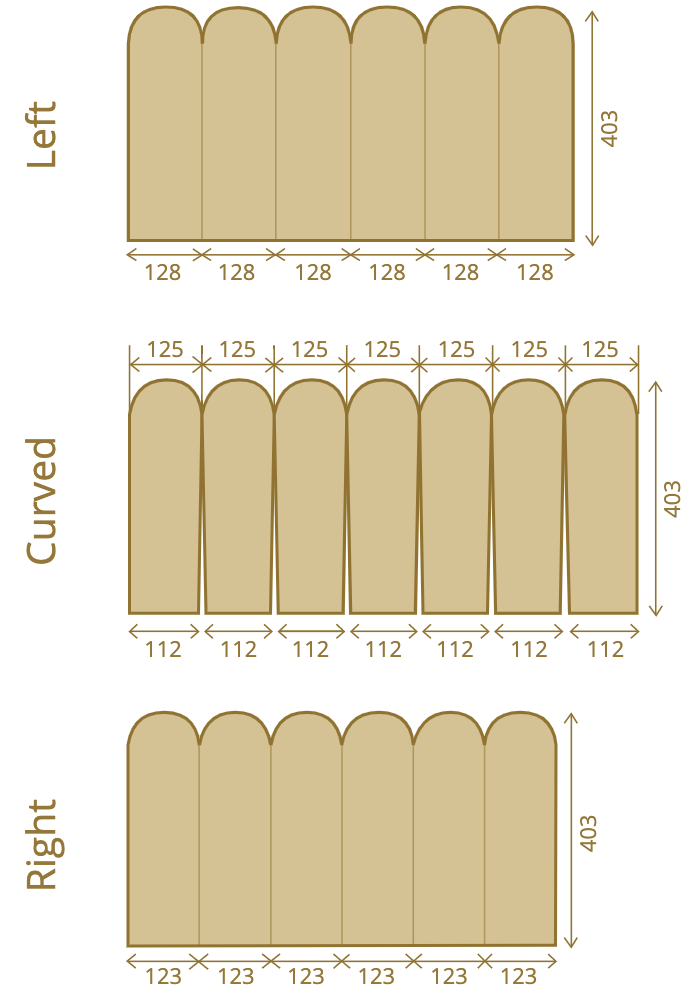
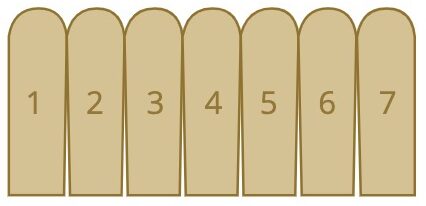
Separate the back of your DIY mid century modern sofa into manageable sections. We have 2 straight sections (left and right) as well as the curved corner section. Measure the length of a straight section of sofa back and divide it by the number of scallops you wish to have to figure out your scallop width. If each section of your sofa is a different length don’t worry about the scallops varying in width too much. Our right-hand scallops are 5mm narrower and it’s not noticeable at all!
For planning the curved section think of it with angles. We chose to have 7 scallops in the corner. Therefore calculated the angles accordingly as shown in the diagram below.
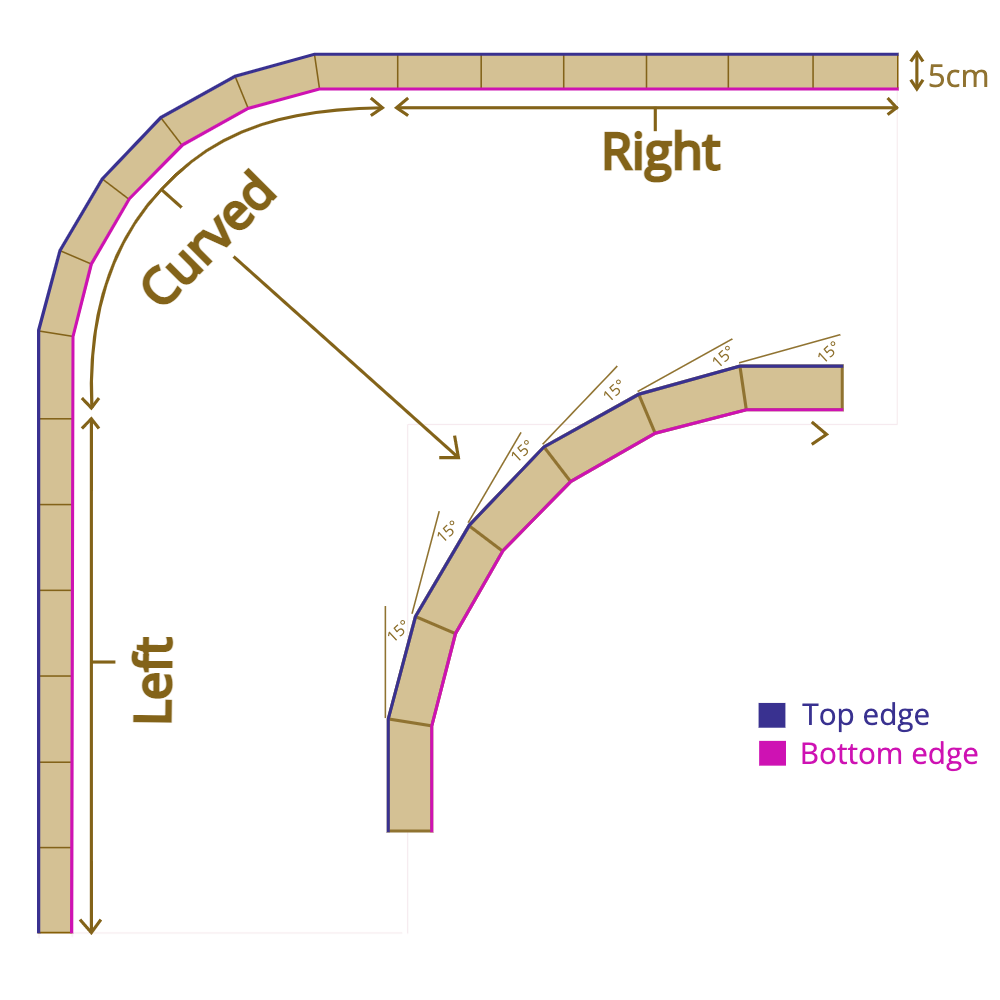
As you can see from the diagram above, the bottom edge is shorter than the top to account for the curve. By using your sizes/angles you can calculate the size of the bottom of your scallop compared to the top. This will give you your tapered shape dimensions for your DIY mid century modern sofa. For reference, the below diagram shows all of the dimensions of our scallops.
Step 2 – Gather Materials
Fabric
When choosing the fabric for your seat there are a few things to consider including; price, style, and durability. For more details on what to look for when choosing an upholstery fabric check out this post about sewing a seat cushion. We opted for a pink velvet upholstery fabric for our DIY sofa as velvet is a typical material used during the mid century modern era. This fabric is durable, easy to clean, and above all else cute!
Foam
For the back of your seat, the depth of the foam is not that important, as long as it provides a decent amount of comfort. Ideally, you want to purchase a foam that is around 50mm in depth. You can change the depth depending on how wide you are creating your tufted channels to achieve the best look. For reference, our foam was 75mm thick and our scallops were roughly 125mm wide.
We picked up 2 sheets of foam from Dunelm Mill and they worked very well for us.
Batting
Using batting in your sofa is the key to making it look as smooth and seamless as possible. It will bulk out the back of your sofa making it look more professional. We purchased our batting on eBay. It was good quality, reasonably thick, and worked like a charm.
Board
The back of the sofa is constructed by stapling the fabric taut over a backing board. We used 4mm thick rigid board.
You can use any board/sheet which is easy to cut to the right shape and is also relatively lightweight (as you want to keep the weight of your van as low as possible). Here are some recommendations:
Cardboard
Using thin straight pieces of cardboard when upholstering can really elevate its finish and make it look more professional. They are vital for getting a neat edge when using a staple gun. These cardboard pieces can really be anything as long as it’s cut nice and straight. We would recommend cutting 2cm wide strips from old cereal boxes. Each scallop will need two cardboard strips.
Step 3 – Cut Backing Board
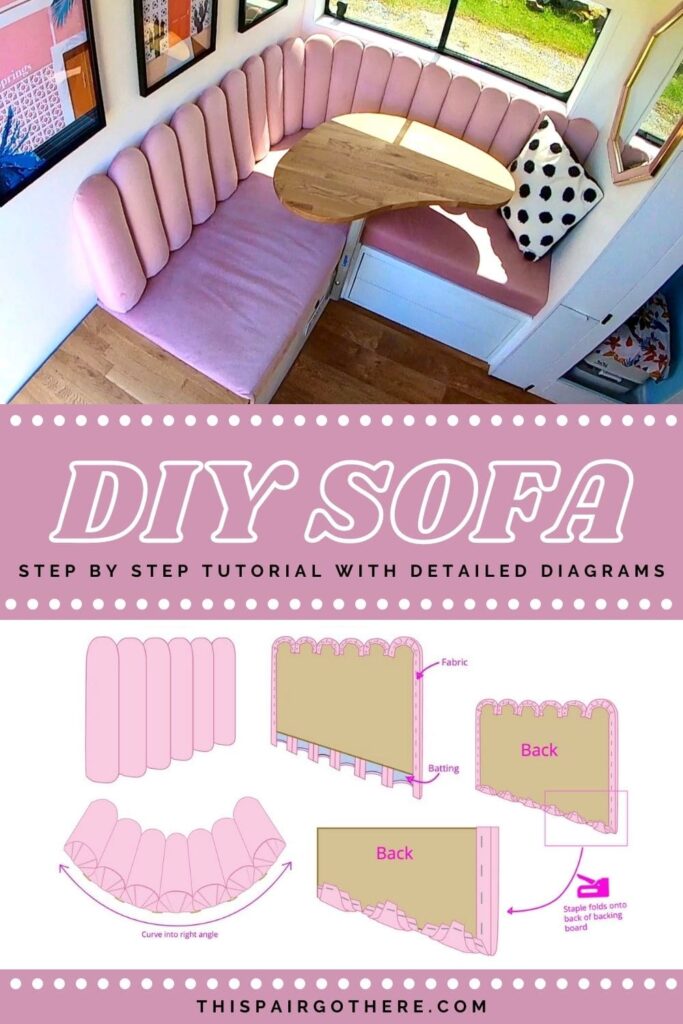
Measure and draw out your desired design of your DIY mid century modern sofa onto your backing board. It is pretty important that this is done as accurately as possible to achieve the best results. As always, measure twice before cutting. Depending on what material you have selected, you may be able to use a Stanley knife to cut it, or if you have opted for something thicker a fine blade on a jigsaw can also work well. Just make sure to take your time when cutting your scalloped shapes. For straight sections cut around the perimeter of the shape. For the curved sections cut out each scallop piece individually. The diagram in step 1 shows the exact shapes we cut out to create our sofa.
Step 4 – Cut Foam
The foam pieces should be approximately 1cm larger than the shape/size of your scallop/channel. Draw out the scalloped shapes directly onto your foam block. We found it easiest to make a template of the shape to trace around and cut out multiple pieces. Using a bread knife, cut along your markings in a saw-like motion. When cutting different sized pieces make sure to label them up so you don’t lose track.
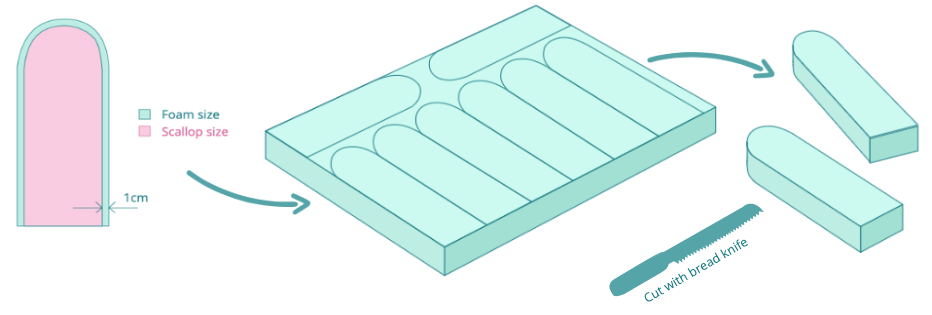
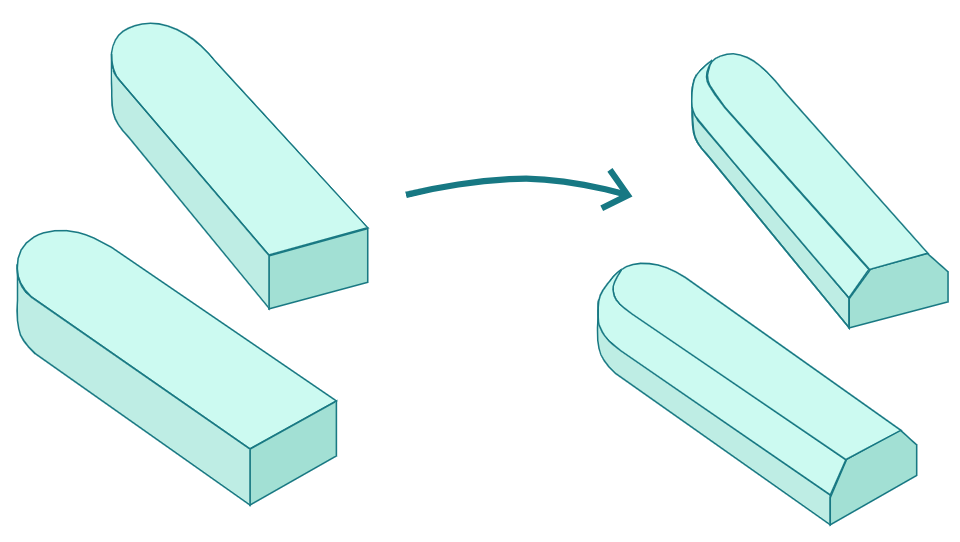
It can be difficult to achieve a smooth channel with the straight edges of the foam. This is why you need to shape the foam to mimic the round channel you are looking for. At a 45 degree angle trim the top edges of foam off in a saw like motion. It doesn’t have to be perfect, it just needs to be a little less square. The diagram below shows how it should look.
Step 5 – Cut Fabric / Batting
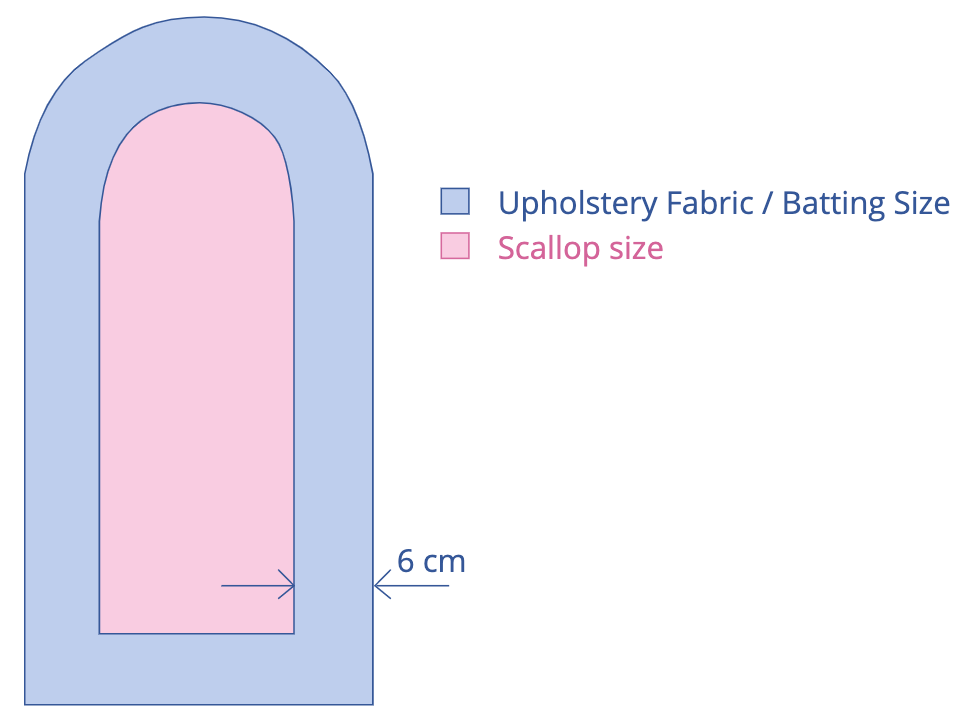
The fabric and batting for the DIY mid century modern sofa should both be significantly larger than the size of the scallop. This will make it easier to grab onto and pull tight when securing it into position. We found that adding approximately 6cm all the way round worked well. When cutting your fabric make sure that the grain is running in the same direction for all parts. This will be particularly noticeable if you are using a printed fabric or a fabric which lays smoother in one direction, like velvet.
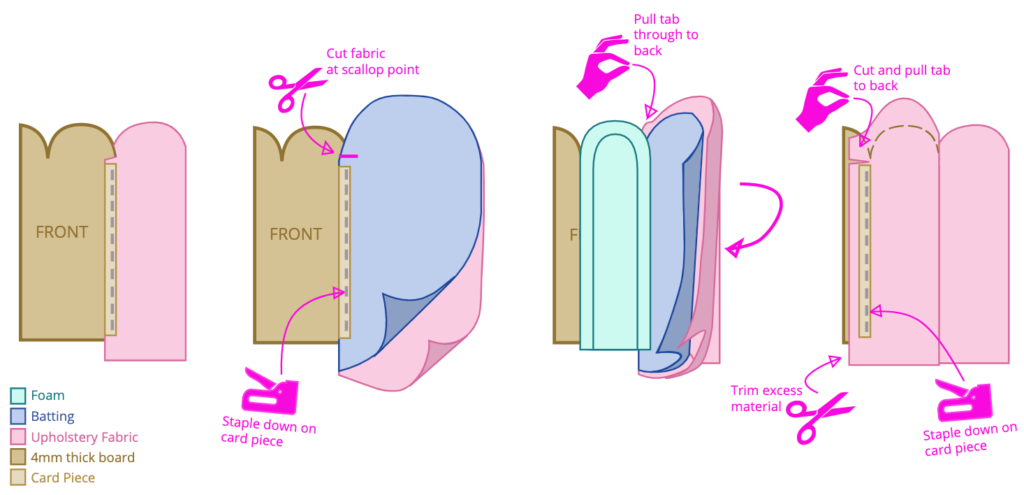
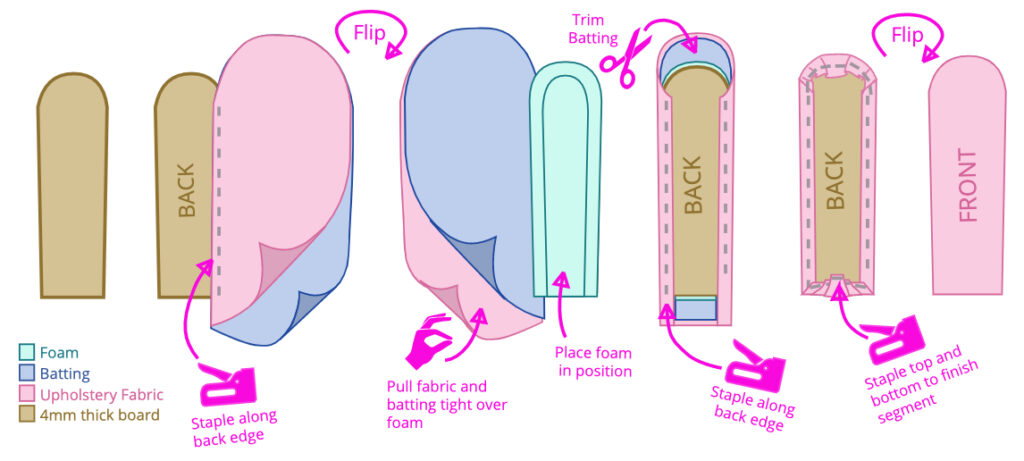
Step 6 – Attach First Scallop to Straight Section
Secure Back
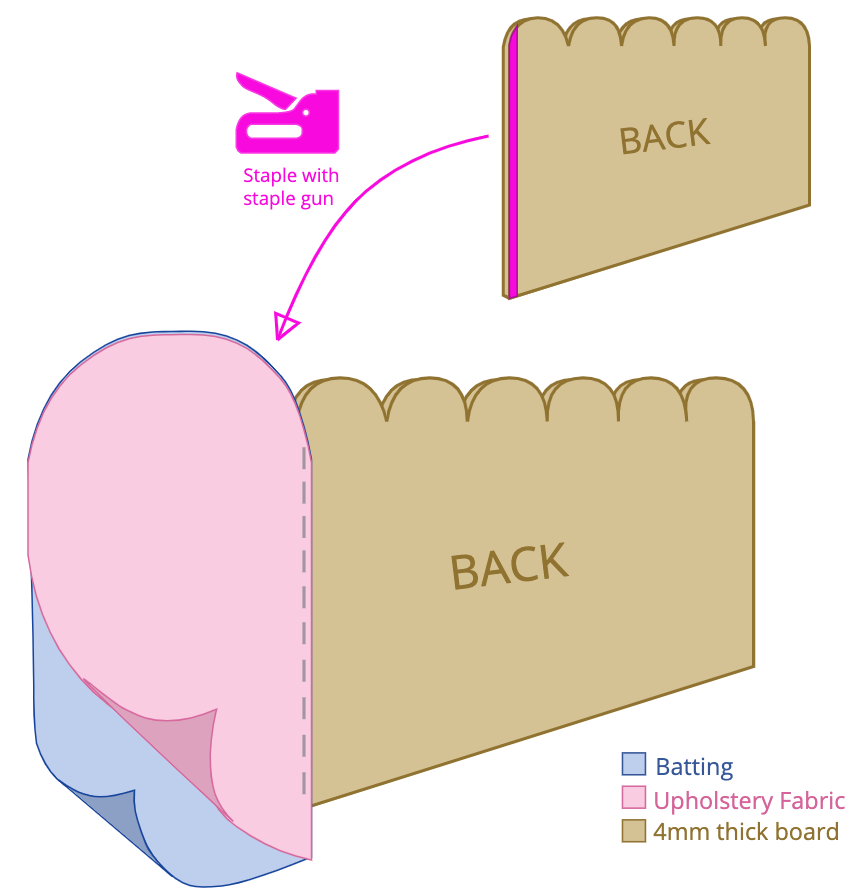
Flip the board around so the back is facing you. Take a piece of batting and a piece of fabric and lay it on top approximately 2 cm from the edge as shown in the below diagram. Make sure that the good side of your fabric is facing you. Then, using a staple gun, staple approximately 1cm in from the edge in a straight, neat line.
Attach Foam
Flip the board back around so it is facing you and place your first piece of foam into position. The foam should be a little bit bigger than your scallop. Stick the foam piece into place more securely by spraying it with adhesive before placing it into position. This is not essential but can help keep the foam in position when covering with fabric.
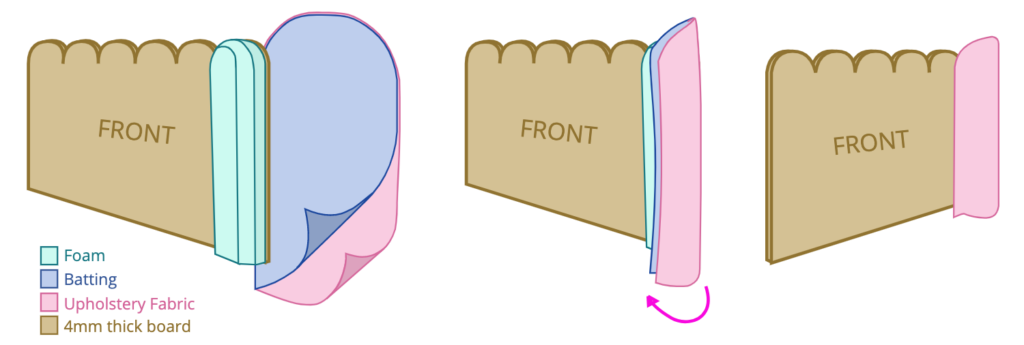
Fix To Front
Pull the fabric and batting tightly over the foam piece. It should squash the foam a bit and the curve of the scallop should look smooth. If it is not looking smooth – pull tighter.
When you are satisfied with the look/shape of your scallop, it is time to secure it into position. Take a thin strip of cardboard and place it on top of the fabric making sure to push it hard against the foam. Staple the card piece down with a staple gun. Make sure to press the nose of the staple gun against the foam. Don’t be stingy with the staples – use one every couple of centimeters. This DIY mid century modern sofa build takes a hell of a lot of staples! As you are stapling make sure the fabric is still pulled taught and the card is hard against the foam.
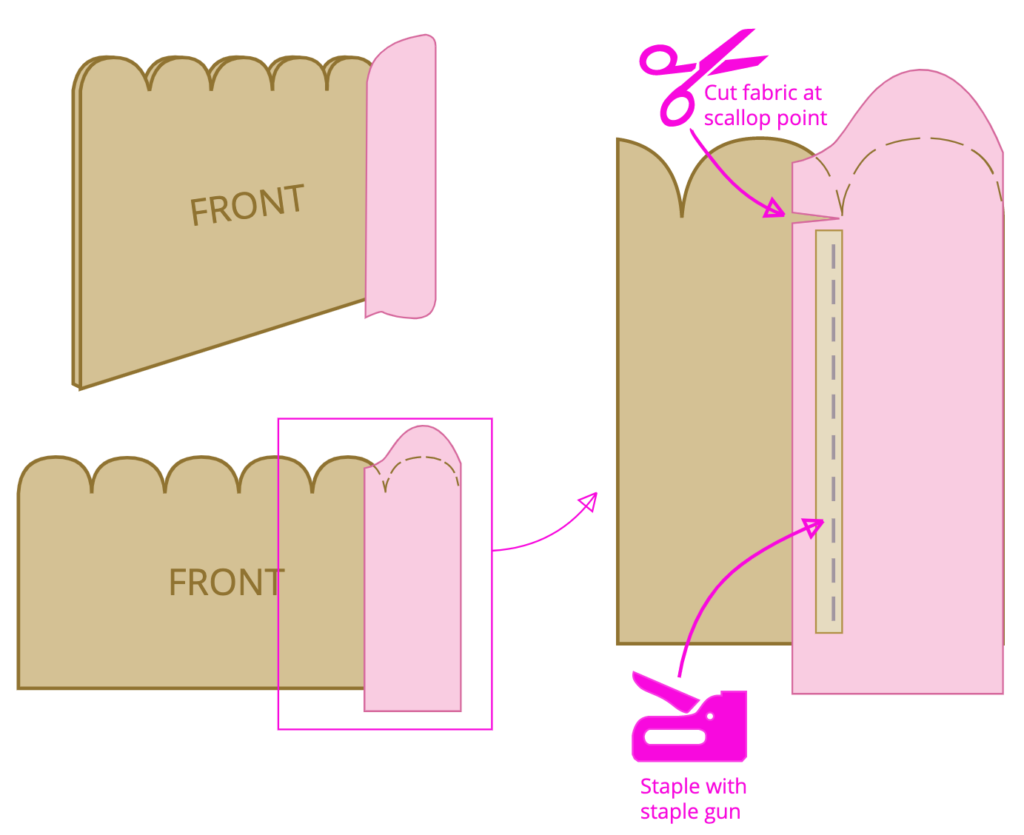
The staples and card piece should hold your channel in a neat smooth curve. If you have any lumps or bumps we suggest redoing the scallop as it will not improve and will be harder to fix later on. Practice makes perfect here. Making sure everything is held tight and smooth is a bit tricky but when you get into the swing of it is becomes second nature.
With it held in position cut the fabric at the point where 2 scallops meet. Try to cut it as neatly as possible as this makes finishing off the upholstering of the top of the curve easier.
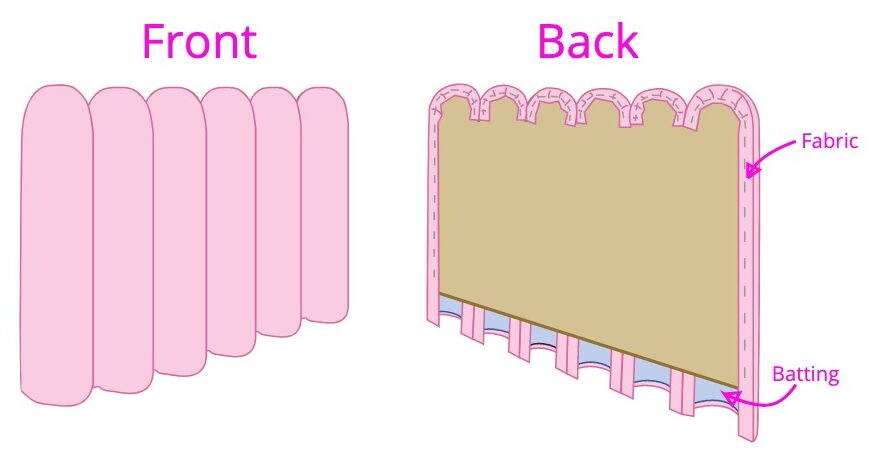
Step 7 – Upholster Top of Scallop Curve
Begin by pulling the tab you have created (by cutting the fabric) through to the back. Flip your board around so the back is facing you. There should be a semi-circle of fabric and batting showing at the top. Trim the batting so it is in line with where the board/foam meet. This doesn’t need to be perfect, the fabric will cover everything and smooth it out.
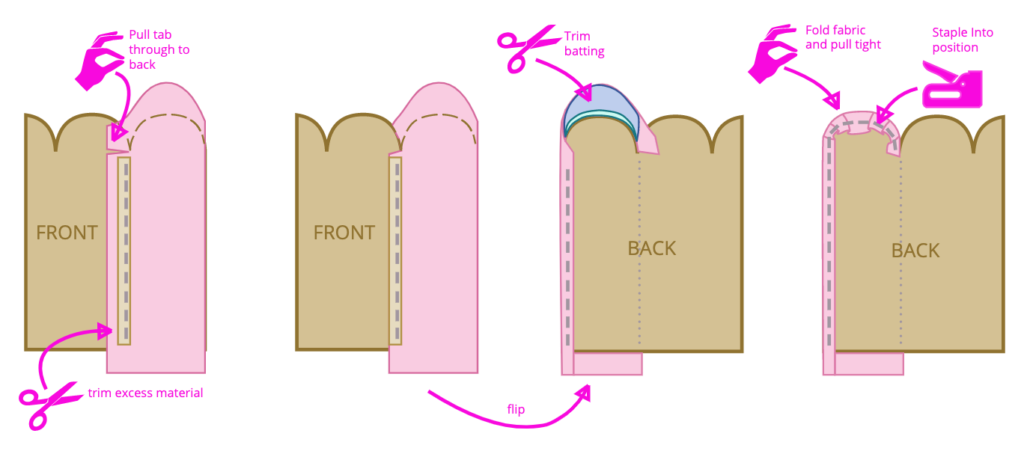
Pull the fabric tight over the top to the back of the board and then staple into place. There is no right order to pulling and bunching the fabric. The back doesn’t need to be too neat as it won’t be visible. Make sure that the fabric on top of the scallop is laying smooth and flat as this will be very obvious. The neater you lay it, the more professional your DIY mid century modern sofa will look! It should look something like the diagram above.
Step 8 – Add More Scallops
All of the middle scallops are fixed in a very similar way to the end/first scallop. The only difference is the way the fabric/batting is added. Lay the fabric with the good side facing down on top of the previous scallop. Take another piece of card and press it firmly against the previous scallop and staple it into position. Trim the fabric at the point where the scallops meet and pull the tab through to the back in the same way as the previous scallop was finished.
Place/glue the next foam piece in its position. Make sure that it follows the curve of the back panel just 1cm over the top. Again, make sure it is placed hard against the previous scallop – this will keep the lines between the scallops neat and even. Pull the fabric and batting taught over the foam and secure with staples in the exact same way as the previous scallop (Step 6). All of the middle scallops are created in the exact same fashion. After each scallop is secured in place, finish off the top of the scallop as shown in step 7.
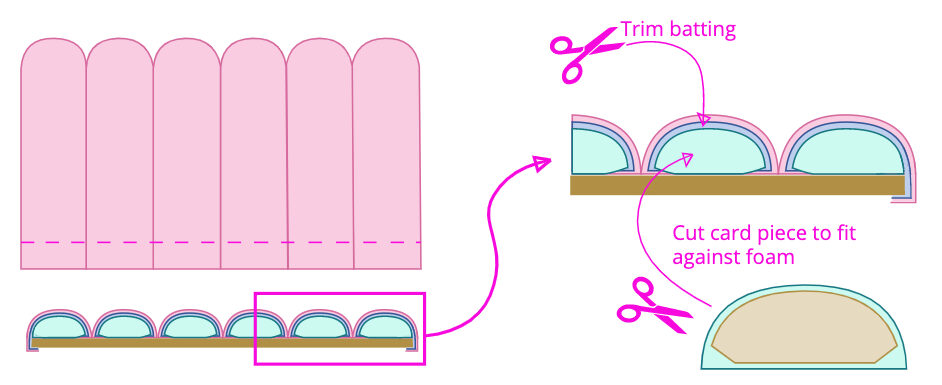
Step 9 – Upholster Bottom of Channel
Once you have finished upholstering the body of the channels and the top of your scallops you should have something which looks like the diagram below. There should be extra material and batting hanging down past the bottom of the board. In our case there was around 6 cm of excess fabric. This will be used to neatly finish the bottom of the scallop.
Look at the shape of your foam and cut a piece of cardboard in a similar shape – only a bit smaller than the foam. This does not have to be perfect by any means. The cardboard will just help the bottom keep in its rounded shape. The diagram below shows the cardboard piece you need to cut. Trim the batting so it will not fold past the foam onto the backing board. Again the trimming does not have to be accurate here – The bottom will be pretty hidden by the end.
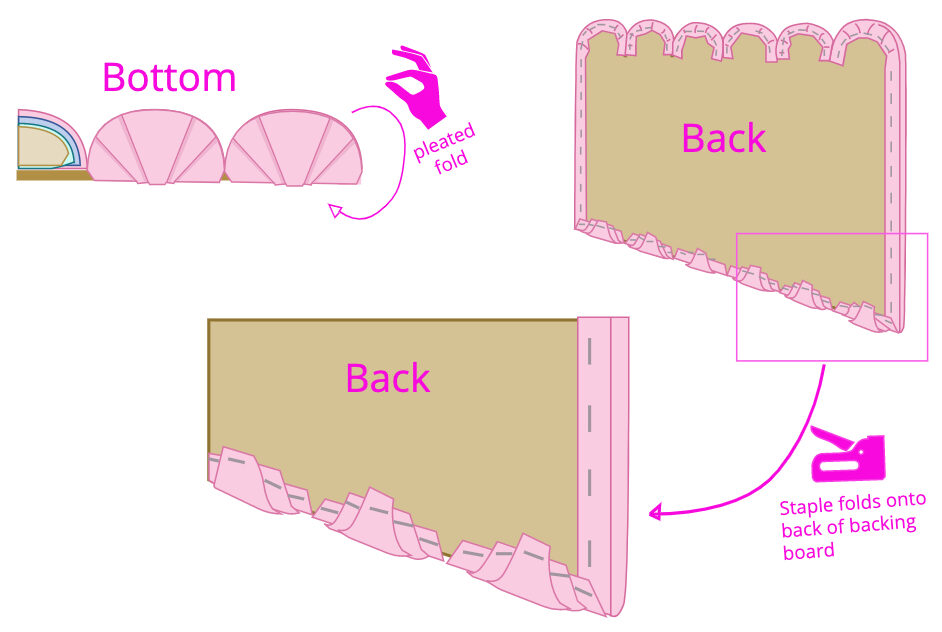
Now it is time to fold the remaining fabric over the bottom and staple onto the back of the backing board. Due to the amount of fabric and the shape of the channel the fabric will need to be bunched up. There is no right or wrong way of doing this. We felt that it looked the neatest with a pleated fold. Make sure to pull the fabric tight enough so that it lays smooth but not too tight to distort the shape of the bottom of the channel. It should look something like the diagram below. It really finishes off the channels giving your DIY mid century modern sofa a polished appearance.
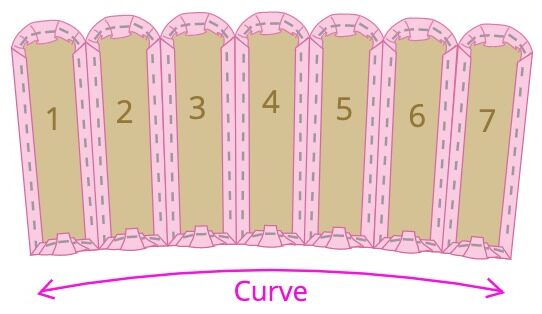
Step 10 – Upholster Curved Sections
The curved sections are upholstered in a very similar way to the straight sections. The only difference is that each channel is upholstered separately as shown below. This means that they can later be joined and curved. As per the straight sections, make sure that the fabric and batting is pulled tight so that it looks smooth and insert a staple every couple of centimeters.
Keep track of your sections by numbering the back of them. As you can see from the diagram below our 1st and 7th channel are a slightly different shape than the middle 5. (the outside edges are 90 degrees).
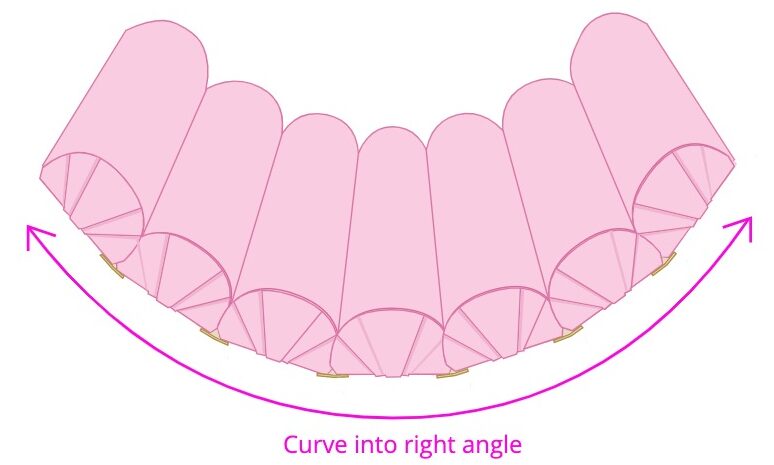
Step 11 – Join Curved Channels
This step is super simple. All you need is a staple gun and some more strips of cardboard. Again, a cereal box cardboard will be perfect. You just need it to be able to bend a little along its long axis. Place the curved sections face down on the floor in the correct order. Butt the channels up against each other making sure to keep the bottom corners in line with each other.
With the channels held tightly together, place a strip of cardboard over the join between two channels. In two neat rows, staple the cardboard to the backing boards. It should look something like the diagram below when the strips are stapled in position. This should hold all of the individual pieces together and allow them to be curved into a right angle.
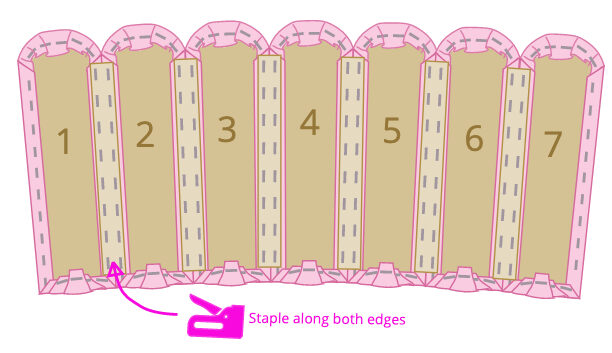
Flip your section over so that the front is face up. Gently lift the two outside channels so that the whole section curves like the diagram below. When you are happy with the curve, check that the staples in the back are all holding it well. If there are any areas where the staples are lifting just add more staples. It’s as simple as that.
Step 12 – Join Sections Together
Joining the 3 sections (right, curved, & left) together can be done in a very similar way to joining the curved channels. To make it extra strong we opted for long horizontal supports. The supports can be made from a cardboard material however we opted for something a little stronger for our DIY sofa. We used 2mm thick flexible plastic we had leftover from aqua paneling our shower.
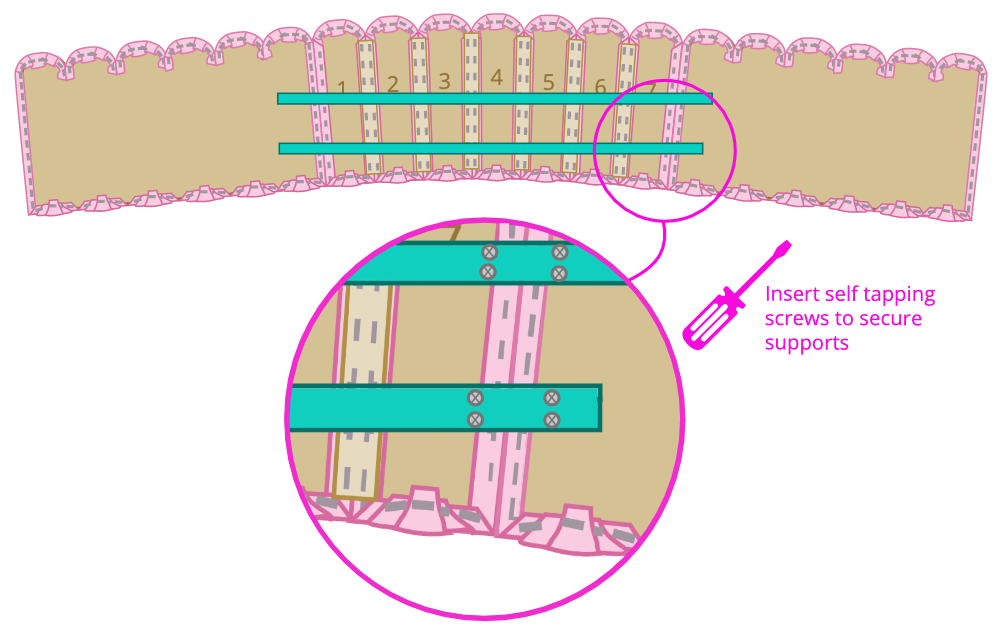
Much like the previous step, butt the sections up against each other making sure the corners are aligned. Then with your horizontal support, fix it into position. With our plastic strip, we used two self-tapping screws on each side of the join as shown in the diagram above. You can fix the support in other areas if you need to but ours was solid with just a few screws.
Step 13 – Fix to wall
This is the final step in this mammoth DIY mid century modern sofa project. To fix the sofa to the walls in our van we used some plastic gutters we bought from B&Q. The gutters were the perfect distance to account for the seats leaning backwards slightly. The sofa will be fixed on the left and right sections and the curve will be suspended.
The gutter is fixed onto the wall with self tapping screws. We found it easiest to drill pilot holes on the side which will be fixed to the wall and larger holes opposite like in the diagram below; Thus making it easier to get a screwdriver into position to turn the screws. Place your seat cushions in position to determine where the sofa back should sit. When the gutters are secured onto the wall on both sides it is time to attach the sofa.
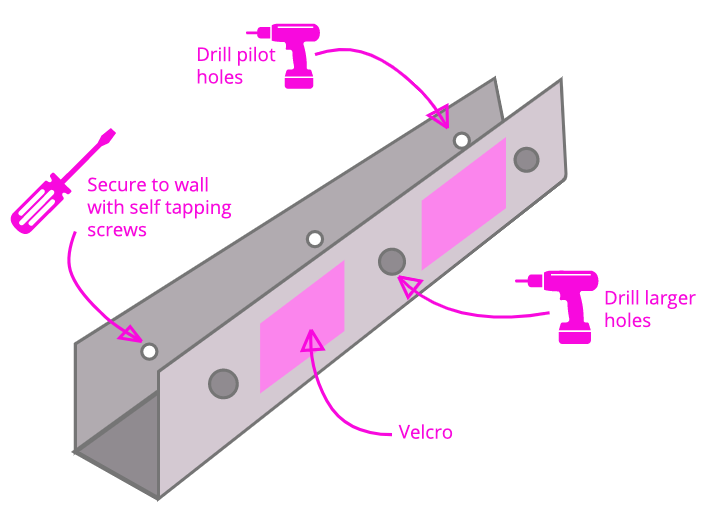
The sofa will be attached to the gutter and wall using heavy-duty velcro. It may seem a bit weak but the heavy-duty stuff is incredibly strong and we have no complaints with it whatsoever. Our sofa back has not moved a millimeter since using it. Cut a few strips and place them along the gutter at intervals to fix the sofa back to. Also cut a few small sections to stick directly onto the wall to fix the top of the sofa back to. Make sure to place the opposite velcro pieces onto the back of the sofa backing.
Carefully place the sofa back into position and press it firmly into the wall. This should keep a strong hold. The great thing about the velcro is that it means you can remove it if you ever needed to.
Conclusion
Choosing to make a DIY mid century modern sofa is not an easy job but we would definitely say it is worth it. Every time we open the side door of our van we immediately see our handmade sofa and are extremely happy and proud of it. It has really elevated the look of our van and certainly adds a little spice to the overall look. The van no longer looks like a van – more like a fancy mid-century modern showroom.
If you have any questions about the DIY mid century modern sofa please don’t hesitate to ask in the comment section!
IF YOU LIKED THIS POST, PIN IT – PRETTY PLEASE XOXO
2 Responses
Awesome post!! Appreciate the detail you have gone into showing us exactly how to create a beautiful sofa 😍 love the illustrations, little works of art 🎨
Wonderful diagrams.