- What type of material you are going to use throughout the build.
We built our coffee table almost completely out of scrap materials we had leftover from other projects. Particularly, you will need to decide what material you are going to use to clad the curve, as the depth of the material will need to be considered when planning the layout and calculating the curve. - You must consider where it is located and what surrounds it.
e.g. van walls or other pieces of furniture. The build instructions below do not go into detail regarding how to create a frame for the coffee table, as we were building our coffee table to coincide with 1 existing wall and the structure of our sofa. This most likely will be the case for you too. However, you may wish to add additional battens to these preexisting walls/structures in order to help with the construction of the coffee table and provide an area for a hinge to be built into it you plan on accessing the storage space below by adding a hinge to the table top.
The …
Step 1 – Calculate the curve
Prior to constructing anything, it is important to accurately calculate the radius of the curve.
Make sure you know where you want the curve the start and end, this will also help dictate the size of the curve. For example, we knew we wanted to blend our curved coffee table into our preexisting sofa structure and for it to end at a right angle to the bulkhead wall.
Note: you may wish for the curve to flatten out at either end to make it look a little less severe. We recommend approx 50mm of straight at each end.
Step 2 – Draw the curve on plywood
Firstly, get an adequately sized piece of plywood. Ideally, it will have a corner with an exact 90 degrees angle. From there, simply measure 50mm from the side and 50mm from the bottom and draw a straight line. This is to account for the 2 small straight edges at the end of the curve.
Next, draw/trace the shape of your curve onto the plywood. To do this, it is easiest to build a tool like the diagram below. It can be made out of a piece of scrap plywood, we used some leftover 5mm plywood.
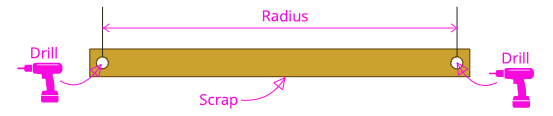
The radius between the two holes should be equal to the external radius of the storage solution minus the thickness of the material that will be used to clad the coffee table in your campervan. Make sure that the holes you drill are just large enough to fit a bradawl/pencil through. The small holes will help the dimensions stay as accurate as possible.
Using a Bradawl, poke it through one of the holes on the tool straight into the 12mm plywood sheet, this will essentially act as an anchor point. Poke a pencil through the other hole and swing the tool around the bradawl to trace the shape of your curve, as seen in the diagram below. Try to be smart about where you position your centre points so you don’t waste plywood. We created two curves.
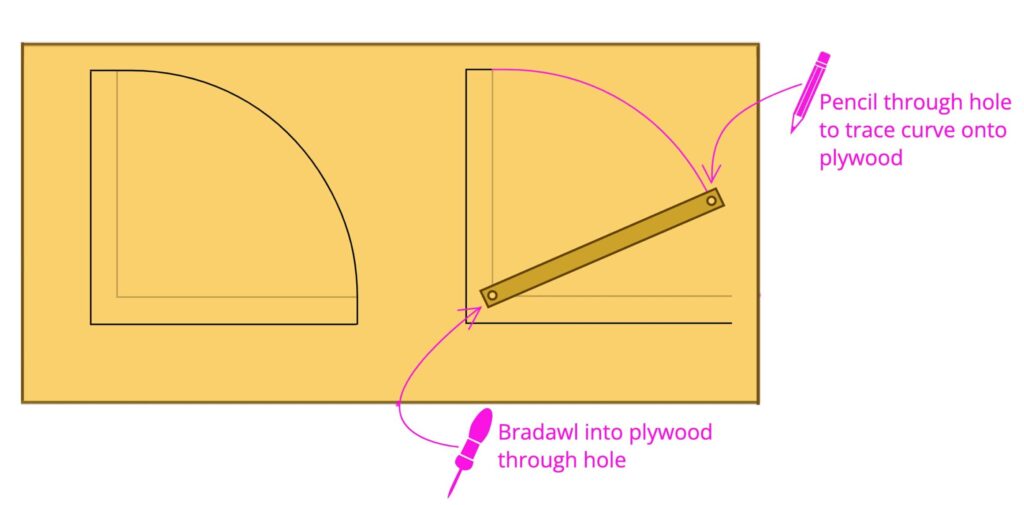
Make sure to connect the small 50mm straight extension to the radius of the curve.
Either repeat this process, or cut out the first quadrant, and trace around it for the second quadrant.
Step 3 – Cut the curves quadrants.
Cut out the plywood quadrants using a jigsaw. Make sure to be as careful as possible when using the jigsaw to avoid cutting into the curve. To be safe, cut just outside of the curved line you have drawn. You want these curves to be as accurate as possible for the best/smoothest result.
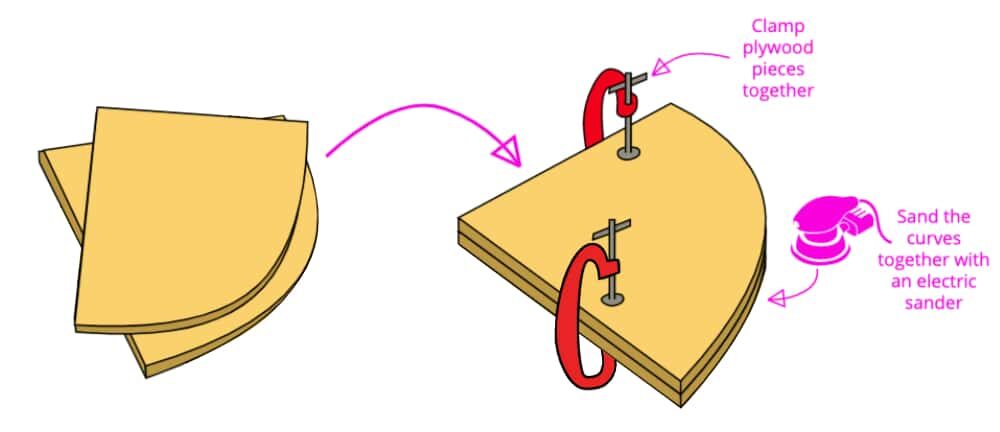
With your pieces cut out, stack them together and clamp them in position. Using an electric sander, smooth the curves together to the curved line you have drawn. Sanding the curves together gives the best result as the smooth curves will be identical to each other. Perfect for making a deliciously smooth curved campervan storage solution.
Step 4 – Trial Fit the Quadrants
Simply trial fit a quadrant by placing it on the floor in its desired location. As it is still a reasonably large board with a 90-degree angle, it should slot into position extremely neatly.
One side of the curve should align perfectly with a pre-existing structure that you are trying to blend the coffee table into. The other end of the curve will be perpendicular to a back wall of some sort. Mark onto the wall where the curve meets it.
Next, using a set square, extent the mark you made vertically up the wall. This will be a guideline for the other quadrant later.
Step 5 – Cut the quadrants to size
Remove the majority of the quadrant so you are left with a much smaller semi-circle.
The depth of the semi-circles should be the same as the size of timber you are going to use to construct the coffee table. For reference, we chose 25mm x 25mm battens for our curved campervan storage solution.
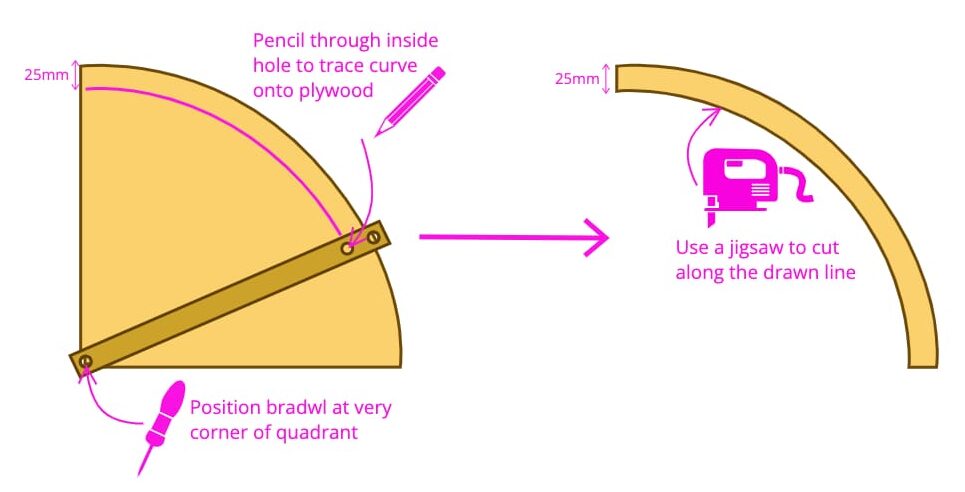
This can be done by either using the same method stated in Step 2, or you can simply measure 25mm in at several points and connect the marks using the other quadrant as a stencil.
Do this for both quadrants.
Step 6 – Cut timber battens to height
Timber battens are required to support the quadrants. Cut 3 timber battens to the exact height you want the coffee table, minus the height of the 2 quadrants and the height of the material used as the table top.
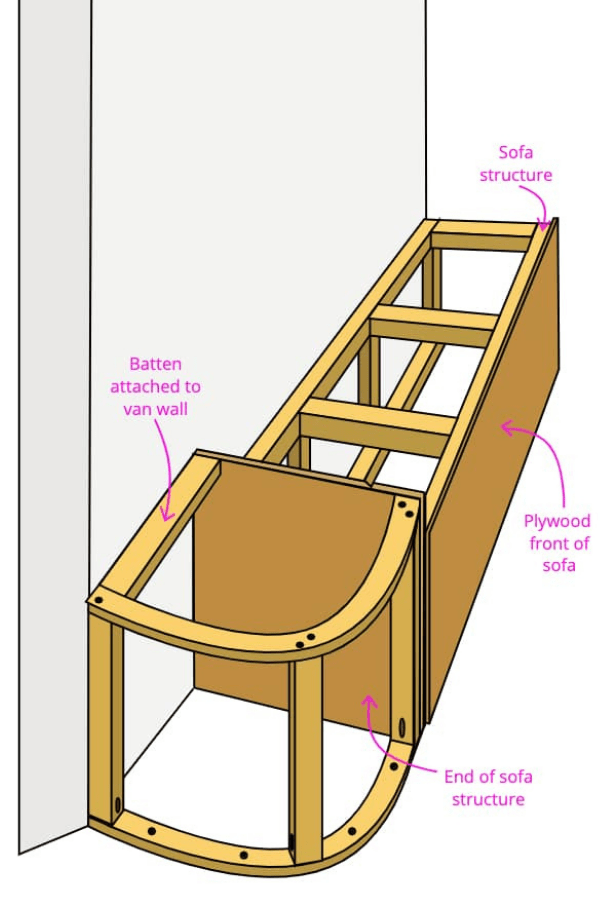
Step 7 – Construct the coffee table structure.
The coffee table is reasonably easy to construct. Start by placing the first quadrant in position on the ground. Once you are happy with how it is sitting, screw it into the van’s floor.
Next, using a pocket hole jig, drill pocket holes into the timber battens. Pocket hole 2 holes at one end on the opposite faces, this will prevent the battens from pivoting.
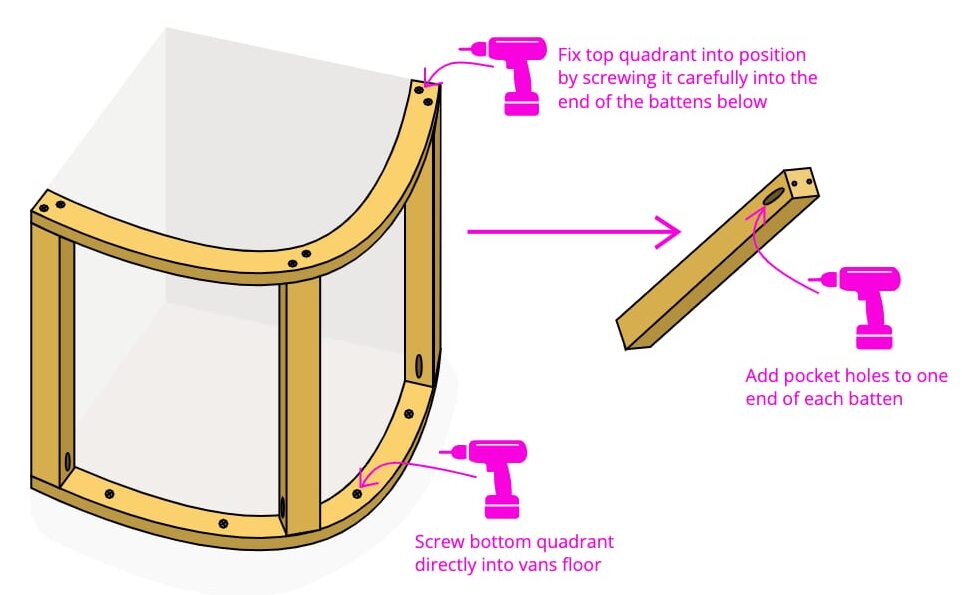
Attach the timber battens at equal intervals. One at each end, and one in the middle of the quadrant. This is not only structural but is also vital when creating a smooth seamless curve. Simply, align the batten to the outside edge of the quadrant and screw into the pocket holes created earlier. Repeat this for each batten.
Next, place the second quadrant on top of the battens, make sure it not only aligns with the timber battens but also the surrounding structures e.g. the marks made on the van’s wall earlier and the surrounding furniture structures.
Once satisfied with the position, simply screw directly down through the quadrant into the timber batten. Make sure not to go too quickly as this could split the wood.
Step 8- Trial fit the cladding.
The curved exterior wall can be made out of several different materials depending on your budget or taste. We personally used a leftover aqua panel from the installation of our shower. We have also created a curved kitchen cupboard door out of an acrylic panel which worked equally as well. Another option is flexible plywood, however, this can be extremely expensive, typically retailing at 3x the price of standard plywood, and it is often hard to come by.
Note: we have experience painting all three materials. Each of them has a very similar finish. If you opt for a plastic choice, it will still blend seamlessly into pre-existing furniture made out of wood.
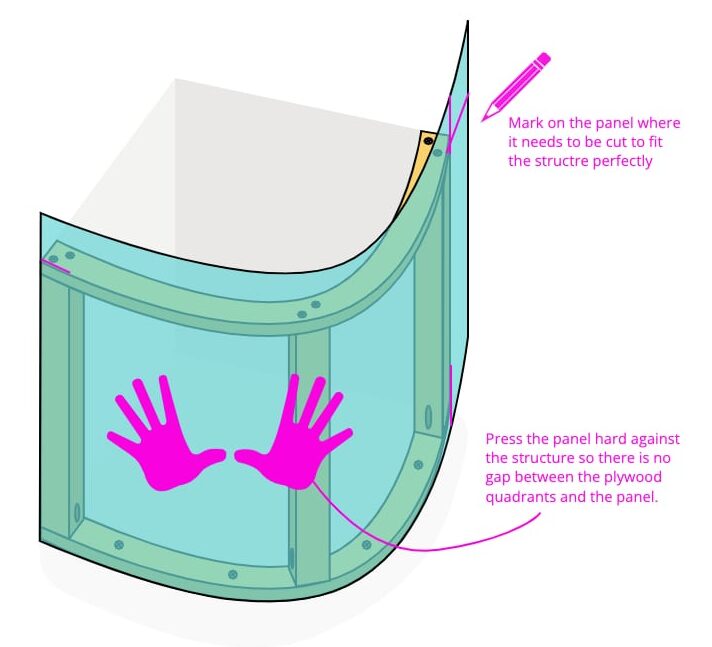
Trial fit the cladding by wrapping the material around the quadrant, making sure to push it extremely tightly into the frame to achieve a sleek seamless curve. This will also allow you to measure how much material is needed to fully cover the structure. Once you are satisfied with the trial fit, cut the material to the exact height and width using a jigsaw.
Note: you may wish to cut the material slightly taller than needed as the excess can easily be sanded off for a clean finish.
Step 9 – Create the curve.
Start by securing one end of the curve into position with several 20mm screws. By anchoring one end it allows you to get a better purchase on the material and pull it tighter to hug around the curved quadrants.
We recommend securing the curve as you go by screwing it into position along the quadrants. This will prevent any gaps, and the curve will remain tight into the structure of this storage solution in your campervan – creating a more professional finish.
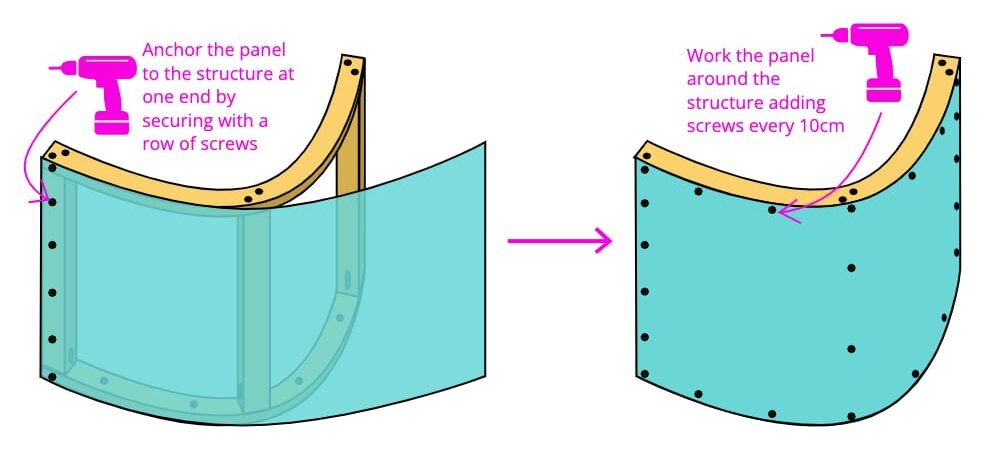
Continue this process the entire way around the structure, screwing into position intermittently.
Once the structure is secured, add a few extra screws into the timber battens supporting the structure. Make sure to countersink all screws.
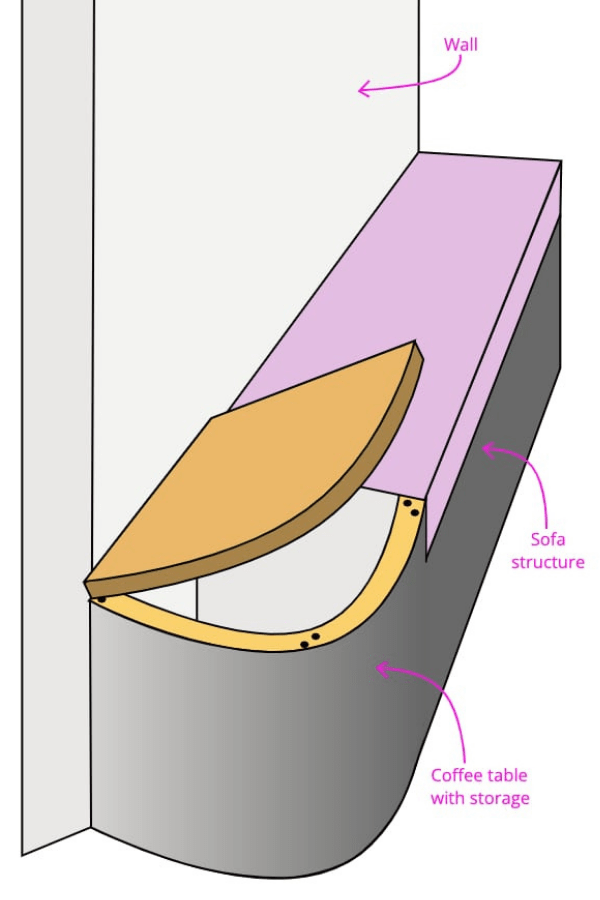
Step 10 – Create the table top.
The tabletop of your coffee table can be made out of any material. We opted to use the same material as our kitchen countertop to keep the finish of our van uniform. If you also choose this option, you may wish to take note of the grain direction in order to keep it the same throughout your van.
Start by placing the tabletop material on top of the structure.
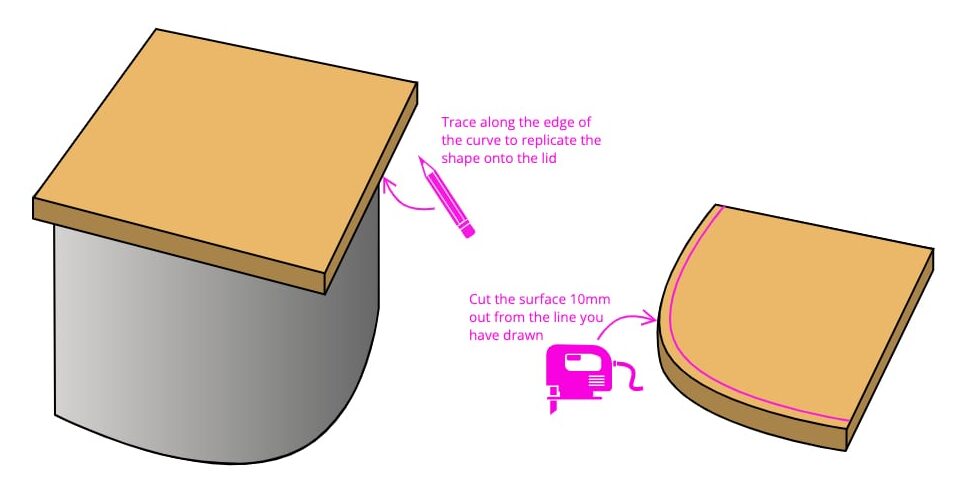
Next, simply draw a line from the underside of the tabletop, following the curve of the structure. Once you have drawn this line, you may wish to add an additional 10mm along the edge in order to be able to access it using your fingertips.
Once you are satisfied with the shape, cut it out using a jigsaw.
Step 11 – Attach the table top
The tabletop can be attached in three different ways.
- securely attached (not accessible)
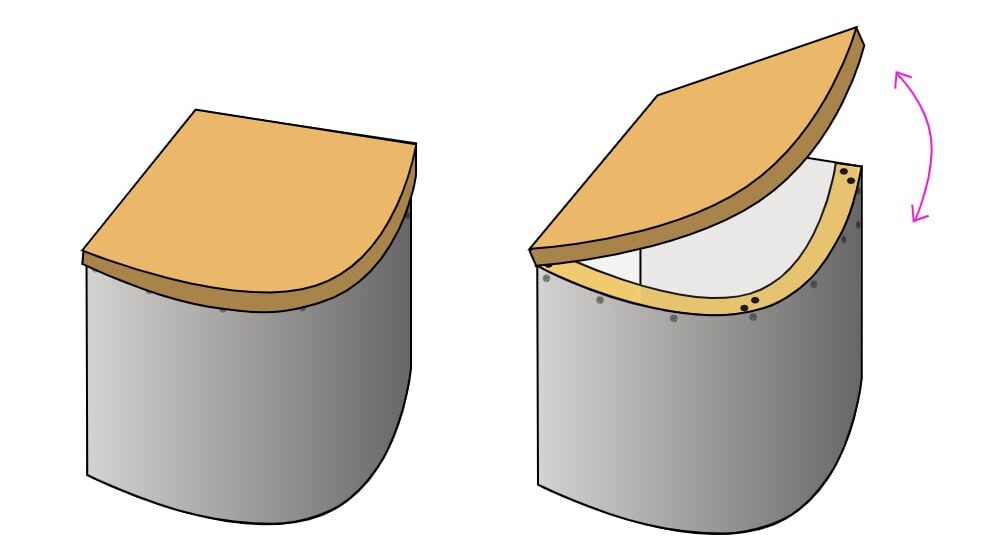
- the top is like a lid. (accessible)
- or hinged (accessible)
We personally recommend utilising the storage area underneath the table and therefore do not recommend simply securing it into position with screws.
The next two options are equally functional, however, the hinges add a bit more finesse to the build.
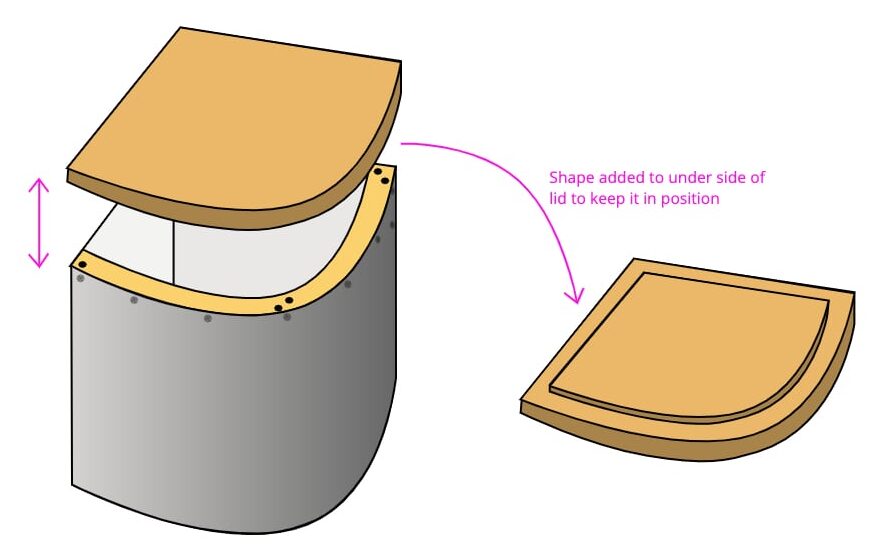
1. Create a table top lid
In order to create a lid, simply attach a piece of 6mm plywood to the underside of the tabletop. This plywood piece should be the exact same shape as the internal size of the coffee table as shown in the diagram below. Once you have cut the plywood piece to size, simply attach it to the back of the tabletop with wood glue. You may wish to add a couple of screws to make sure it is extra secure.
2. Create a hinged table top
When creating a hinged tabletop it is important you select the correct type of hinges. We used soft close concealed cabinet hinges because this type of hinge folds back on itself, and allows the door to lay flush against the face of the cabinet (or coffee table).
There are plenty of alternative types of hinges that can be used, many of which are much easier to install, e.g. a piano hinge. However, we believe that a concealed cabinet hinge has the most professional finish. To find out more about hinges, click here.
Next, select which direction your tabletop will open. This will dictate where to position the hinges. Simply install the hinges as stated in their instructions.
Finally, attach the tabletop and align it correctly using the screws on the hinges.
Step 12 – Finshing touches
The coffee table should now be completely functional, however, there are a few final finishing touches that can be done to polish up the coffee table.
Firstly, countersink, caulk, and paint any exposed screw on the external facade of this unique campervan storage solution. If you used plastic or any other smooth bendable material to clad the coffee table, make sure to lightly sand it first, therefore the paint will stick much better to it.
You may also wish to treat the tabletop if you have opted to use wood.
Finally, if you are extremely persnickety, you may wish to paint the interior of the coffee table, this is not necessary, but will certainly make it look extremely professional.
Conclusion
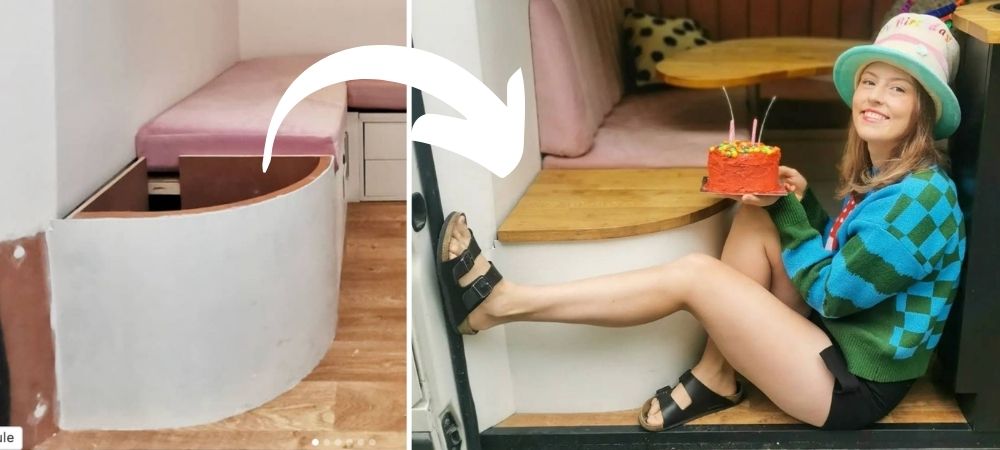
Storage is key in a campervan, and this stunning coffee table makes this storage solution look sexy as hell! The curved facade not only opens and creates a more inviting space, but it also offers a large, uncompromised area for storage, whether it is for rubbish and recycling, shoe storage, or even access to your electrical systems. This storage solution is outstanding, and who doesn’t want a coffee table in their van?
For more amazing storage solution ideas for your campervan conversion check out the link below
If you like this post, pin it – pretty please xoxo