
Step 1 – Pick a location for the water heater
Time: 15 minutes
The Propex electric water heater is quite large measuring 600 x 270 x 260mm (L x W x H). However, it is not that tall and therefore can likely be hidden under a bed, or even a bench seat.
Note: If this heater takes up too much space, Propex also has a 6L variant that is 200mm shorter, measuring 400 x 270 x 260mm (L x W x H).
Also, this heater requires 230V electricity and therefore needs access to a socket at all times. This may affect the location of the water heater.
Step 2 – Screw it into position
Time: 15 minutes
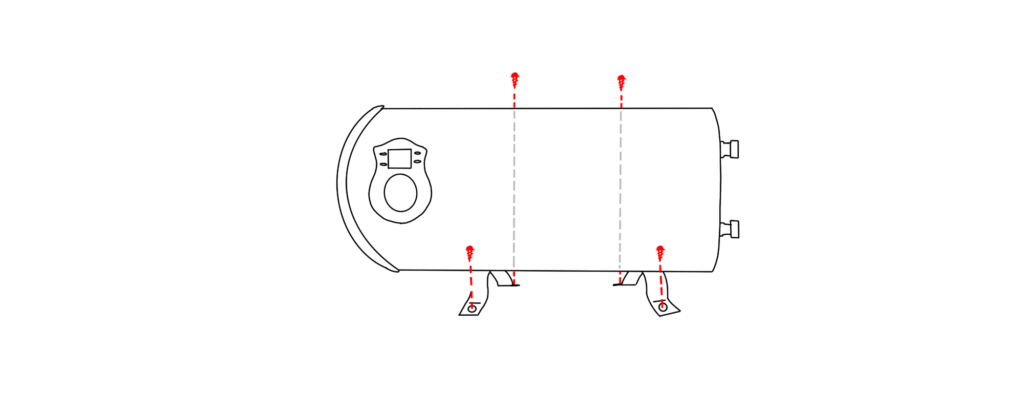
Once you are satisfied with the location of the heater, secure it into position.
The heater has 4 feet with holes in them, this will become the anchorage points of the heater. Use the screws provided for a solid connection. Make sure the screws are long enough to firmly bite into the floor without penetrating the metal floor of the van – as this could become a potential ignition point for rust.
Note: We had some difficultly with this stage as we positioned our heater on a false floor. Therefore, had to mount the heater onto a batten and then secure the batten to the floor.
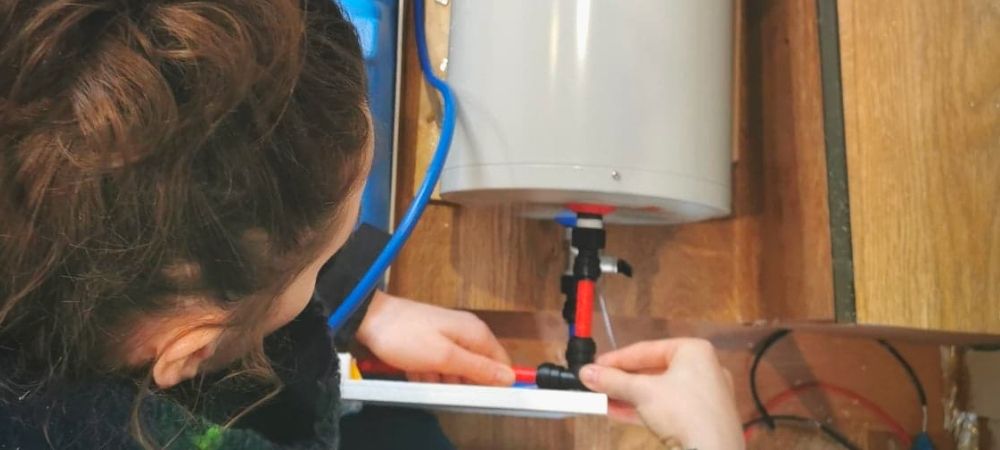
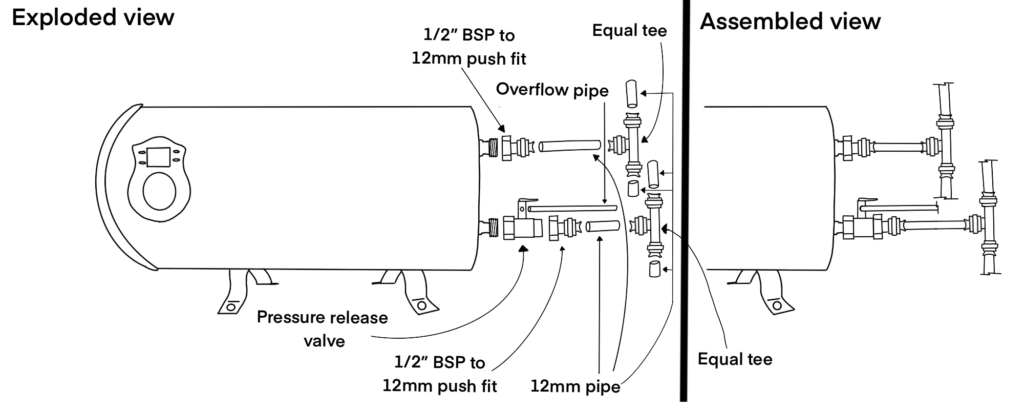
Step 3 – Attach the fittings to the Propex Electric water heater
Time: 5 minutes
Firstly, wrap PTFE tape around the threaded part of the pipes. This is standard practice when plumbing as it helps to prevent leaks.
Next, attach the metal pressure relief valve with the drain lever fitting on the inlet of the water tank (the bottom pipe).
Simply attach the fittings provided with the tank to the inlet and outlet. These fittings are Female 1/2″ BSP to 12mm push-fit connections.
Refer to the diagram in step 5 if needed.
Step 4 – Drill a hole through the floor for overflow
Time: 10 minutes
Attach the clear pipe provided with the Propex electric water heater onto the drain lever situated on the pressure relief valve which is screwed onto the inlet pipe.
Next, examine the underside of your van to see where a suitable location would be to drill through the floor – be careful to avoid anything important e.g. brake cords or fuel tanks.
After deciding on a location, simply drill a reasonable sized hole and pass the pipe through the floor so it can be seen from the underside.
Cut the pipe down to size, so there isn’t too much excess.
Step 5 – Connect the Propex water heater into your plumbing circuit
Time: 5 minutes
Firstly, cut a small piece of red and blue 12mm pipe – no longer than 150mm long. Push each piece into the respective fitting. The top fitting is the outlet (red) and the bottom fitting is the inlet (blue).
Next, attach a push-fit “12mm equal tee” to both the red and blue pipes if you are supplying the hot water to a sink and a shower. If you are only supplying the hot water to one outlet, then an equal tee is not necessary for the outlet (red pipe).
Inlet – the cold water
Insert the pipe which has come from the water pump etc. into one side of the equal tee junction. On the other side, insert a blue 12mm pipe that will transport the water to the sink (or shower). The other outlet (e.g. sink or shower) will have water going straight from the pump etc. from a tee junction fitted prior to the water heater.
Outlet – the hot water
At the equal tee, simply insert a red 12mm pipe into each end, each end will go to a different outlet – the sink and shower
Step 6 – Plug the water heater in
Time: 10 minutes
The final step when installing a Propex Electric Water Heater is supplying power to it. The water heater comes with a standard plug which requires 230V power.
Simply wire up a socket nearby and plug the water heater in.
If your water heater is not the most accessible (e.g. under a bed or seat) you should install a remote switch, therefore, you do not have to struggle to switch the heater on.
We recommend getting a switch with a small LED so you know when the heater is on, as it can consume a lot of power.
Conclusion
Thankfully, installing a Propex Electric Water Heater is one of the easiest jobs when plumbing a van. The heater comes with clear concise instructions and there aren’t too many nasty surprises.
Feel free to ask us questions regarding installing the water heater whether it is about materials, price, time, or whatever else. You can always find us in the comments.
Next Step: Creating and plumbing a shower – installing a shower mixer
12 Responses
Hi I’ve plumbed in my 6lt tank but it doesn’t seem to be filling up and there is water going to the tank
Dobrý den. Jde tenhle ohřívač použit i v beztlakém oběhu s ponorným čerpadlem? Díky moc
Hi does this have a pump in side or is ran off pressure thanks
Good Evening,
The water heater doesn’t have a built-in pump and works in tandem with our electric water pump (Shurflo Trail King 10 Water Pump).
To learn more about our water system and how we installed it follow the link below:
https://thispairgothere.com/how-to-install-a-water-system-in-a-campervan/
Hope this helps 🙂
just need hot water for sink so do i have 2 separate feeds the cold waster from tank direct to sink and the hot water only going through this heater please advise
Hi.
I’m waiting a camper van conversion, I only have cold water, one tap in it, what is the best ,and smallest solution for me to get hot water using the single cold tap .
Hi there, I do not believe it is possible to get hot water with just a single tap (unless it is a mixer tap)
Our advice would be to just boil a pan of water rather than install hot water systems as they generally tend to be bulky.
😊
Hey! I just wondered how you’ve found using this water heater when off grid in terms of power draw? And how long a shower do you get on average with the 10L version?
Hi there,
We have used this water heater without issue on our travels for the past year. We have found that in winter, we did not use it too often and tried to outsource showers as it can use a fair amount of electricity. For example, we have a 300amh lithium battery and to fully heat up the water may use approximately 20% of our battery. We haven’t really looked in-depth into how much power it consumers as generally, we are chasing the sun, so power is not a problem for us.
The 10l water heater is perfect for 2 (short) showers. perhaps about 10 minutes total! However, this is just an estimate. All I can say with confidence is that it is enough time for both of us to have a shower, and wash and condition our hair before the water runs cold! 🙂
Hope this helps!
Hi I recently purchased a camper van fitted, as you describe, with a Propex water heater. The top fitting has developed a small leak when the water pump is switched on and the system is under pressure. The leak was looked at by a plumber who replaced the John Guest fitting . He did not use PTFE tape as he didn’t consider it necessary and the leak appeared to be cured
However, the top fitting is now leaking again and I can’t see where the water is coming from.
The pump fitted to the van is a Shurflo 30PSI – could there be an issue with over pressure on the fitting or is the pressure OK for the Propex heater ?
Should I remove the John Guest and wrap PTFE tape around the threads ?
Hi just something simple as in the pictures on this web page can the heater be instaled as in the picture vertical with the inlet and outlet at the bottom.
Hi there,
thanks for your comment 🙂
I’m not 100% sure what you are asking. Our water heater is mounted on the floor of the van, are you asking if it can be wall-mounted? If so, I’m not sure. I’m sure it would be easy to mount, however, I couldn’t comment on if it would still work effectively.
Hope this helps 🙂