If, like us, you’ve decided that having a hot shower in your van is a must; this post is for you. One of the final hurdles when creating a van shower is selecting and installing the shower mixer. The mixer connects the hot and cold water supplies to create a flow of water at the perfect temperature.
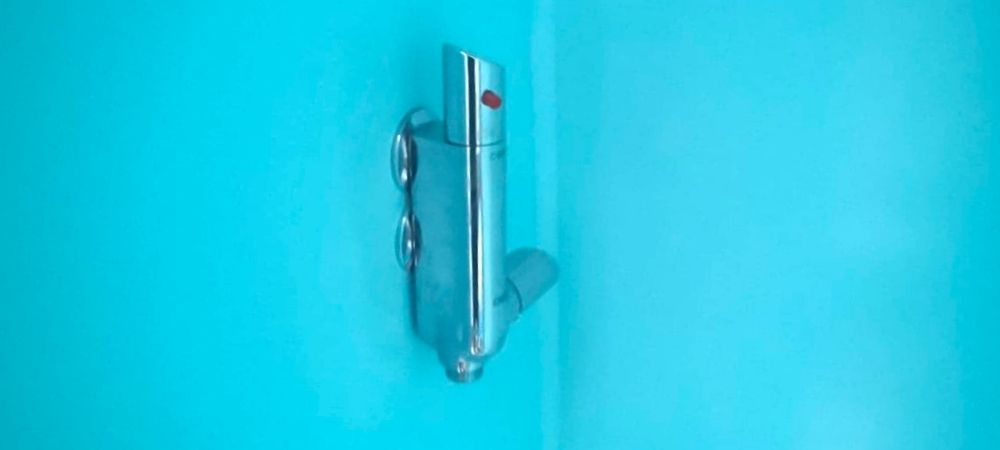
We are using this shower mixer, and the instruction below are designed specifically for this component however, many of the steps are universal.
Prerequisite – Build Shower, Waterproof Shower
time
20 minutes
Price
£80.05
related Posts
Time
20 minutes
Price
£80.05
tools used
Step 1 – Choose Your Shower Mixer
There are lots of different options out there, and thankfully most of them are not too expensive. There are a couple of things to consider when selecting a shower mixer:
- How much space you have in your shower
- Ease of installation
- Your desired aesthetic
- The construction of your shower.
The construction of your shower is surprisingly important. If you have designed a shower the same way that we did (12mm ply walls + 2.5mm PVC panels), the wall is not deep enough to attach a regular shower mixer (unless you install a bit of wood to provide enough depth.). Therefore it will be easiest to install a shower mixer designed for caravans/ RVs.
Another important thing to note is the position of the pipes. The first mixer we bought was a horizontal bar with the pipes spaced approximately 6 inches apart. This caused us some problems as we felt it took up too much space which could have otherwise been used as storage. This is one of the reasons why we opted for the compact vertical shower mixer.
Step 2 – Position the Shower Mixer
There a few things to consider prior to installing the shower mixer:
- Which wall to position it on
- What is a comfortable height to operate it
- Will there be a toilet in the shower.
Note: if there is a toilet in the shower, you may wish to position the mixer in a corner in order to give you more room at your back/head.

We recommend getting into your shower and moving around to experiment where the mixer will fit best. You want it to be at a comfortable height to operate but also in a position that you won’t hit your limbs off of it.
Step 3 – Attach the Shower Mixer To Wall
Begin by measuring the distance between the hot and cold inlet pipes. Next, mark on the inside of your shower the position of the centres of the holes. Take a drill bit that matches the size of the threaded parts (21mm) and drill through from the inside of the shower on the marked points. As always – measure twice and drill once.
You should now be able to insert the mixer through the holes you have drilled. On the outside of the shower securely fix the mixer in place with the nuts provided.
Step 4 – Attach Elbows to the Pipes
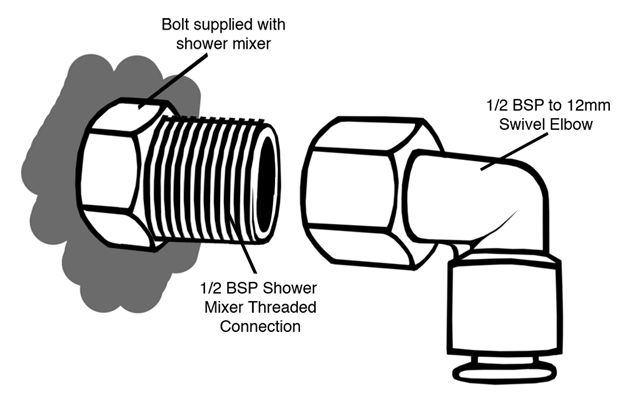
Install a 1/2″ BSP to 12mm push-fit swivel elbow onto the hot and cold pipe that penetrates through the shower wall. This elbow will allow you to direct the pipes in the best direction to fit your layout.

Screw the elbows tightly onto the outside of the shower making sure to use PTFE tape on the threads of the shower mixer. This is standard practice in plumbing to keep the grip nice and tight to avoid leaks. Make sure to wrap the tape in the direction of the threads so it doesn’t bunch up when screwing the elbow on.

Step 5 – Connect Pipes
First, insert John Guest plugs into the ends of the 12mm pipe to provide rigidity.
Connect the 12mm hot and cold water pipes into the swivel elbow installed in the previous step. This will connect you into the plumbing circuit and should now be ready to be tested out.
If a leak appears, stop immediately and start troubleshooting.
Conclusion
Out of the millions of jobs you take on when building a van, this is one of the easiest. Thankfully, we didn’t come across any issues when fitting the shower mixer which makes a nice change. We found that the most tricky part of the process was sourcing the plumbing parts, therefore we have carefully crafted our materials list at the top so you don’t have the same issue.
Feel free to ask us questions regarding installing a shower mixer, whether it is about materials, price, time, or whatever else. You can always find us in the comments.
Another important thing to note is the position of the pipes. The first mixer we bought was a horizontal bar with the pipes spaced approximately 6 inches apart. This caused us some problems as we felt it took up too much space which could have otherwise been used as storage. This is one of the reasons why we opted for the compact vertical shower mixer.
Step 2 – Position the Shower Mixer
There a few things to consider prior to installing the shower mixer:
- Which wall to position it on
- What is a comfortable height to operate it
- Will there be a toilet in the shower.
Note: if there is a toilet in the shower, you may wish to position the mixer in a corner in order to give you more room at your back/head.

We recommend getting into your shower and moving around to experiment where the mixer will fit best. You want it to be at a comfortable height to operate but also in a position that you won’t hit your limbs off of it.
Step 3 – Attach the Shower Mixer To Wall
Begin by measuring the distance between the hot and cold inlet pipes. Next, mark on the inside of your shower the position of the centres of the holes. Take a drill bit that matches the size of the threaded parts (21mm) and drill through from the inside of the shower on the marked points. As always – measure twice and drill once.
You should now be able to insert the mixer through the holes you have drilled. On the outside of the shower securely fix the mixer in place with the nuts provided.
Step 4 – Attach Elbows to the Pipes
Install a 1/2″ BSP to 12mm push-fit swivel elbow onto the hot and cold pipe that penetrates through the shower wall. This elbow will allow you to direct the pipes in the best direction to fit your layout.

Screw the elbows tightly onto the outside of the shower making sure to use PTFE tape on the threads of the shower mixer. This is standard practice in plumbing to keep the grip nice and tight to avoid leaks. Make sure to wrap the tape in the direction of the threads so it doesn’t bunch up when screwing the elbow on.

Step 5 – Connect Pipes
First, insert John Guest plugs into the ends of the 12mm pipe to provide rigidity.
Connect the 12mm hot and cold water pipes into the swivel elbow installed in the previous step. This will connect you into the plumbing circuit and should now be ready to be tested out.
If a leak appears, stop immediately and start troubleshooting.
Conclusion
Out of the millions of jobs you take on when building a van, this is one of the easiest. Thankfully, we didn’t come across any issues when fitting the shower mixer which makes a nice change. We found that the most tricky part of the process was sourcing the plumbing parts, therefore we have carefully crafted our materials list at the top so you don’t have the same issue.
Feel free to ask us questions regarding installing a shower mixer, whether it is about materials, price, time, or whatever else. You can always find us in the comments.


That’s awesome but is the hot water line run with pvc pipe or copper pipe
Yes, we used pvc throughout our whole plumbing system.
Thanks 🙂